Last updated on January 4, 2026
Imagine being able to install a fresh copy of Windows on a computer without ever touching a USB drive or DVD. This isn’t magic; it’s the power of PXE network boot. For IT professionals and system administrators, mastering how to deploy Windows with PXE network boot is a game-changer, enabling rapid, simultaneous installations on multiple machines across a network.
❗ Why is this important? A recent study by Technavio projects the global desktop virtualization market to grow by USD 21.69 billion from 2021 to 2026. Efficient deployment methods like PXE boot are at the heart of managing this growth, significantly reducing setup time and operational costs.
This guide is designed to walk you through the entire process, from understanding the core components to a practical, step-by-step setup. We’ll use clear language and explain each concept, making it accessible even if you’re new to network deployments.
What is PXE Network Boot?
PXE stands for Preboot Execution Environment (pronounced “pixie”). It’s a industry-standard technology that allows a computer to start up and load an operating system from a network server instead of a local hard drive, USB stick, or CD/DVD.
💡 Think of it like this: A PXE-enabled computer is like a student who shows up to class without a textbook. Instead, they “raise their hand” (the boot request), and the teacher (the DHCP server) tells them which library (the TFTP server) to go to and which specific book (the Windows installation files) to read. The student then gets the book and starts learning (installing Windows).
The Key Components of a PXE Boot System
To successfully deploy Windows via PXE, you need a few essential pieces working together:
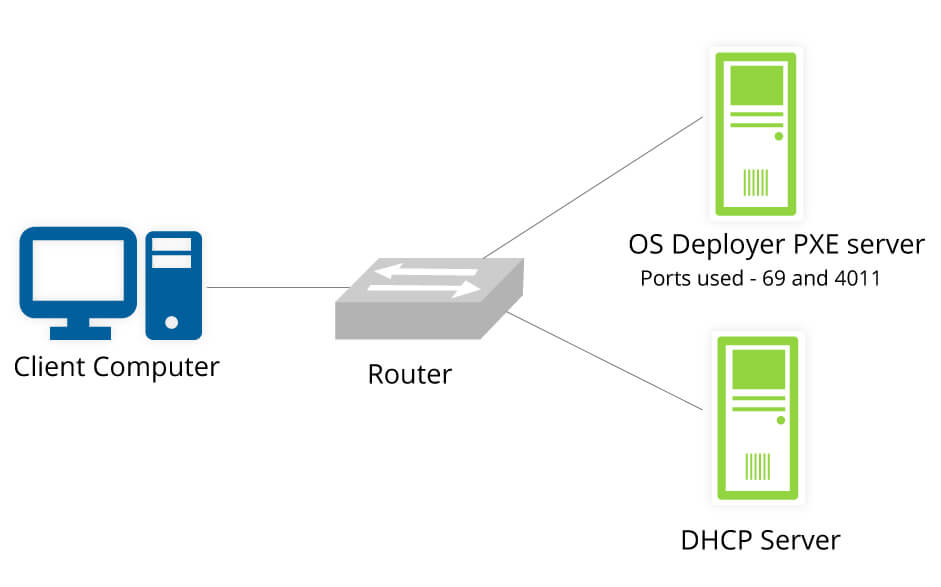
- PXE Client: This is the target computer you want to install Windows on. Its network card must support PXE boot, which is standard on most enterprise-grade desktops and laptops.
- DHCP Server: The Dynamic Host Configuration Protocol server has a crucial role. It not only provides the client with an IP address but also tells it where to find the boot files on the network.
- TFTP Server: The Trivial File Transfer Protocol server is where the actual boot files are stored. It’s a simple protocol designed for transferring small files quickly, which is perfect for sending the initial bootloader to the client.
- Boot Image/File: This is the file the TFTP server sends to the client. In our case, this will be a Windows PE (Preinstallation Environment) boot image that kick-starts the Windows Setup process.
- Installation Source: This is the shared network location (often an SMB share) that contains the complete Windows installation files (e.g., the
sources\install.wimfile from your Windows ISO).
What You’ll Need Before You Start
⚠ Important: The following setup should be performed in a controlled lab or isolated network environment to avoid interfering with your production network’s DHCP services.
- A Server Machine: A computer running Windows Server (e.g., 2019/2022) or a Windows 10/11 machine with the necessary server roles installed. This will host our DHCP, TFTP, and file share services.
- A Windows Installation ISO: The ISO file for the version of Windows you want to deploy (e.g., Windows 10/11).
- Windows Assessment and Deployment Kit (ADK): A free Microsoft toolkit that provides the necessary tools, including Windows PE and the Windows Deployment Services (WDS) utilities.
- Windows PE add-on for ADK: This is required to create custom Windows PE boot images.
- A PXE-Compatible Client Machine: The target computer for the installation.
- A Stable Network: All machines should be connected to the same local network segment.
How to Set Up a PXE Server for Windows Deployment
We will use a combination of built-in Windows Server roles and the Microsoft Deployment Toolkit (MDT) for a robust and manageable setup. While you can use the Windows Deployment Services (WDS) role alone, MDT offers far greater flexibility and automation for real-world scenarios.
Below is a detailed video tutorial for reference:
Step 1: Install the Necessary Roles and Features
On your server machine, you need to add a few roles via Server Manager.
- Open Server Manager and click Add roles and features.
- In the wizard, select Role-based or feature-based installation.
- Select your server from the server pool.
- In the Server Roles list, select DHCP Server. A pop-up will appear to add required features; click Add Features.
- Also, select Windows Deployment Services. Again, add the required features when prompted.
- Click Next until you reach the Features section. Here, ensure that .NET Framework 3.5 and 4.8 features are installed (they are often prerequisites).
- Complete the installation and close the wizard. You may need to configure the DHCP server post-installation with a valid scope (e.g., IP range 192.168.1.50 to 192.168.1.200).

Step 2: Install and Configure the Microsoft Deployment Toolkit (MDT)
MDT is the engine that will orchestrate our deployment.
- Download and install the latest version of Microsoft Deployment Toolkit.
- After installation, open the Deployment Workbench.
- Right-click on the root node and create a new Deployment Share (e.g.,
D:\DeploymentShare). Accept the default settings in the wizard.

Step 3: Import Your Windows OS Source Files
This is where you add the Windows installation files to MDT.
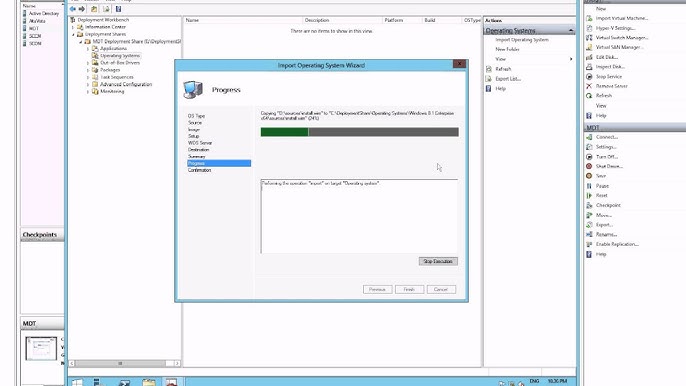
- In the Deployment Workbench, under your deployment share, right-click on Operating Systems and select New Folder. Name it “Windows Source Files”.
- Right-click the new folder and select Import Operating System. Choose “Full set of source files” and point it to your mounted Windows ISO or the folder containing the extracted files.
- MDT will copy the files into the deployment share.
Step 4: Create a Task Sequence
A task sequence defines the steps of the installation.
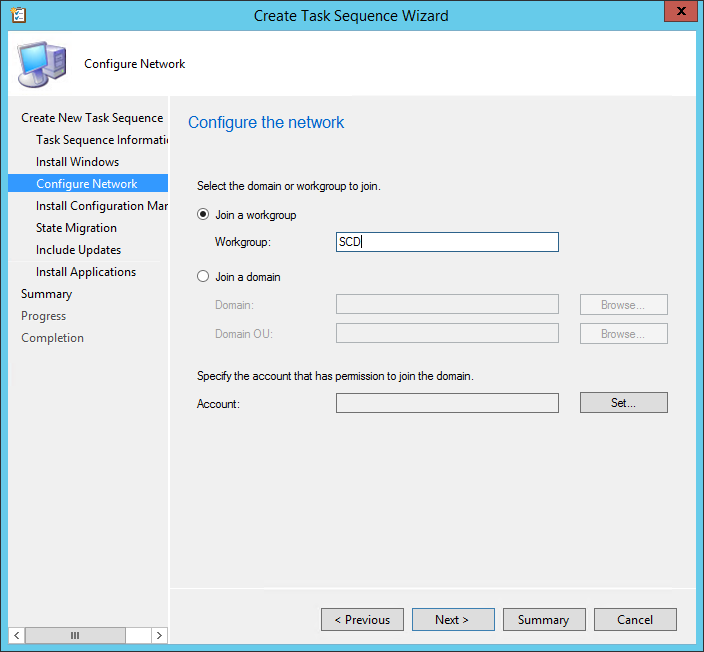
- Right-click on Task Sequences and select New Task Sequence.
- Give it an ID and name (e.g., “Win11-Enterprise-Deployment”).
- Select the template “Standard Client Task Sequence”.
- Point it to the OS you imported in the previous step.
- Enter a product key (or leave blank for volume licensing) and your organization’s details.
- Complete the wizard. You now have a repeatable recipe for installing Windows.
Step 5: Configure the Boot Images
This is the most critical part for PXE. MDT will generate a customized Windows PE boot image (a file called LiteTouchPE_x64.wim). This is the file that will be sent over the network via PXE.
- Go to Advanced Configuration for your deployment share.
- Under the Windows PE tab, you can customize components (like adding network drivers if your client’s hardware isn’t recognized).
- Right-click the deployment share and select Update Deployment Share. Choose to completely regenerate the boot images. This process places the final boot image in the
\Bootfolder of your deployment share (e.g.,D:\DeploymentShare\Boot\LiteTouchPE_x64.wim).
Step 6: Integrate with Windows Deployment Services (WDS) for PXE
Now, we link our boot image to WDS, which will handle the PXE requests.
- Open the Windows Deployment Services console.
- Expand your server, right-click on Boot Images, and select Add Boot Image.
- Navigate to the
LiteTouchPE_x64.wimfile generated by MDT (from Step 5) and add it. - WDS is now configured to serve this boot image to any PXE-booting client.
The Client-Side: Performing the Network Boot and Installation
With the server ready, it’s time to deploy!
Step 1. Configure the Client BIOS/UEFI
On the target computer, enter the BIOS/UEFI settings (usually by pressing F2, Del, or F12 during startup). Navigate to the Boot options and set the boot order to prioritize Network Boot or PXE Boot. Save and exit.
Step 2. Initiate the PXE Boot
The computer will restart. You should see a message like “Press F12 for network boot.” Press the key promptly.
The magic happens, the client broadcasts a DHCP request. Your DHCP server (with the PXE options configured via WDS) responds with an IP address and the location of the boot image on the WDS/TFTP server. The client downloads the Windows PE boot image and boots into it.
Then the MDT Wizard Appears, instead of the standard blue Windows Setup screen, you’ll see the MDT wizard. Here, you can select the task sequence you created (e.g., “Win11-Enterprise-Deployment”).
Now the wizard will execute the task sequence. It will partition the disk, apply the Windows image, install drivers, and configure applications based on your setup. The entire process is automated.
Common Challenges and Troubleshooting Tips
Even with a perfect setup, things can go wrong. Here are some common issues:
- ❌ PXE-E53: No boot filename received: This is the most common error. It means the DHCP server is not providing the boot file information. Ensure your WDS server is configured correctly and that the DHCP options (66 for boot server, 67 for boot file) are set if your WDS and DHCP are on different servers. If they are on the same server, simply configure the WDS server to not listen on port 67 and set the DHCP options 66 and 67 manually.
- ❌ Client gets an IP but fails to download the boot image (TFTP timeout): This is often a firewall issue. Ensure the Windows Firewall on your server allows traffic for WDS (TFTP) and the File Sharing ports.
- ❌ Boot image loads but fails with a driver-related error: The Windows PE image might lack necessary network or storage drivers for your client hardware. You need to inject these drivers into your boot image using the Deployment Workbench and then update the deployment share again.
PXE Deployment Alternative: When to Consider Network Clone
While deploying Windows with PXE network boot by installing from an install.wimfile is incredibly powerful, it’s worth knowing about a related, high-speed technique: network clone or disk cloning via Wittytool Disk Clone.
💡 What’s the difference?
- PXE Network Boot (Setup-based): This method runs the Windows Setup process over the network. It’s highly flexible and ideal for deploying a standard image to machines with different hardware, as Windows automatically detects and installs the necessary drivers during the “specialize” phase.
- Network Clone (Image-based): This approach involves creating a perfect, sector-by-sector copy (an image) of a master computer’s hard drive—including the OS, applications, and settings. This image is stored on a server. Target computers boot via PXE to download and apply this complete image directly to their local disks.
Why would you choose a network clone? The primary advantage is speed. Deploying a pre-configured image is often significantly faster than installing Windows from scratch. According to industry practices, cloning can reduce deployment time by up to 50-70% for large, identical deployments in environments like computer labs or call centers where hardware is uniform.
❗ A word of caution: Traditional network clone methods can be less flexible than the PXE/MDT approach described in this guide. If the target hardware is different from the master computer, you may encounter driver conflicts and the “blue screen of death” due to hardware abstraction layer (HAL) differences. Modern solutions like MDT can incorporate cloning (e.g., by capturing a custom WIM image from a reference machine) while still maintaining driver injection flexibility, giving you the best of both worlds.
Conclusion: Why PXE Boot is a Vital Skill for Modern IT
Learning how to deploy Windows with PXE network boot transforms how you manage your IT infrastructure. The initial setup might seem complex, but the long-term benefits are immense:
- 🚀 Speed and Efficiency: Deploy dozens of machines simultaneously.
- ✅ Consistency: Every installation is identical, eliminating human error.
- 💰 Cost-Effective: No need for physical media, saving time and resources.
- 🖥️ Centralized Management: Update your deployment task sequence (e.g., to a new Windows version or with new software), and all future deployments will inherit the changes.
By following this guide, you’ve taken a significant step towards automating and streamlining your IT operations. The combination of WDS and MDT provides a powerful, scalable foundation for system deployment that is trusted by IT professionals worldwide.