Last updated on March 30, 2026
⚠️ Update Alert: KB5065426 & Sharing Failures
Installing Windows update KB5065426 may break file and printer sharing on cloned PCs. This is because the update enforces strict SID (Security Identifier) validation for SMB/RPC communication. If multiple machines share the same SID from a cloned image, they will be blocked. To fix this without losing your custom settings via Sysprep, you must manually change the SID to ensure network uniqueness.
When you clone a Windows disk to another computer or deploy cloned systems in bulk – especially during a Windows system migration – duplicate Windows SIDs (Security Identifiers) may occur, particularly in domain, networked, or enterprise environments. In older versions of Windows, duplicate SIDs may have been a potential risk. However, in Windows 11 24H2 and environments with KB5065426 installed, duplicate SIDs have become a fatal problem, directly causing network sharing functionality to fail.
In this guide, you’ll learn how to change the Windows SID without using Sysprep after disk cloning. We’ll walk you through three reliable methods, explain when changing the SID is truly necessary, show you how to verify SID changes, and highlight common mistakes to avoid. These solutions work not only for Windows 10 and Windows 11, but also for administrators who need to change SID Windows Server systems after cloning or deployment.
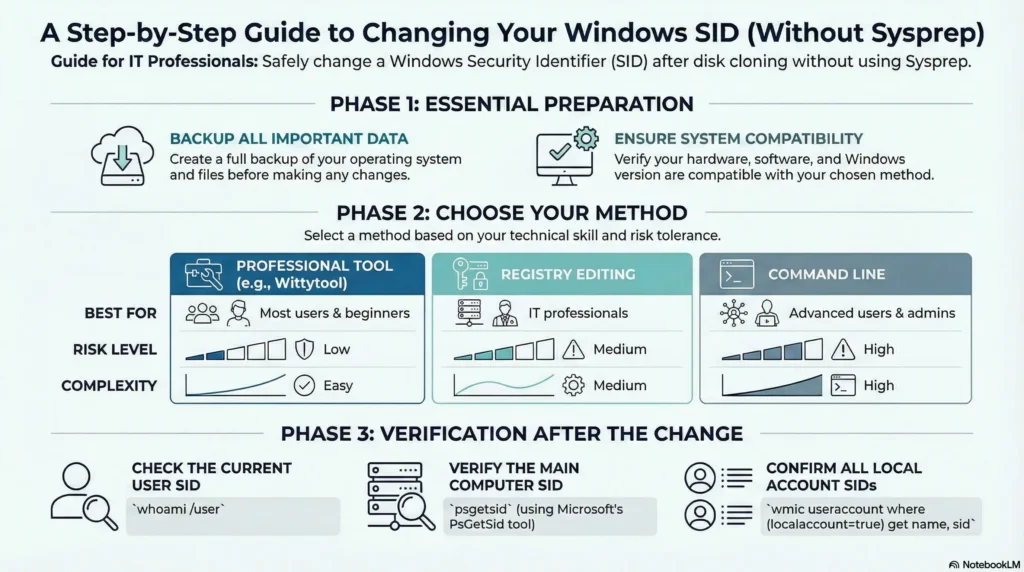
Infographic about how to change Windows SID without Sysprep:
What Is a Windows SID?
A Windows SID (Security Identifier) is a unique value assigned to every Windows installation and user account. Windows uses SIDs to manage:
- User permissions
- Security policies
- Network authentication
- Domain membership
When you clone a Windows disk, the SID is copied along with the system – which may result in multiple machines sharing the same SID.
Why Change Windows SID Without Sysprep
Why Sysprep isn’t always the best option? Traditionally, IT administrators use Microsoft’s Sysprep tool to generalize a Windows installation before cloning. While effective, Sysprep has a major downside: it resets your system to the “Out-of-Box Experience” (OOBE).
This is exactly why many users skip Sysprep and end up with the “Duplicate SID” problem that triggers the KB5065426 sharing failure. The solution? Use a specialized sid changer tools like Wittytool Disk Clone to change the SID without running Sysprep and without losing your custom settings.
Preparing for SID Change
Backup Important Data
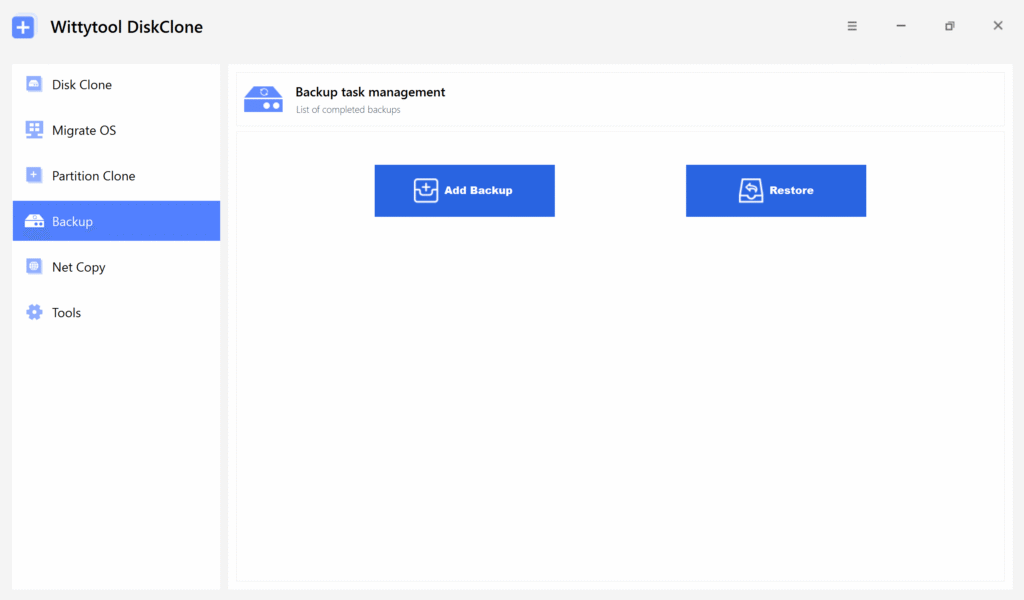
Before changing the SID, prioritize data protection. Use third-party software like Wittytool DiskClone, which isn’t just a cloning and sid changing tool, provide also a free data backup funtion for Windows OS, applications, and hard drives. Regular backups prevent data loss and facilitate recovery if issues arise. Besides, with this SSD cloning software, you can also do a network clone easily.
Ensure System Compatibility
Before changing the Windows SID, verify that your system is compatible with the chosen method. Confirm that hardware, software, and any third-party tools meet requirements, and check that Windows 11/10 is up to date. Performing compatibility checks helps prevent conflicts, ensures a smooth SID change, and reduces the risk of errors during the process.
Three Methods to Change SID Windows 11/10 Without Sysprep
Changing the SID in Windows 10 without using Sysprep requires careful consideration. While the Sysprep generalize command is the standard way to remove unique identifiers, many users find its “Fatal Error” validation and settings reset too restrictive. So we recommend three effective methods, focusing on third-party SID changer tools and manual techniques for Windows 10 and Windows 11.
Method 1. Change Windows SID With Wittytool Disk Clone (Recommended)
Best for: Most users, beginners, and non-enterprise setups
Risk level: Low
Complexity: Easy
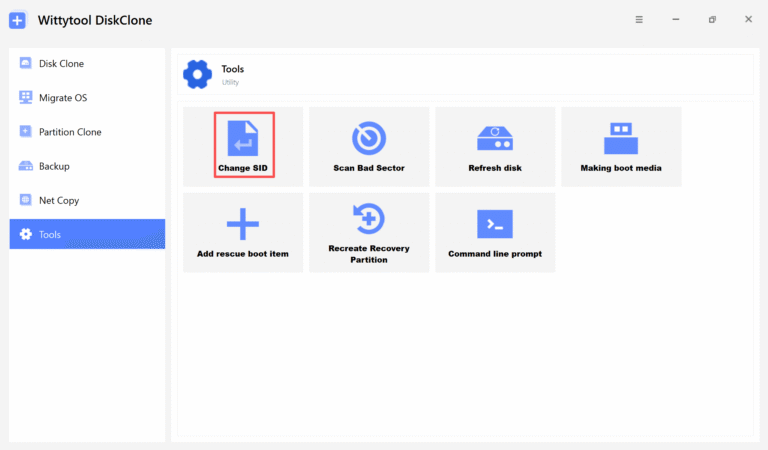
Here, we recommend using Wittytool Disk Clone, which not only a free disk cloning software, but also an effective Windows SID changer tool. It has a “Change Windows SID” feature, which allows you to assign a unique SID either during disk cloning or directly on the current system without cloning, providing maximum flexibility for different deployment scenarios, widely used by system administrators. In addition to modifying SID, Wittytool Disk Clone also supports USB drive cloning and full system backups, making it a versatile tool for disk management and system migration tasks.
Now continue using the WittyTool Disk Clone and follow the step-by-step instructions to change the Windows SID.
Modify your system SID with a single click. Please follow the steps below:
Step 1: Initiation. Locate “Change SID” and click the “Start” button.
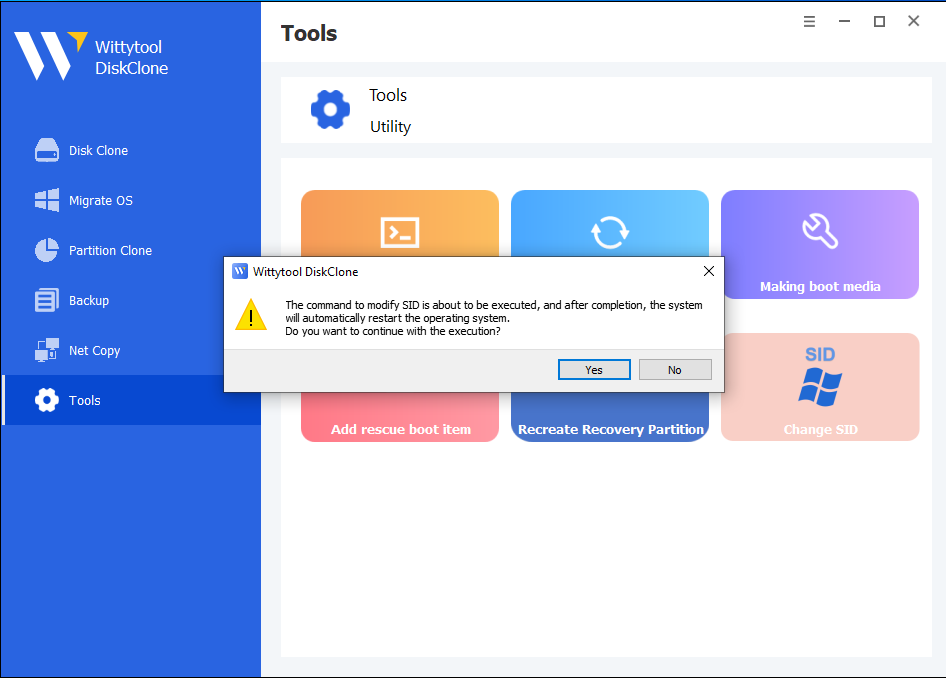
Step 2: Automated Preparation. The program will uninstall applications that may have permission conflicts.
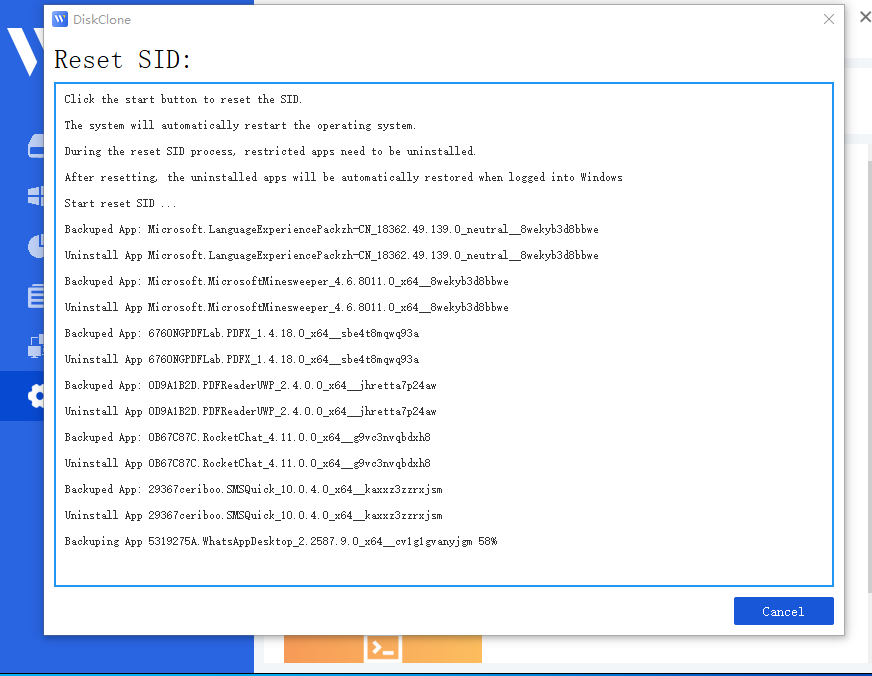
Note: All apps and data are backed up automatically before uninstallation.
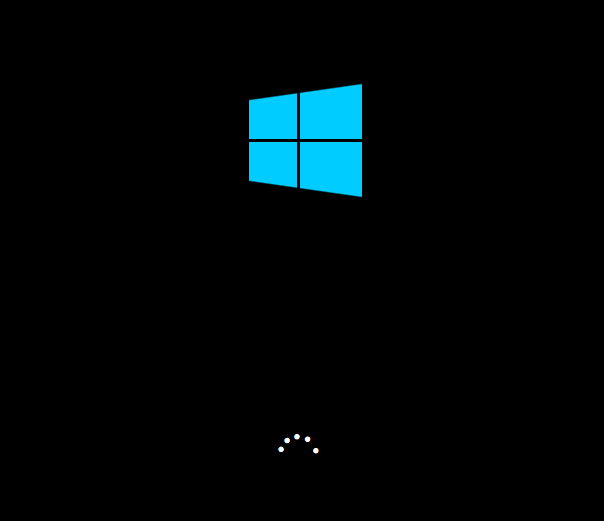
Step 3: System Restart. The system will automatically restart to apply the new SID.
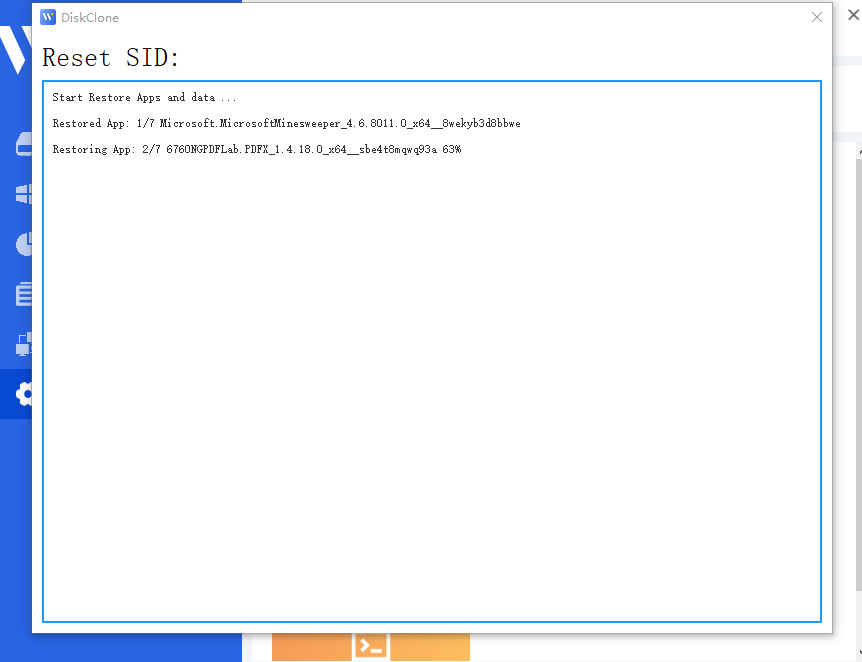
Step 4: Automatic Restoration. Upon logging back in, Wittytool Disk Clone will automatically restore the uninstalled programs and their associated data. Once the restoration is finished, the SID modification process is complete.
Important Post-Process Notes:
*Computer Name: To avoid network naming conflicts, your computer name will be changed to a random string.
*Local Accounts: Your Windows local accounts and settings will remain unchanged.

*Microsoft Accounts: If you use a Microsoft account, you will be required to reset your PIN upon your first login after the restart.

Video guide – How to change Windows SID via Wittytool Disk Clone (Full Walkthrough)
Method 2. Change SID Windows 10/11 via Registry Editing
Best for: IT professionals familiar with Windows internals
Risk level: Medium
Complexity: Medium
For users with technical expertise, manually editing the Windows registry provides direct control over SID changes. Follow these steps carefully:
- Open Registry Editor: Press
Win + R, typeregedit, and press Enter. This opens the Registry Editor. - Navigate to SAM Database: Locate the Security Account Manager (SAM) database. Exercise caution when editing registry entries.
- Modify SID Entries: Carefully alter the SID values. Ensure accuracy to prevent system instability.
- Save and Exit: Save changes and exit the Registry Editor. Restart the computer to apply changes.
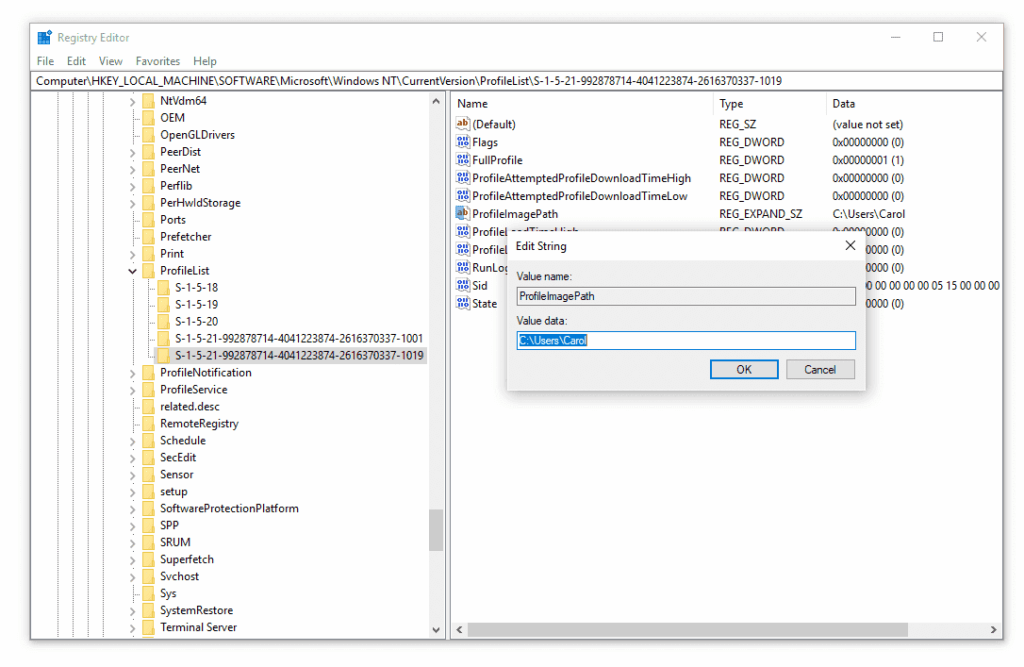
⚠️ Registry editing carries risks. Backup your system before proceeding and ensure you understand each step. This method is suitable for advanced users comfortable with Windows internals.
Method 3. Change SID Windows 10/11 via Command Line
Best for: Advanced users and system administrators comfortable with Windows commands
Risk level: High
Complexity: High
Command-line methods offer a precise approach to changing SIDs without using Sysprep:
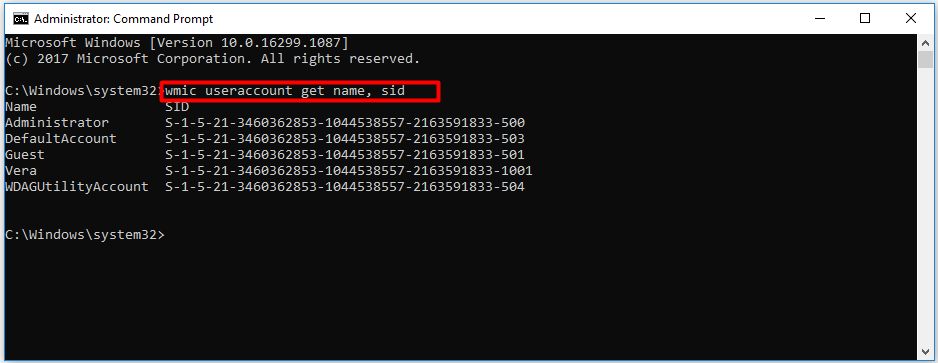
- Open Command Prompt: Access the Command Prompt with administrative privileges.
- Use WMIC Commands: Execute
wmic useraccount get name,sidto list current SIDs. Identify the SID to change. - Apply Changes: Use specific commands to modify the SID. Double-check syntax to avoid errors.
- Restart System: Reboot the system to finalize changes. Verify the new SID through system checks.
⚠️ Command-line modifications require careful attention. This method is recommended for advanced users who understand Windows security identifiers and system commands.
How to Verify if the SID has been Successfully Modified
After attempting to modify the Windows SID using a third-party tool or any method other than Sysprep, it is absolutely critical to verify that the change was applied successfully and correctly. An incorrect SID can lead to severe system instability, permission issues, and network conflicts.
Follow these steps to thoroughly verify the new SID.
Step 1: Verify the Current User SID
This is the most straightforward check and confirms the change for the user account you are currently logged in with.
Firstly, press Win + R, type cmd, and press Enter to open the Command Prompt.
Then, type the whoami /user and press Enter, the output will display your username and its associated SID.
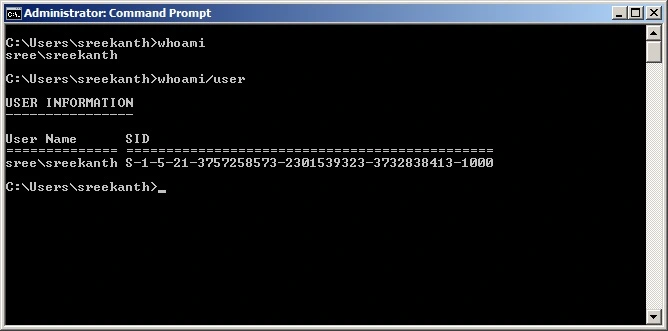
Verification: Compare the displayed SID with a pre-modification backup you (hopefully) created. If the SID is different, the change has been applied to this user account.
Step 2: Verify the Computer SID
The computer (or machine) SID is the foundation for all local account SIDs. It’s crucial to confirm this has changed. We will use the PsGetSidutility from Microsoft’s Sysinternals suite, which is the industry-standard tool for this purpose.
Firstly, download PsGetSid: Go to the official Sysinternals pageand download PsGetSid.exe.
Then, run PsGetSid:
Open Command Prompt as an Administrator.
Navigate to the directory where you saved PsGetSid.exe.
To get the computer’s SID, type psgetsid and press Enter. To get the SID of the local computer by name, use: psgetsid \\localhost or psgetsid \\YOUR-COMPUTER-NAME.
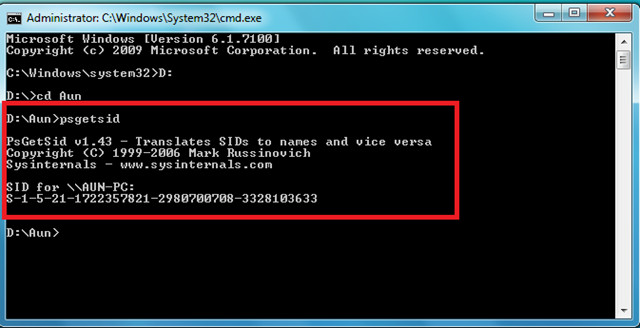
Verification: Compare this computer SID with your pre-modification record. The number sequence must be different from the old one. Note that the computer SID is the same as a user SID but without the final -1001(or similar) relative identifier (RID).
Step 3: Verify SIDs of Other Local Accounts
A successful SID change should affect all local accounts on the machine, as their SIDs are derived from the computer SID.
In the same Administrator Command Prompt, you can use “wmic” to list all local users and their SIDs:
“wmic useraccount where (localaccount=true) get name, sid“
Verification: Check the SIDs of several accounts. The leading part of the SID (e.g., S-1-5-21-947862234-1851278384-2542582929) should exactly match the new computer SID you obtained in Step 2. If any account still has the old computer SID prefix, the modification process was incomplete or failed.
Step 4: Perform a System Functionality Check (Crucial)
A changed SID is useless if it breaks the system. After verification, perform these essential checks:
- Reboot the computer. Ensure it starts normally without errors.
- Log in with a different local user account (if one exists) and verify its SID with whoami /user.
- Access Network Shares: Try accessing shared folders on other computers and have other computers access shares on this one. SID conflicts often manifest as “Access Denied” errors on the network.
- Check Installed Applications: Open key applications to ensure they launch correctly and don’t complain about user profiles or permissions.
Final Warning: If you did not create a system backup or take a virtual machine snapshot before modifying the SID, you are operating at extreme risk. If any of the verification steps fail or the system behaves erratically, the only safe course of action is to restore the system from the backup you created prior to making changes.
What Should I Do if Modifying the SID fails?
This section summarizes common issues and solutions based on real user feedback, helping you troubleshoot problems that may occur when changing the Windows SID.
Case 1. Affected by installed apps
Apps installed from the Microsoft Store are licensed per user. If SID modification fails, manually uninstall such apps before modifying the SID. Reinstall them after the SID change.
Check the log to identify which apps are causing the issue. The log is located at: “C:\Windows\System32\Sysprep\Panther\setupact.log“

Case 2. Affected by installed Windows update patches
Certain Windows update patches may also cause SID modification to fail. In such cases, uninstall the relevant update patches, modify the SID, and then reinstall the updates.
Case 3. Windows Update in Progress
If the system is in the middle of a Windows update, attempting to change the SID may fail or cause errors. Before modifying the SID, check whether Windows is currently updating. If updates are in progress, allow the update to complete and restart the computer. Only after the system has fully finished updating should you proceed with the SID modification.
Conclusion
Changing the Windows SID after disk cloning is not always required – but in networked or enterprise environments, it’s often essential. If you want a safe, fast, and non-destructive solution, using a professional SID-change method without Sysprep like Wittytool Disk Clone is the best approach.
FAQs About Windows SID and Disk Cloning
Why should I avoid using Sysprep to change the SID?
Sysprep is Microsoft’s official tool for generalizing a Windows image, including generating a unique SID. However, it removes user-specific settings, deactivates Windows, and requires the system to go through the Out-of-Box-Experience (OOBE). If you want to change the SID on a Windows 10 or 11 system without Sysprep, while keeping installed programs and user data intact, a non-Sysprep method is recommended.
I updated to KB5065426 and my network sharing stopped working. Do I have to reinstall Windows?
No, you do not need to reinstall Windows or uninstall the update (which puts your security at risk). The issue is likely caused by duplicate Machine SIDs on your network.
Instead of using Sysprep which would wipe your settings, you can use WittyTool DiskClone to simply generate a new, unique SID for your PC. This satisfies the new security requirements of update KB5065426 and restores your file and printer sharing capabilities immediately, while keeping all your software and configurations intact.
Is it safe to use a third-party tool to change the SID?
Using a reputable SID changer tool like which from Wittytool is generally safe and more reliable than manual registry editing. It automate the SID modification process, reduce the risk of errors, and maintain installed applications and system settings.
What are the risks of changing the SID manually via the Registry?
Manually changing the SID is highly discouraged and is considered extremely risky. The SID is deeply embedded in the Windows security subsystem and registry. Manually altering it is very likely to corrupt the Windows installation, leading to catastrophic failure, boot issues, and loss of access to user profiles and system resources. This method is not supported by Microsoft and is primarily documented for educational purposes. We strongly recommend using a dedicated tool instead.
What happens if two computers on the same network have the same SID?
In modern Windows networks (Windows NT 4.0 SP4 and later), duplicate computer SIDs do not usually affect domain communication or authentication, because computer accounts have unique passwords. However, duplicate SIDs can still cause issues in Workgroup environments and with some legacy applications or security software that rely on SIDs for identification. The most serious problems occur when cloned systems have duplicate user profile SIDs, potentially leading to permission conflicts and errors accessing network resources or local files. Ensuring unique SIDs is a best practice for system stability and security.