Last updated on June 25, 2026
Upgrading your computer’s storage is one of the single most effective ways to boost performance. Whether you are switching from a sluggish mechanical Hard Disk Drive (HDD) to a lightning-fast Solid State Drive (SSD), or simply upgrading to a larger drive because you’re running out of space, the hardware part is usually easy. The software part – specifically, figuring out how to move OS to another drive – is where most people get stuck.

I have spent over a decade working in IT data recovery and system migration. I’ve seen countless users attempt to manually “copy and paste” their C: drive files to a new disk.
⚠ Warning: This does not work. Windows contains hidden boot partitions and registry links that cannot be moved via simple copy commands.
In this guide, I will walk you through three effective solutions to transfer your OS to another hard drive. We’ll start with the most reliable method: using specialized software to clone Windows 11/10/8/7, ensuring an exact copy of your system. We will also cover image-based backups and the “clean slate” approach, guaranteeing you can boot up from your new drive with zero issues.
Solution 1: Transfer OS to Another Hard Drive Using Disk Cloning Software (Fastest)
If you value your time and want to avoid technical headaches, this is the method I recommend to 95% of my clients. While Windows has some built-in tools, they aren’t designed for seamless migration. To transfer OS to another hard drive safely and boot up instantly, specialized software is a must.
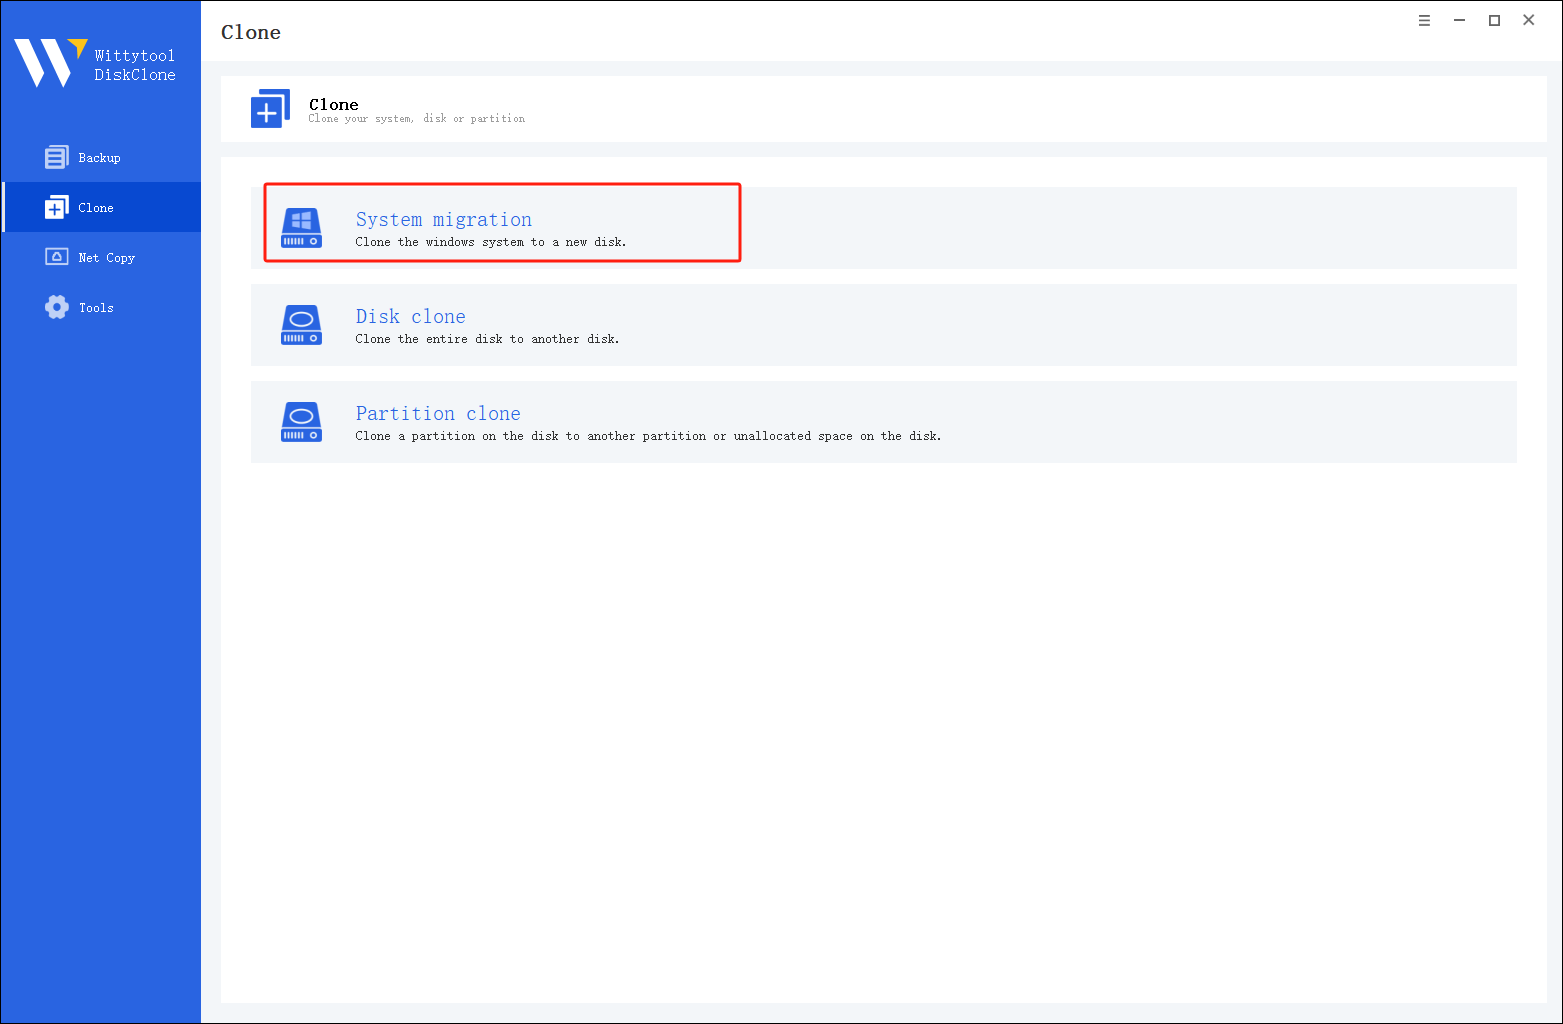
For this guide, I recommend a free system cloning software – Wittytool Disk Clone. It is particularly friendly for computer novices because it simplifies what can be a daunting process into just a few clicks. Whether your goal is to install Windows on NVMe SSD for a speed boost or to replace an old hard drive, this tool handles all the critical “invisible” work – such as correctly copying hidden boot partitions and optimizing sector alignment specifically for modern SSDs – completely automatically. This ensures your new drive boots perfectly without any technical hassle on your part.
Step 1: Select Migrate OS in left pannel, then choose the destination disk from the list.
*Change Windows SID: When cloning multiple machines on the same network, select “Change Windows SID” to prevent SID duplicated issues related to network access. This direct approach allows you to change windows sid without sysprep, making large-scale cloning operations much quicker and more efficient.
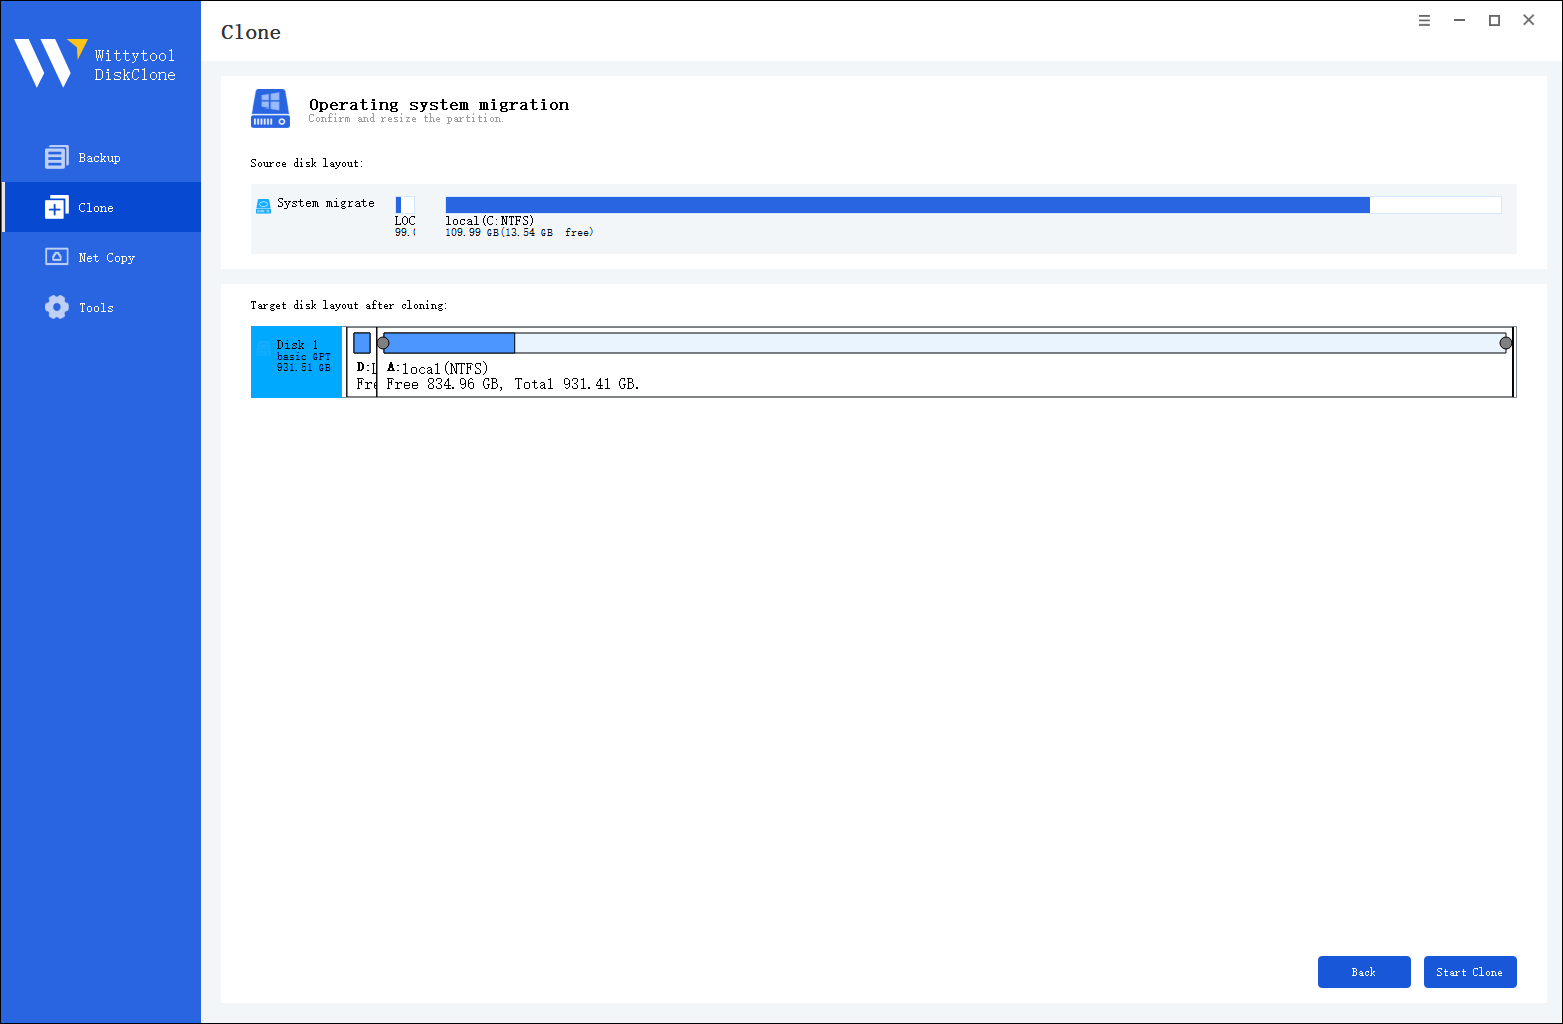
Step 2: Confirm Partition Size. Review and resize the partitions on the target disk as needed. Once ready, click the “Start Clone” button to begin the cloning process.
Once the cloning process is complete, you must tell your computer to load Windows from the new drive:
Step 3. Restart your PC and immediately press the BIOS key (usually F2, F12, or Del) repeatedly as the computer starts up.
Step 4. Navigate to the Boot menu or Boot Priority settings. Move your new disk to the top of the list to make it the primary boot device.
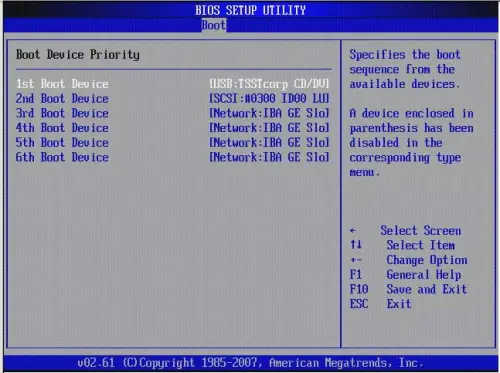
Step 5. Save your changes (often by pressing F10), exit the BIOS, and allow the PC to restart.
Watch this video guide to learn how to clone your system with Wittytool Disk Clone:
My Viewpoint: "I always recommend cloning over fresh installs for novices. The risk of forgetting to back up a specific folder (like game saves in 'My Documents' or browser bookmarks) is eliminated because everything moves with you. It is the only method that feels like magic - you turn the PC on, and it’s exactly your computer, just faster.
Solution 2: Migrate Windows to New Drive via Built-in Backup & Restore
If you prefer not to install third-party software, you can use the native tools built into Windows. However, note that Microsoft has not significantly updated this feature since Windows 7, and it can be temperamental.
The Mechanism
This method involves creating a “System Image” (a snapshot of your drive) saving it to an intermediate drive (like an external USB), and then “Restoring” that image onto your new drive.
The Process
Phase 1: Create the System Image
- Plug in a large external USB drive (intermediate storage).
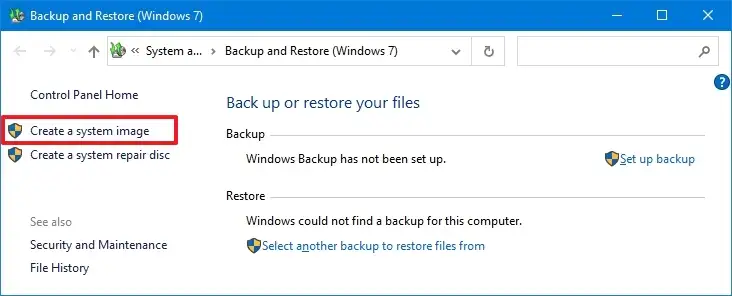
- Go to Control Panel > System and Security > Backup and Restore (Windows 7).
- Click Create a system image on the left pane.
- Select your external USB drive as the destination for the backup.
- Windows will select the drives required for Windows to run (usually C: and System Reserved). Click Start Backup.
Phase 2: Create Bootable Media
You cannot restore the image while inside Windows. You need a boot stick.
- Insert a USB flash drive (at least 8GB).
- In the same Backup & Restore window, select Create a system repair disc (or use the Windows Media Creation Tool to make a bootable USB).
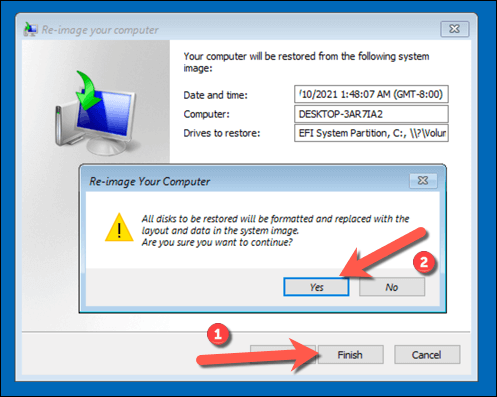
Phase 3: Restore to the New Drive
- Shut down the PC and install your New Drive.
- Plug in the Bootable Media and the External Drive containing the image.
- Boot the PC from the USB stick.
- Select Troubleshoot > Advanced Options > System Image Recovery.
- Select the image you created and point it to the new drive.
❗ Important Limitation:
Windows System Image Recovery often fails if the new drive is smaller than the old drive, even if the actual data would fit. For example, moving a 1TB HDD (with only 200GB used) to a 500GB SSD often causes an error with this method.
Solution 3: Move OS to Another Drive by Performing a Clean Install
Sometimes, the best way to move is to leave the junk behind. A fresh installation installs a pristine copy of Windows on your new drive.
When Should You Choose This?
If your current computer is plagued by viruses, corrupted system files, or bloatware that has accumulated over years, cloning will just move those problems to the new hardware.
Industry Insight:
According to tech support statistics, approximately 30% of OS migration failures are due to corruption in the original source operating system. In these cases, a fresh install is the only viable path.
Step-by-Step Guide
Step 1: Backup Your Data
Since we aren’t cloning, you must manually copy your photos, documents, and work files to an external drive or cloud storage (OneDrive/Google Drive). Here Wittytool Disk Clone also can backup your files efficiently.
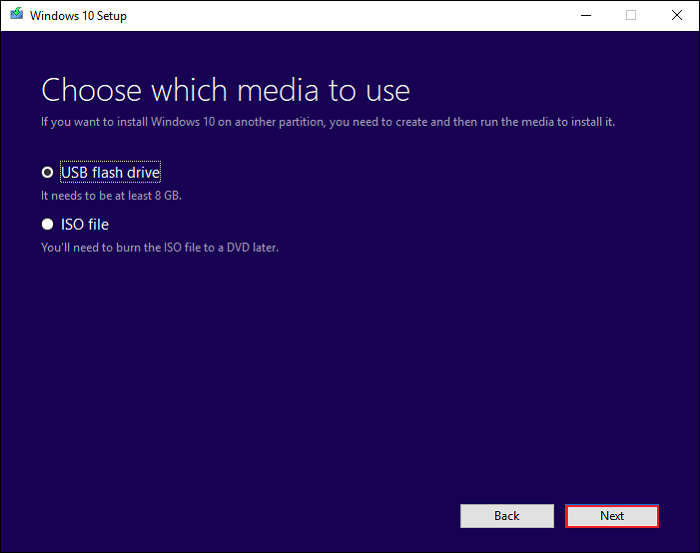
Step 2: Create Windows Installation Media
- Download the Windows Media Creation Tool from the official Microsoft website.
- Run the tool and select Create installation media (USB flash drive).
- Follow the prompts to turn your USB stick into a Windows installer.
Step 3: Install Windows
- Shut down and connect your new drive.
- 💡 Tip: I highly recommend disconnecting your old drive physically during this step. This prevents Windows from accidentally placing boot files on the wrong drive.
- Insert the USB installer and boot from it.
- Select Install Now.
- When asked for a product key, click “I don’t have a product key” (it will activate automatically later if your motherboard has a digital license).
- Select Custom: Install Windows only (advanced).
- Select your new drive (Unallocated Space) and click Next.
Step 4: The Aftermath
Once Windows installs, you will need to:
- Run Windows Update to get drivers.
- Reinstall all your software (Chrome, Office, Steam, etc.).
- Copy your manual backup files back onto the computer.
Comparison: What is the Best Way to Migrate OS to SSD/HDD?
To help you decide which method fits your skill level, I have compiled this comparison based on three criteria: Difficulty, Time Required, and Data Retention.
| Feature | Method 1: Cloning Software | Method 2: Backup & Restore | Method 3: Fresh Install |
| Difficulty Level | ⭐ (Easiest) | ⭐⭐⭐ (Hard) | ⭐⭐ (Medium) |
| Time Required | Low (30-60 mins) | High (2-4 hours) | Very High (3+ hours) |
| Preserves Data? | Yes, 100% | Yes, mostly | No (Manual backup needed) |
| Best For | Novices & Quick Upgrades | Users with strict policy against 3rd party tools | Systems with viruses/bloatware |
| Success Rate | High | Moderate | High |
My Professional Recommendation:
If your current Windows system is running well and you just want more speed or space, use Method 1. It eliminates the headache of reinstalling drivers and finding lost software license keys. Use Method 3 only if your current computer is crashing frequently or infected with malware.
FAQ About Moving Windows to New Drive
Will I lose my Windows license if I move the OS to a new drive?
Generally, no. In modern Windows 10 and 11 systems, the license is tied to your motherboard (digital entitlement), not the hard drive. When you clone or reinstall on a new disk, Windows typically activates automatically once you connect to the internet.
Do I need to format the new drive before cloning?
Yes, usually. You need to “Initialize” the disk in Disk Management (as explained in Solution 1) so the computer recognizes it exists. However, you do not need to create partitions manually; the cloning software will handle the partitioning.
Can I clone a larger HDD to a smaller SSD?
Yes, provided the used data on the HDD is smaller than the total capacity of the SSD.
- Example: You have a 1TB HDD but only use 200GB of space. You can clone this to a 500GB SSD.
- Most professional cloning software will automatically resize the partitions to fit the smaller drive.
My computer won’t boot after moving the OS. What should I do?
This is a common panic point, but usually easy to fix:
- Check Connections: Ensure the SATA/NVMe cable is seated firmly.
- BIOS Settings: Restart and press F2/Del to enter BIOS. Ensure the new drive is top of the “Boot Priority” list.
- Boot Mode: If you cloned an MBR disk but your BIOS is set to UEFI (or vice versa), it won’t boot. You may need to enable “Legacy Boot” or “CSM” in BIOS.
What to Do Next?
If you have your new drive ready, I suggest starting with Solution 1. Download a reputable disk cloning tool – many offer free trials or free versions for home users – and perform a “dry run” to see if the software detects both your drives.
Disclaimer: Always back up your critical data to a separate location (like the cloud) before performing any major hardware changes.