Bad sectors on a hard disk are a common issue that can lead to data loss, slow performance, or even complete drive failure. As a data management specialist with over 10 years of experience, I’ve seen how early detection and learning how to repair bad sectors on HDD can save users from costly disasters. This guide provides easy-to-follow methods for checking and removing bad sectors, using reliable software and tools. We’ll focus on practical solutions for beginners, avoiding technical jargon, and including key steps like data backup to ensure safety.
According to industry reports, nearly 10% of hard drives develop bad sectors within three years of use, making regular checks essential. Let’s explore how you can protect your data and extend your drive’s lifespan.
Methods to Detect Bad Sectors on HDDs and SSDs
Identifying bad sectors early is crucial to prevent further damage. Bad sectors are small areas on the disk that become unreadable, often due to physical wear or logical errors. SSDs can also develop similar issues, though they’re less common than on HDDs. We’ll cover simple ways to check for these problems, starting with built-in Windows tools. 💡 Remember, regular scans can catch issues before they worsen.
1. Scanning for Bad Sectors with Windows File Explorer
Windows includes a free tool called Error Checking that can scan for bad sectors without additional software. Here’s how to use it:
Open File Explorer and right-click on the drive you want to check (e.g., C: drive).
Select “Properties,” go to the “Tools” tab, and click “Check” under Error Checking.
Follow the prompts to scan the drive. This process may take time depending on drive size.
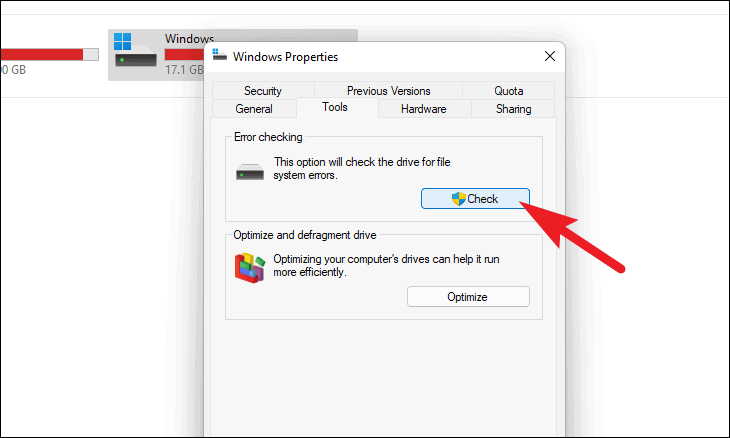
This method checks for logical bad sectors—those caused by software issues – and attempts to repair them automatically.
⚠ Note: It won’t fix physical damage, but it’s a good first step for minor errors. If the scan finds issues, it might prompt you to restart your computer for repairs.
2. Using Free Tools for Bad Sector Detection
For a more thorough check, free bad sector repair tools like HDDScan or CrystalDiskInfo offer detailed diagnostics. These tools provide deeper insights into drive health, including S.M.A.R.T. data, which monitors parameters like read error rates. For instance, a 2023 study by StorageReview noted that S.M.A.R.T. alerts can predict up to 70% of drive failures related to bad sectors. To use such a tool:
- Download a reputable free tool (always from the official website to avoid malware).
- Run the scan – it will display bad sector counts and overall drive health.
- Review the report; if bad sectors are found, consider backup and repair steps.
❗ Important: Free tools are great for detection, but may have limitations in repair capabilities. Always back up data first.
Protecting Your Data When Bad Sectors Appear
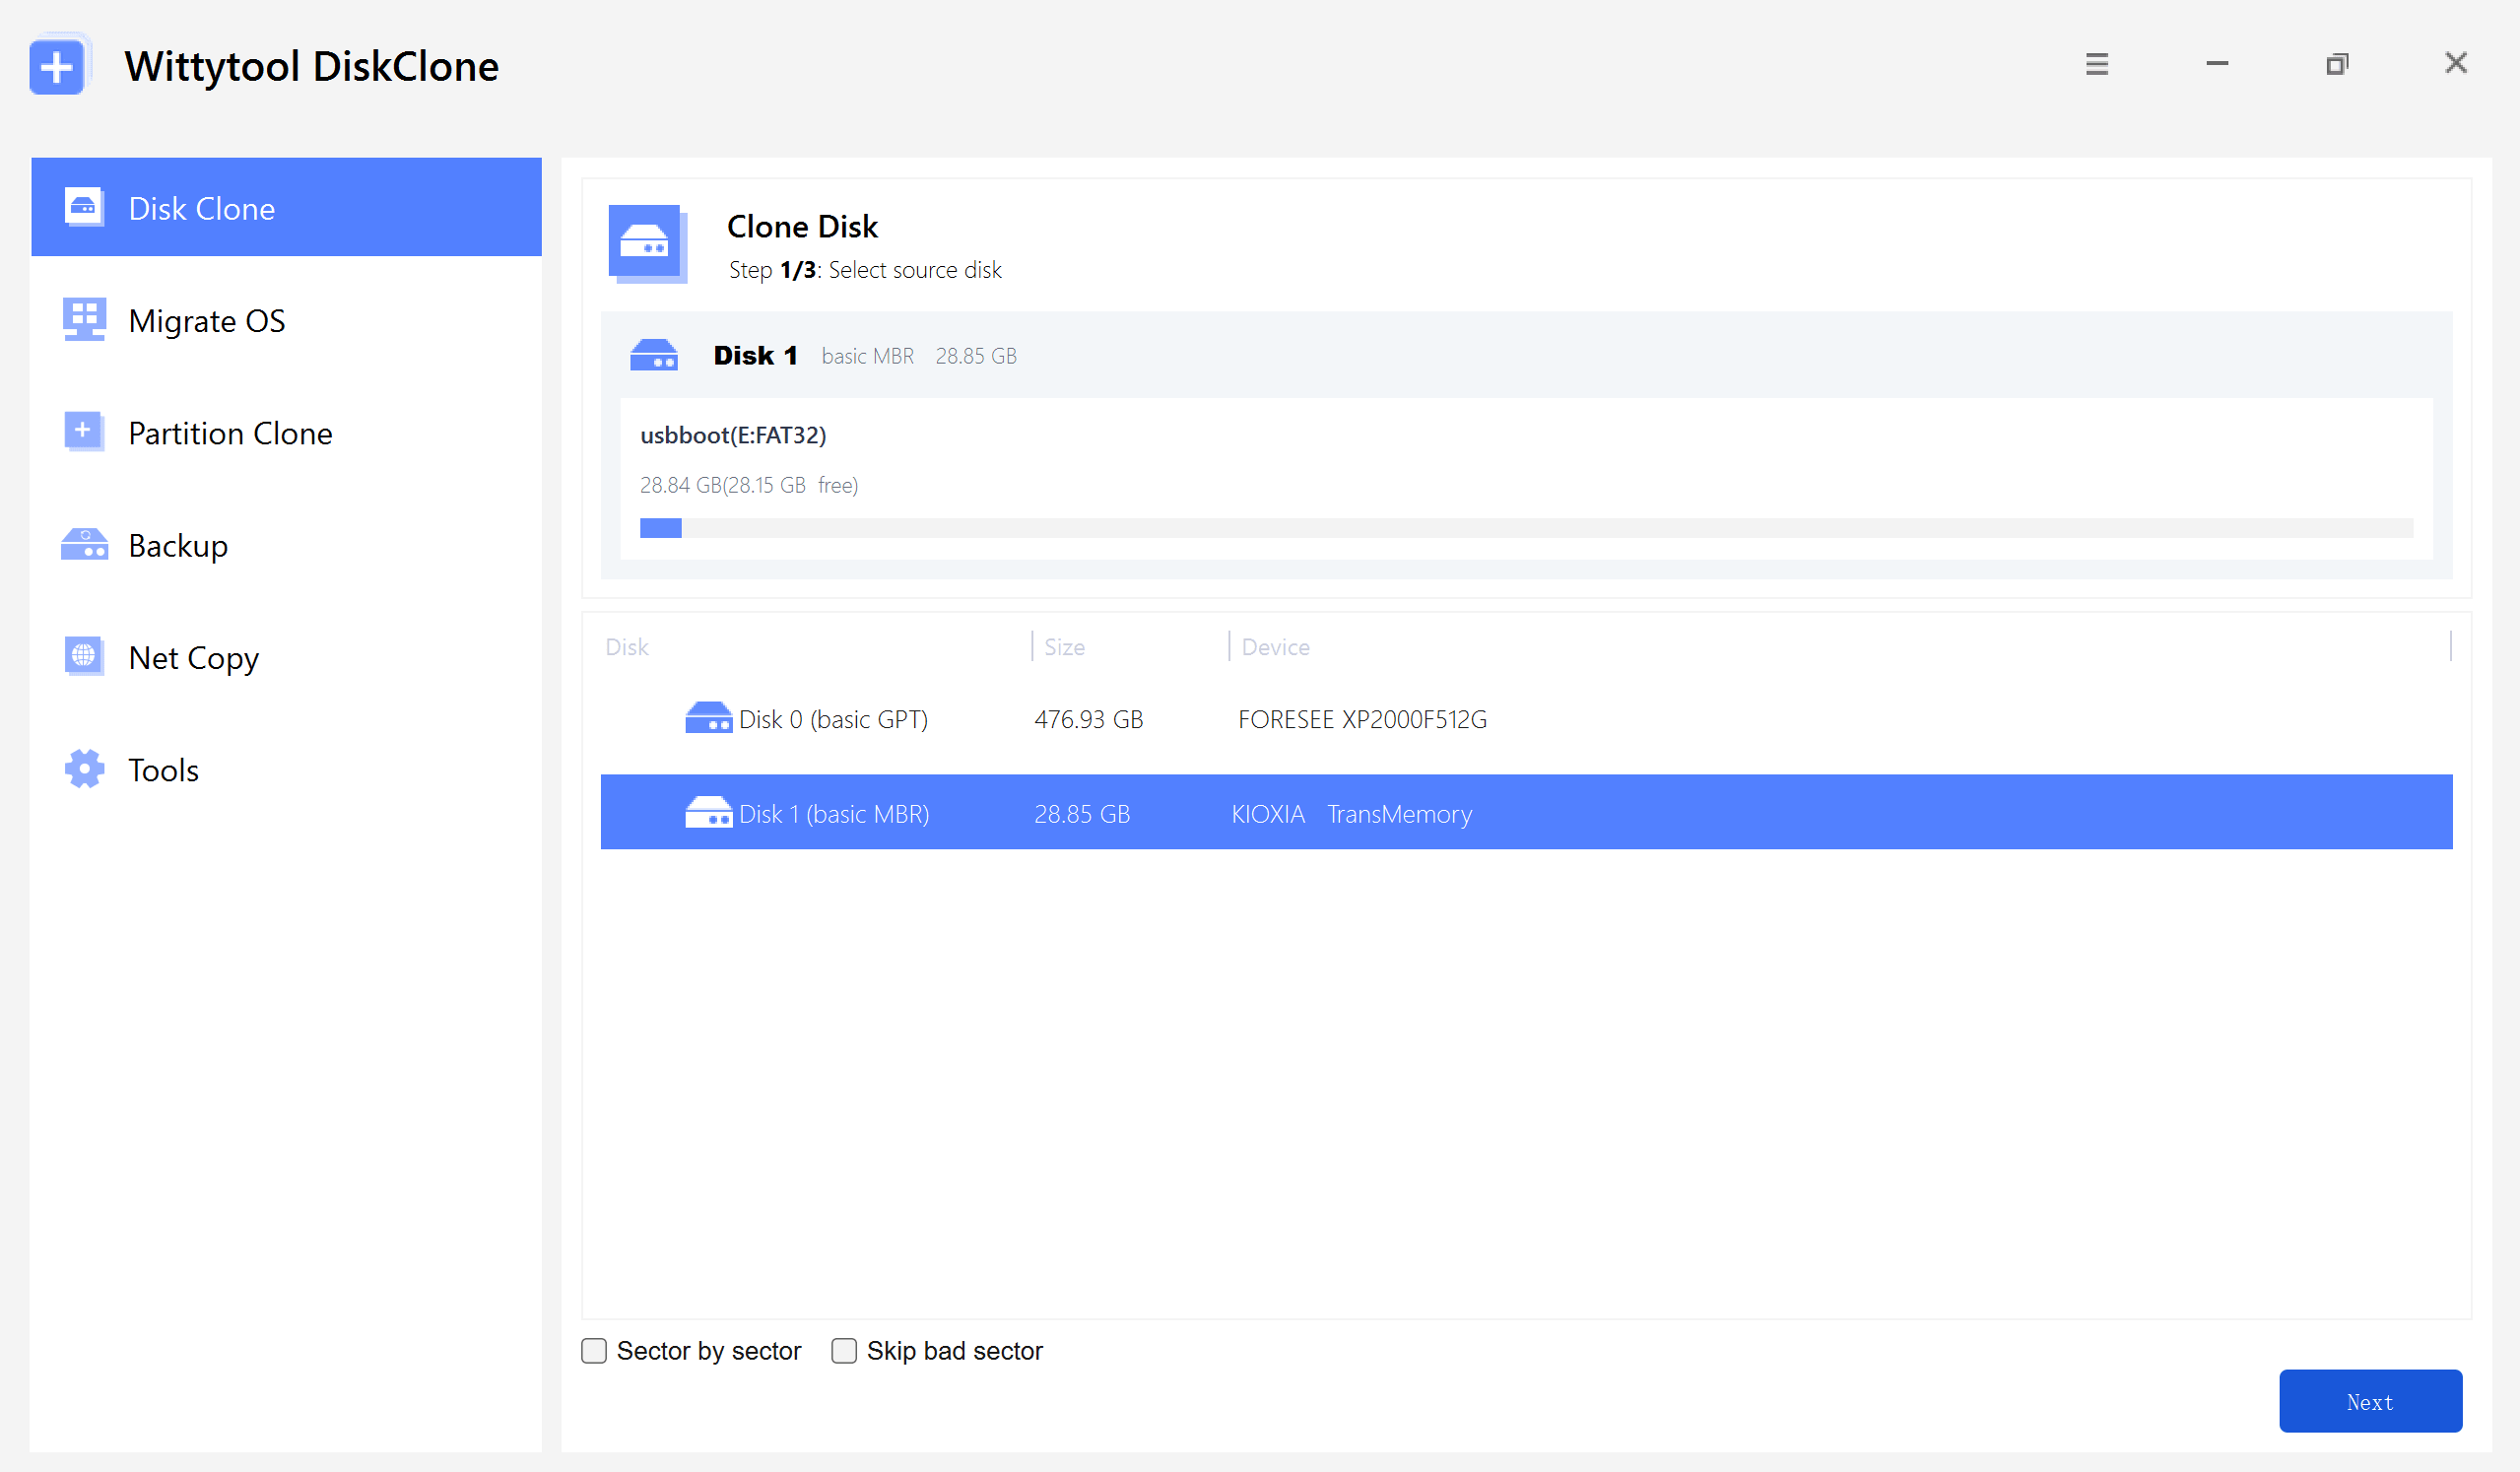
If bad sectors are detected, your priority should be safeguarding data to prevent loss. Cloning the drive copies all data to a healthy disk, isolating the bad areas. This principle applies not only to hard drives but also to other storage devices; for example, using specialized sd card clone software can effectively protect data on damaged memory cards. I recommend using a disk cloning software like Wittytool Disk Clone for this process, as it’s designed to handle drives with errors efficiently by skipping bad sectors to avoid corruption. Here’s a simple approach:
Step 1: First, pick either Disk Clone or Partition Clone (both follow the same logic), then simply select your source disk and hit Next.
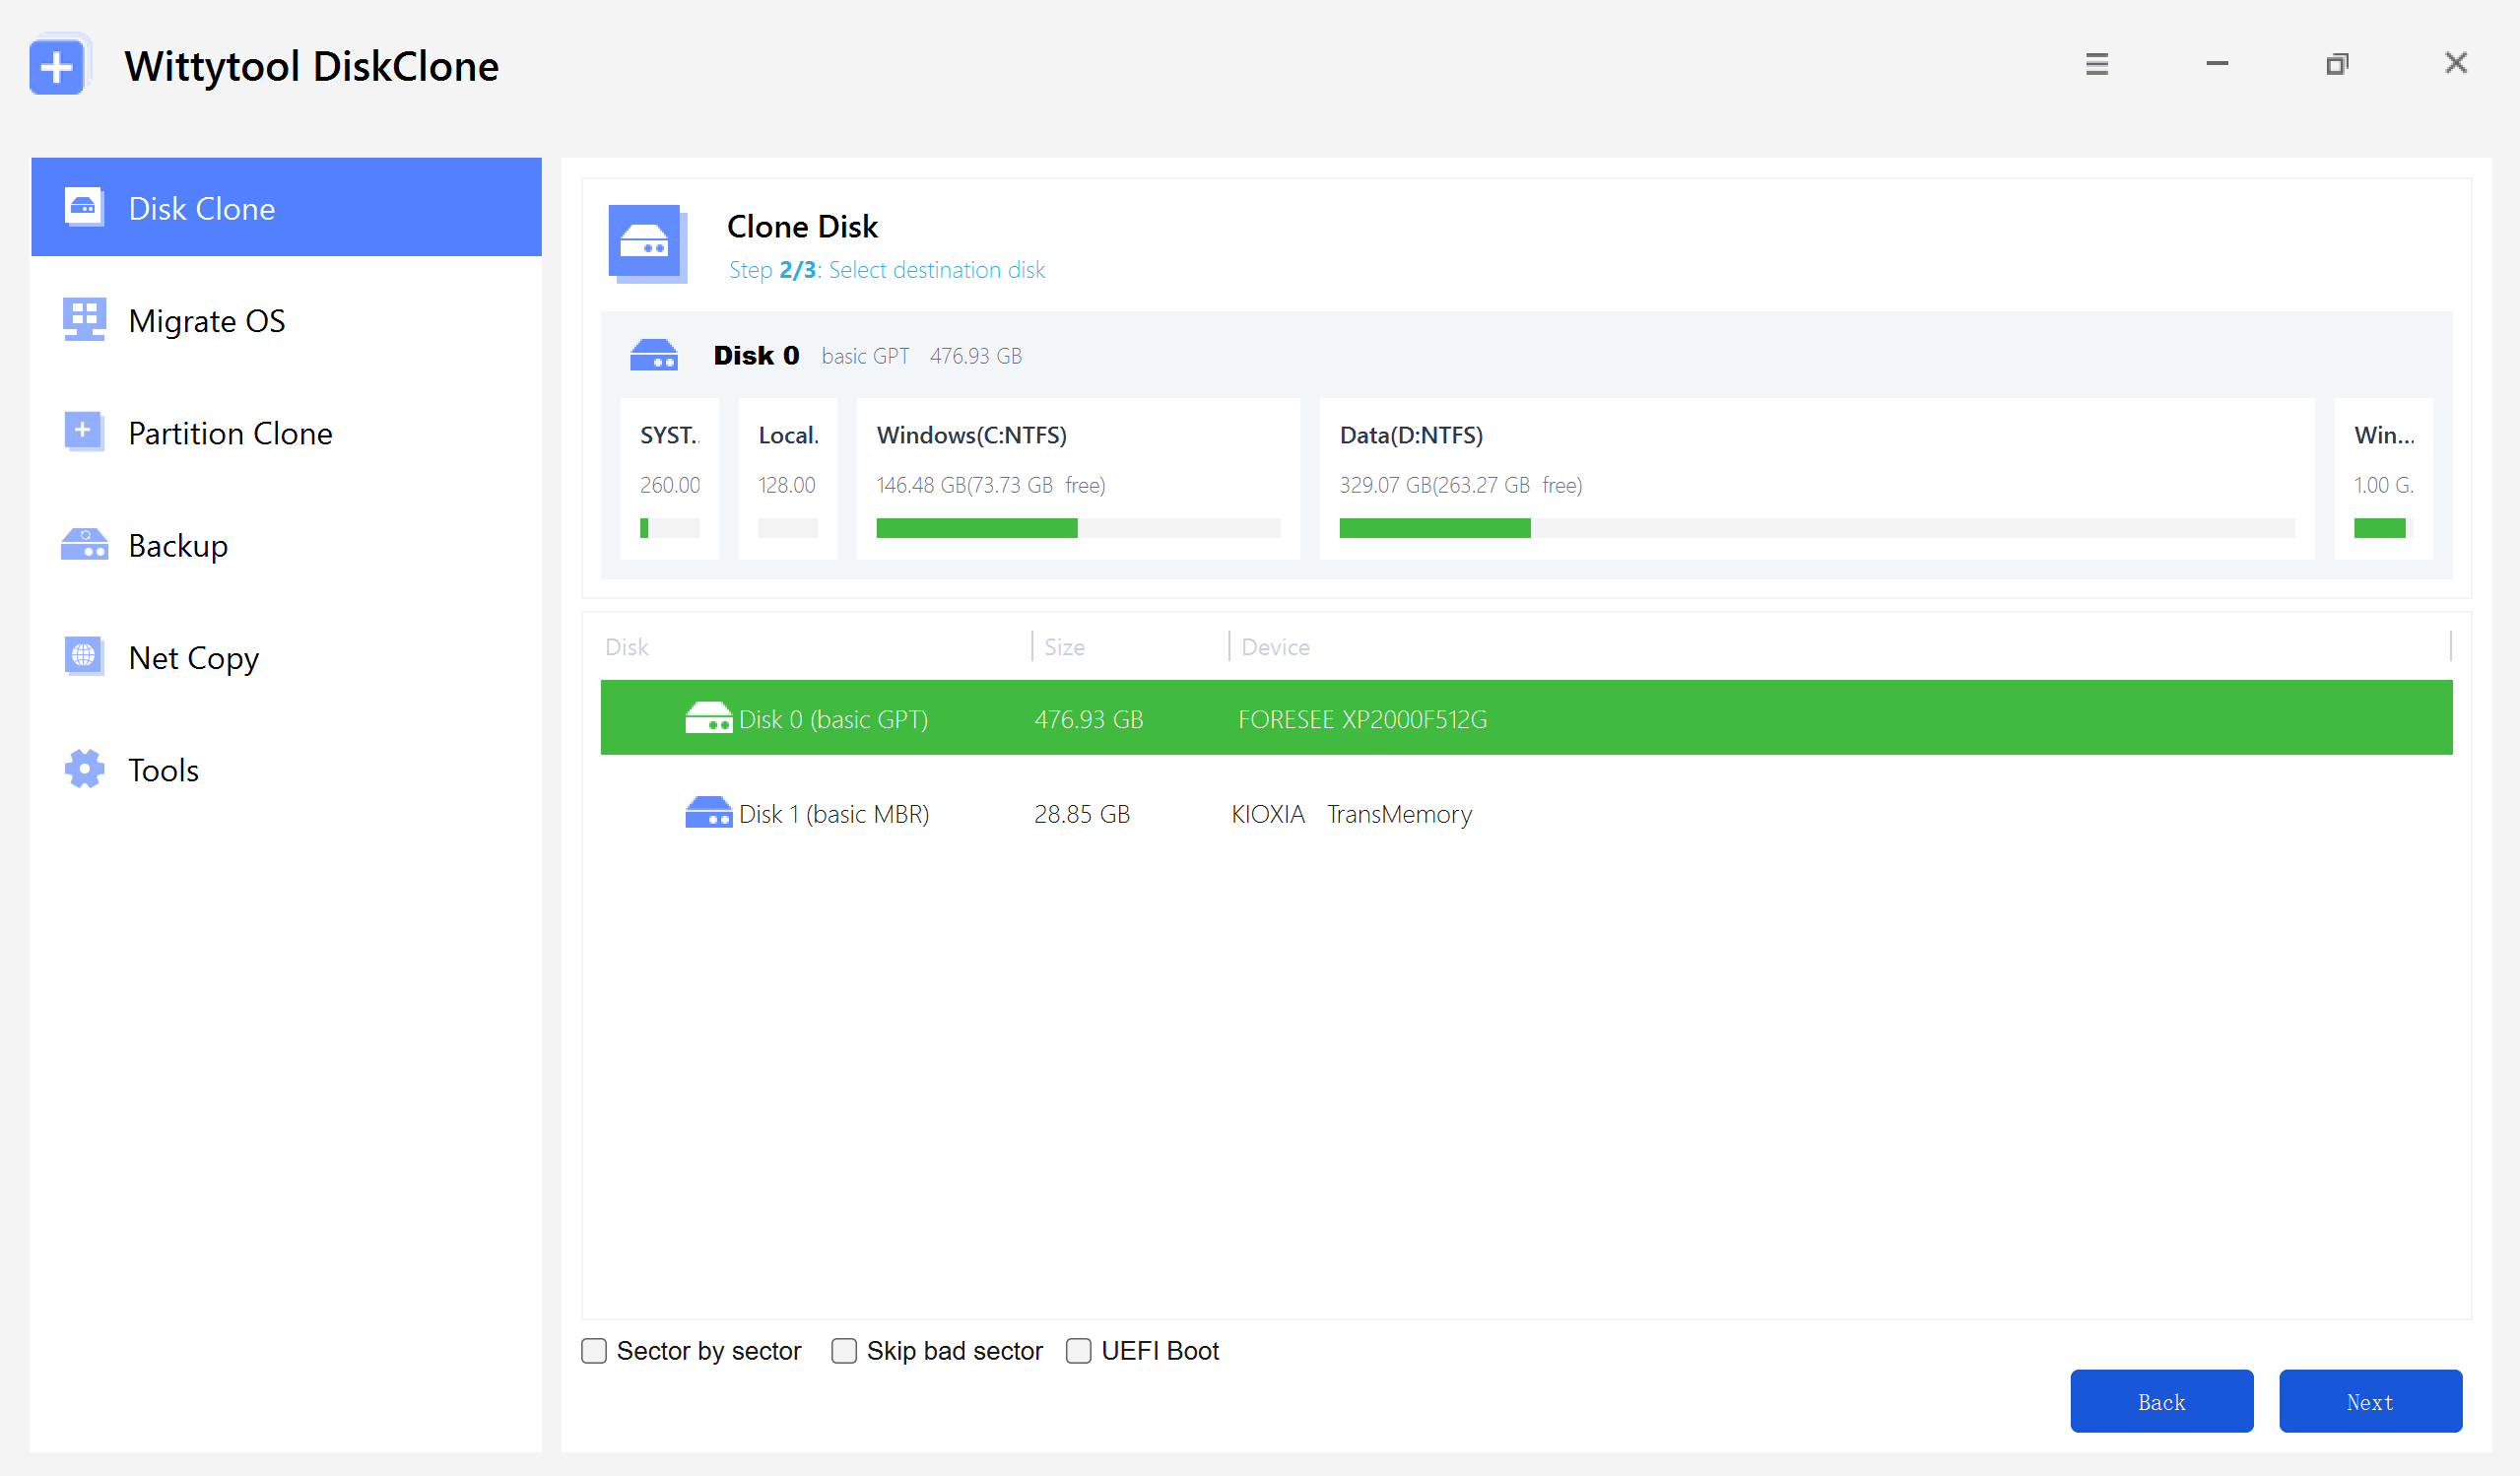
Step 2: After choosing your destination disk, click Next to view the available setup options. You have the flexibility to enable sector-by-sector cloning, ignore bad sectors, or check the UEFI BOOT box to switch the boot mode for seamless compatibility with modern UEFI-based hardware.
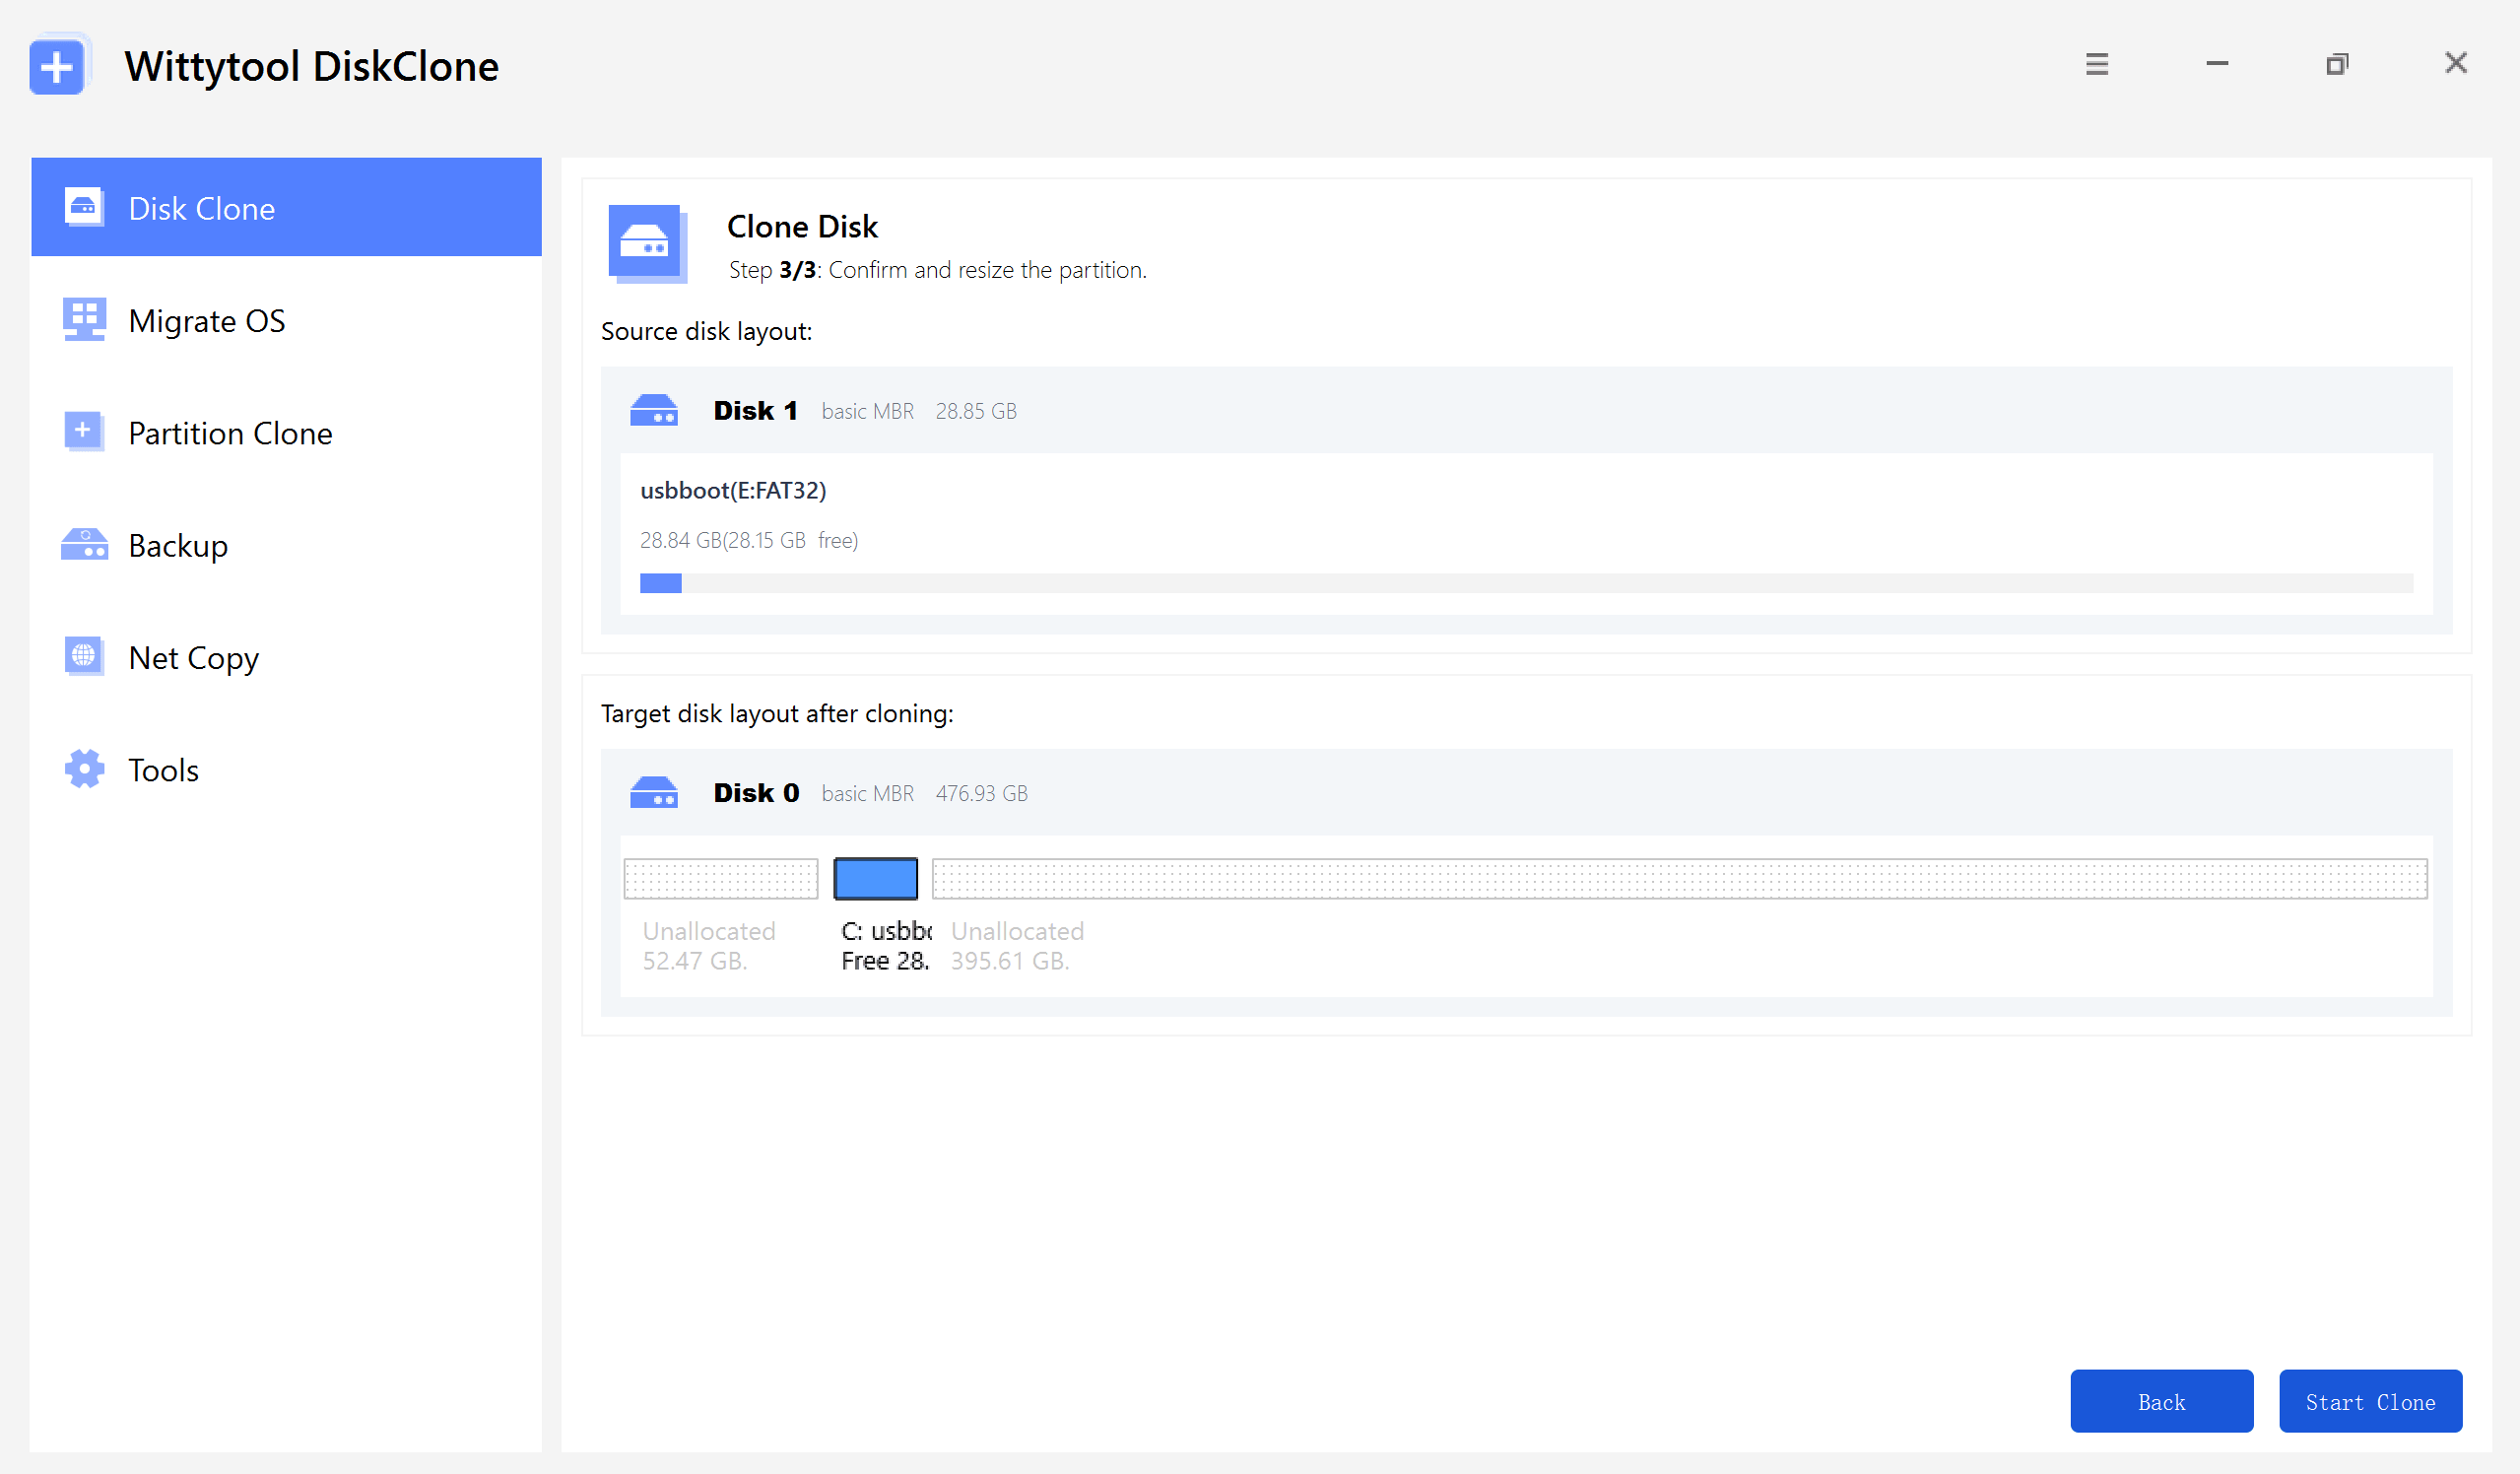
Step 3: Adjust the partition sizes on your target drive as required by your specific layout. Once finished, click the “Start Clone” button to kick off the cloning operation.
Video guide on how to clone HDD/SSD using Wittytool Disk Clone:
This method ensures your files are safe while you proceed with repairs. Disk cloning is the best practice, as it reduces the risk of irreversible data loss during repair attempts.
Effective Tools and Methods to Repair Bad Sectors
Once data is protected, you can focus on removing bad sectors. Repair methods vary based on the type of issue. For example, the approach to repair bad sector of Western Digital drives, or other brands, depends on whether the sectors are logical (software-related) or physical (hardware damage). Logical bad sectors can often be fixed with software, while physical ones may ultimately require drive replacement. Below, we’ll explore reliable techniques that apply to these different scenarios.
1️⃣ Using Command Prompt to Eliminate Bad Sectors
The Windows Command Prompt (CMD) offers a built-in way to repair logical bad sectors via the chkdskcommand. This tool scans and attempts to recover data from damaged sectors. Follow these steps:
Type “cmd” in the Windows search bar, right-click Command Prompt, and select “Run as administrator.”
Enter the command chkdsk C: /f /r(replace “C:” with your drive letter). The /fflag fixes errors, and /rlocates bad sectors.
Allow the process to complete; it may take hours for large drives.
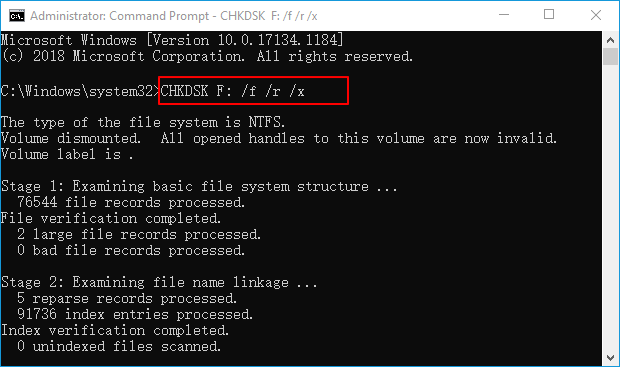
💡 This method is effective for logical issues but won’t repair physical damage. A 2022 report by TechInsights found that chkdsk resolves about 60% of logical bad sector cases in consumer drives.
2️⃣ Fixing Logical Bad Sectors Through File Explorer
For a user-friendly option, File Explorer’s Error Checking tool can also repair logical bad sectors. Repeat the scanning steps mentioned earlier; if errors are found, Windows will offer to fix them. This is ideal for beginners who prefer a graphical interface over CMD.
While these built-in methods help, specialized bad sector repair software often provides more comprehensive solutions, such as low-level formatting or remapping bad areas.
3️⃣ Professional Repair with MHDD (For Advanced Users)
Another professional but complex option is MHDD. This free, DOS-based tool can interact directly with the hard drive’s hardware for deeper-level bad sector repair.
⚠ Important Note:MHDD is complex and high-risk, not recommended for average users. Incorrect use can lead to complete data loss. It should only be used by experts who have already backed up all important data.
Main Purpose:
MHDD can force the drive to mark and isolate (remap) physical bad sectors, sometimes fixing stability issues that other software cannot handle.
💡 In practice, this is often a temporary fix.The safest action when a drive develops physical bad sectors is still to replace it as soon as possible.
Criteria for Selecting the Best Bad Sector Repair Software
Choosing the right tool is crucial for a successful and safe repair process. The table below summarizes the key features to look for in reliable bad sector repair software.
| Criteria | Key Considerations |
|---|---|
| Repair Effectiveness | Proven success in handling both logical and physical bad sectors (remapping). |
| Data Safety | Offers read-only scanning and creates a disk image/clone before any repair actions. |
| Ease of Use | Features a clear, intuitive graphical interface suitable for non-experts. |
| Drive Monitoring | Includes S.M.A.R.T. data analysis to provide a comprehensive health assessment. |
| Compatibility | Works with your specific drive type (HDD/SSD) and connection (SATA, NVMe, USB). |
| Software Reputation | Developed by a trusted company with positive user feedback and regular updates. |
By prioritizing software that excels in these areas, you can make an informed decision that protects your data and effectively addresses disk errors. Always remember to back up your data before starting any repair process.
Conclusion
Dealing with bad sectors doesn’t have to be daunting. By regularly checking your drive with built-in tools or free software, backing up data via cloning, and using repair methods like CMD or specialized tools, you can maintain your hard disk’s health. Early action is crucial – industry data shows that drives with unchecked bad sectors are 50% more likely to fail within a year. Start with simple scans and escalate to professional software if needed. Your data’s safety is worth the effort.
Frequently Asked Questions About Bad Sector Repair
Q1: Can bad sector repair software recover lost data?
A: Some tools can recover data from logical bad sectors, but if sectors are physically damaged, data may be irrecoverable. Always clone the drive first for backup.
Q2: How often should I check for bad sectors?
A: For typical users, a quarterly scan is sufficient. Heavy users or those with older drives should check monthly.
Q3: Is it safe to use free bad sector repair tools?
A: Yes, if downloaded from official sources. Avoid untrusted sites to prevent malware.
Q4: Can SSDs develop bad sectors?
A: Yes, though less common than HDDs. SSD bad sectors often relate to wear-leveling issues and require SSD-specific tools.
Q5: What if repairs don’t work?
A: If bad sectors persist, the drive may have physical damage. Replace it to avoid data loss.
By following this guide, you’re taking a proactive step toward disk health. If you have more questions, consult a professional for personalized advice.