Last updated on October 16, 2025
Formatting an SD card is a common task – it can fix errors, clear out clutter, or prepare the card for a new device like a camera or phone. But one wrong move can lead to heartbreaking data loss, wiping out precious photos, important documents, and other irreplaceable files. 💡 A 2024 report by Statista indicates that damaged or corrupted storage devices, including SD cards, are a leading cause of data loss for individuals. This makes creating a backup absolutely essential before you hit that “Format” button.
This guide is designed for everyone, especially if you’re not very tech-savvy. We’ll walk you through the entire process, from understanding why formatting requires a backup to the actual steps of backing up and formatting on both Windows PCs and Android phones. The core principles you learn here for safeguarding your data are similar to the process you’d use to safely format a new SSD or other storage devices. Our goal is to make this process stress-free and foolproof. Let’s get started!
Does Formatting an SD Card Erase Everything?
This is the most critical question to answer first. The short answer is: yes, for all practical purposes, formatting erases everything you can see and access.
When you format an SD card, your device (phone, computer, camera) sets up a new file system. Think of this as wiping the card’s table of contents clean. The system can no longer find your old files, so it looks empty and ready for new data. However, with specialized data recovery software, it’s sometimes possible to recover files after a quick format because the actual data might still be physically present on the card until it’s overwritten by new files.
⚠ Key Takeaway: You should always operate under the assumption that formatting will permanently delete your data. Taking a few minutes to create a backup is the only way to guarantee your files are safe.
The Right Way to Back Up Your Memory Card Before Formatting
Now for the most important part: securing your data. There are several reliable methods to back up your SD card, ranging from simple copy-pasting to using powerful software. We’ll cover the most effective ones.
Method 1: The Simple Copy-Paste Using Windows File Explorer
This is the most straightforward method, perfect for smaller amounts of data and users who prefer not to install new software.
- Connect the SD Card: Insert your SD card into your computer’s card reader. If your laptop doesn’t have a slot, you can use a USB SD card adapter.
- Open File Explorer: Click the folder icon on your taskbar or press the
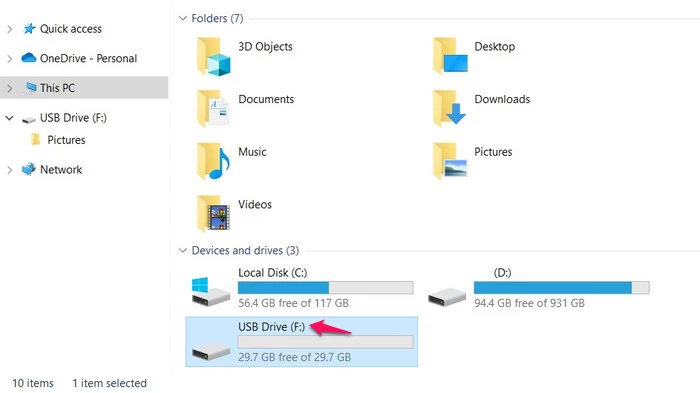
Windows key + E. - Locate the SD Card: Your SD card will appear under “Devices and drives” with a letter like (D:) or (E:).
- Select and Copy Files: Double-click to open the SD card drive. Press
Ctrl + Aon your keyboard to select all files and folders. Then, right-click and choose Copy, or pressCtrl + C. - Paste to a Safe Location: Navigate to a safe folder on your computer, like your Documents folder or Desktop. Right-click in an empty space and select Paste (
Ctrl + V). Wait for all files to finish copying.
❗ Pro Tip: Do not remove the SD card while files are transferring. Wait until the progress bar disappears completely. If you’re also troubleshooting storage issues, like figuring out why an SSD is not showing up in Windows, the same principle of stable connections applies here to prevent corruption. A study by Acronis highlights that improper ejection is a common cause of file corruption during manual transfers.
Method 2: Using a Cloning Software to Backup SD Card Data
For a faster, more complete backup, cloning software like Wittytool Disk Clone is the best choice. The same powerful cloning technology isn’t just for SD cards; it’s also the recommended method when you need to clone your ASUS hard drive to SSD for a system upgrade. Unlike simple copying, cloning creates an exact image of your entire SD card, preserving all data and its structure. This is ideal for backing up a card used for a system (like a Raspberry Pi) or ensuring no file is left behind.
Here’s how to do it in a few steps:
Watch the Disk Cloning Video Guide with Wittytool Disk Clone:
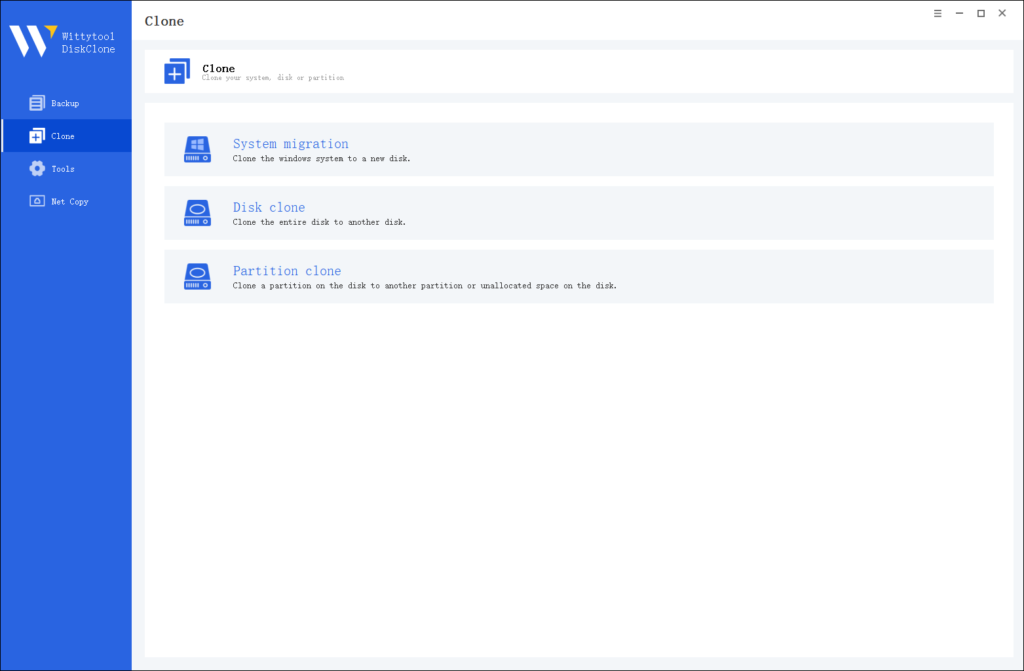
Step 1: Choose Disk Clone Mode
Launch Wittytool Disk Clone and navigate to the main interface. From the left panel, select Disk Clone Mode. This mode is perfect for creating an exact copy of your disk or SD card.
Pro Tip: If you’re specifically looking to transfer data from one SD card to another, check out this detailed guide: how to copy SD card to another.
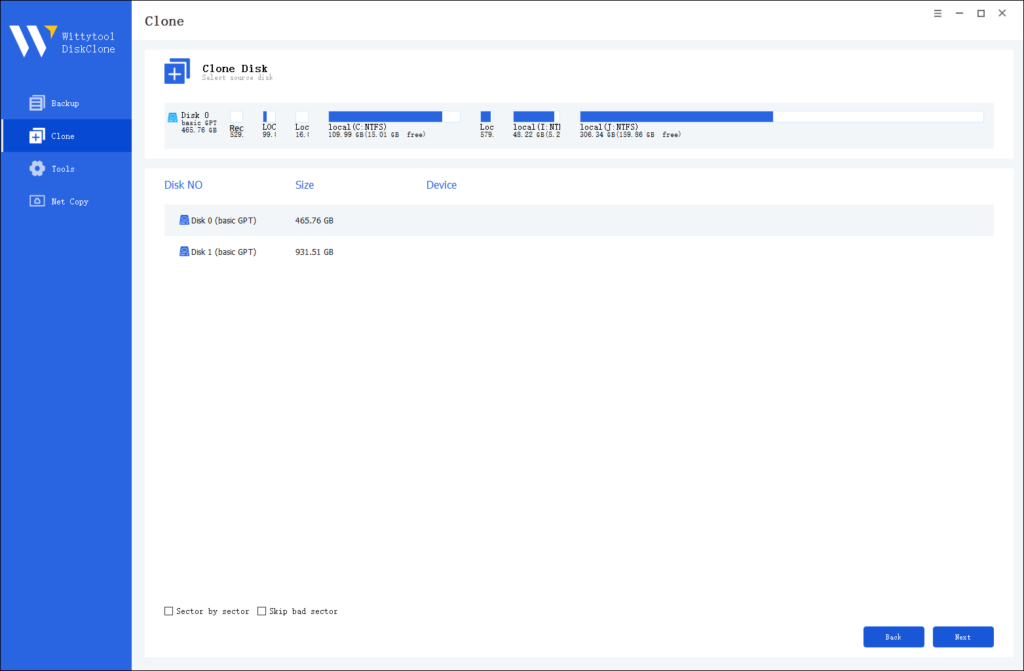
Step 2: Choose Source Disk
Next, select the source disk or SD card you want to clone. The software will display the layout of the selected disk at the top of the list view for easy reference.
Important Notes:
- Sector by Sector Clone: Use this option if your source disk has bad sectors or a damaged file system. It ensures every sector is copied, including damaged ones.
- Skip Bad Sectors: If your source disk has bad sectors, this option allows the software to clone only the healthy sectors, making it ideal for older disks.
Step 3: Choose Destination Disk
Now, select the destination disk or SD card where the cloned data will be stored. Ensure the target disk has enough storage capacity to accommodate the data from the source disk.

Step 4: Start the Cloning Process
Once you’ve selected the source and destination disks, review the settings and click “Start Clone”. The software will handle the rest, ensuring a seamless and accurate cloning process.

💡 Why this is better: This image file is a snapshot of your SD card at that moment. If anything goes wrong during formatting, you can use this same software to restore the image and get all your data back exactly as it was.
According to software reviews on platforms like TechRadar, using cloning software can reduce the risk of backup errors by over 70% compared to manual methods.
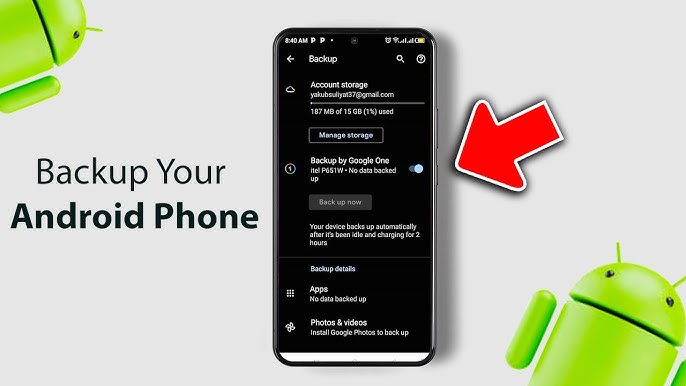
Method 3: Utilizing the Built-in Backup on Android Devices
If you don’t have a computer handy, you can often back up your SD card directly from your Android phone.
- Open Your File Manager App: Most Android phones have a “Files” or “My Files” app.
- Navigate to SD Card Storage: Open the app and look for an option like “SD Card” or “Portable Storage.”
- Select Your Files: Long-press on a file or folder to select it. You can then tap other items to select them all, or use the “Select all” option.
- Copy or Move: Tap the three-dot menu or copy icon and choose Copy.
- Paste to Internal Storage: Navigate to your phone’s Internal Storage, choose a folder (like “Downloads” or create a new “Backup” folder), and tap Paste.
Video tutorial for backing your Android Phone:
Method 4: Backing Up to the Cloud from Your Android Phone
For an off-device backup that you can access from anywhere, cloud storage is a great option. Services like Google Drive, Dropbox, or OneDrive work well.
- Install a Cloud App: Ensure you have an app like Google Drive installed and are signed in.
- Upload Files: Open the app, tap the + (plus) icon, and select Upload.
- Navigate to Your SD Card: Find the “SD Card” section and select the files or folders you want to back up.
- Start Upload: Tap Open or Upload to send the files to the cloud.
💡 Note: Cloud backups are excellent for photos and documents but can be slow for large video files and may require a paid subscription for significant storage space.
Video tutorial for backing up to the cloud from your Android Phone:
How to Format an SD Card on a Windows PC
Once your backup is confirmed safe, you can proceed with formatting. On Windows, you have three main options.
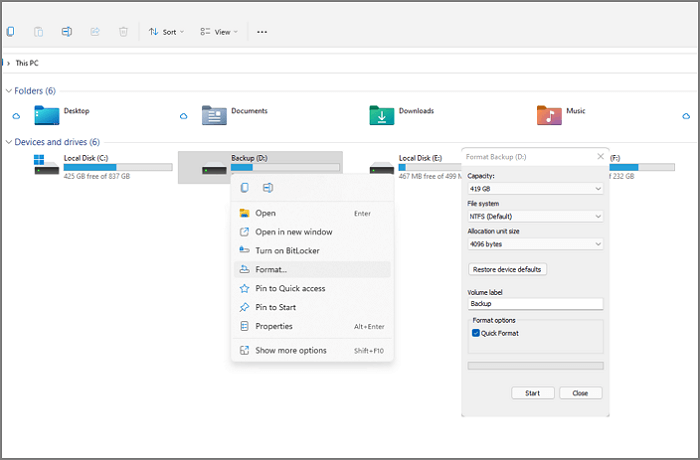
Option 1: Formatting via File Explorer (Easiest)
- Insert the SD card.
- Open This PC or Computer.
- Right-click on your SD card drive and select Format.
- Choose the File System (use FAT32 for cards 32GB and smaller, exFAT for 64GB and larger).
- Ensure “Quick Format” is checked and click Start.
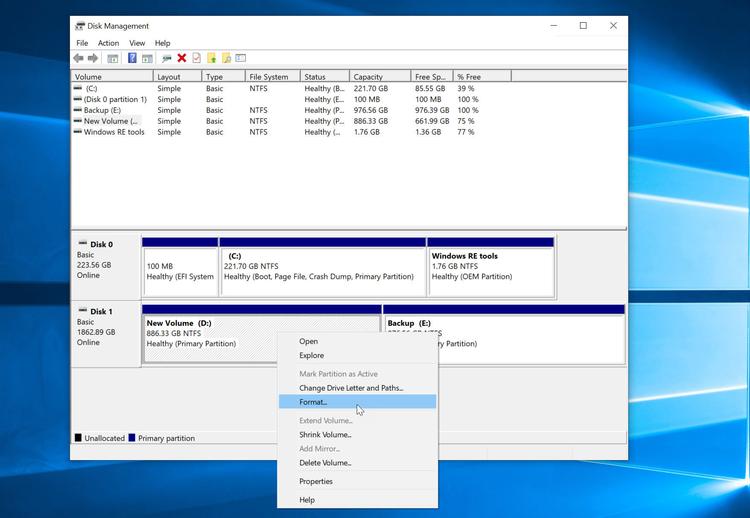
Option 2: Using Disk Management
This tool is useful if the card doesn’t show up in File Explorer.
- Right-click the Start button and select Disk Management.
- Locate your SD card in the list of volumes.
- Right-click on the SD card’s partition and select Format.
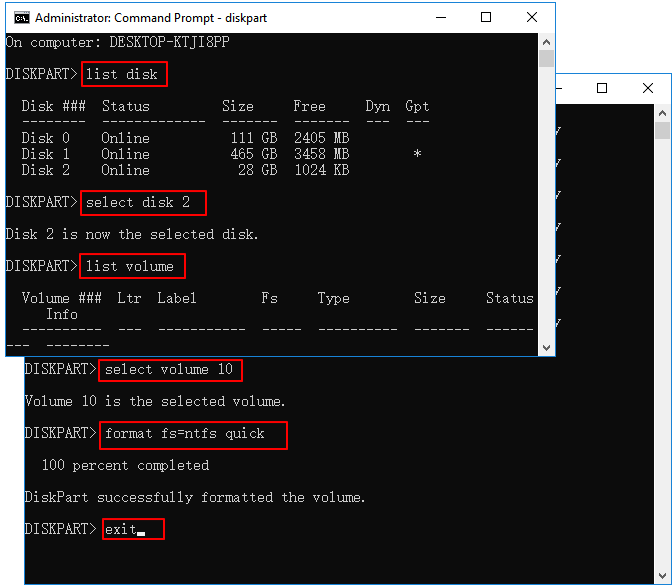
Option 3: Using the diskpart Command (Advanced)
This is a powerful command-line tool. Use it with caution.
- Type “cmd” in the Windows search bar, right-click “Command Prompt,” and select “Run as administrator.”
- Type
diskpartand press Enter. - Type
list diskand press Enter to see all drives. Identify your SD card by its size (BE CAREFUL TO CHOOSE THE RIGHT ONE). - Type
select disk X(where X is your SD card’s number) and press Enter. - Type
cleanand press Enter to wipe the card completely. Then, you can create a new partition and format it.
How to Format an SD Card on an Android Phone
This process is very simple and integrated into the Android system.
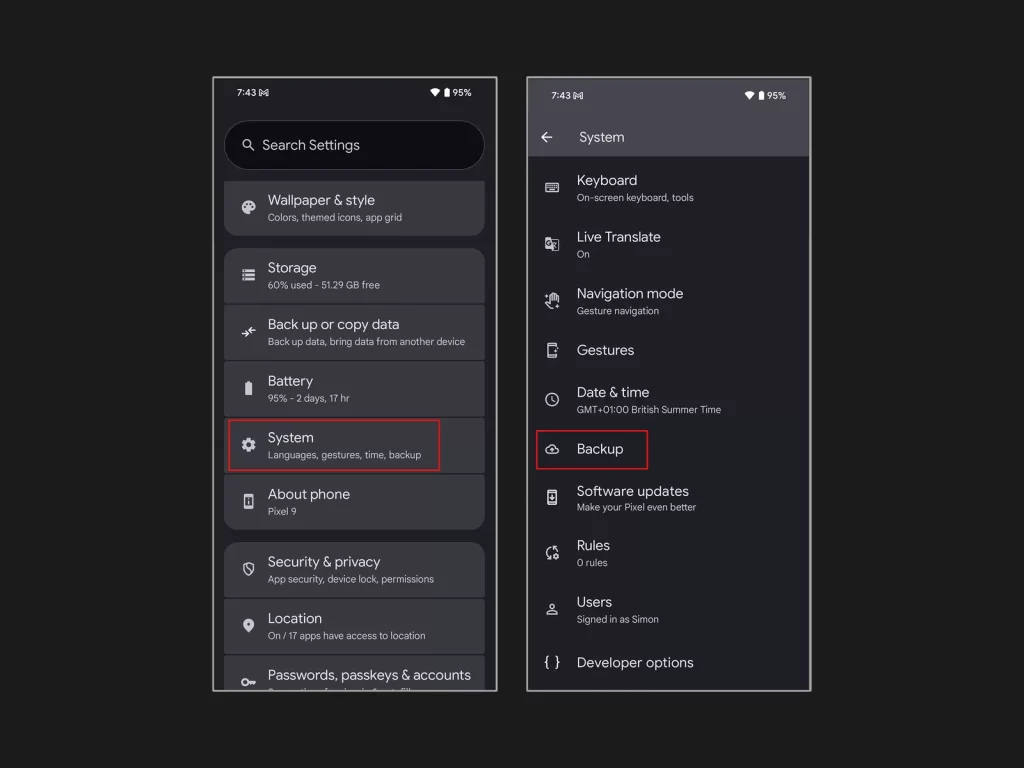
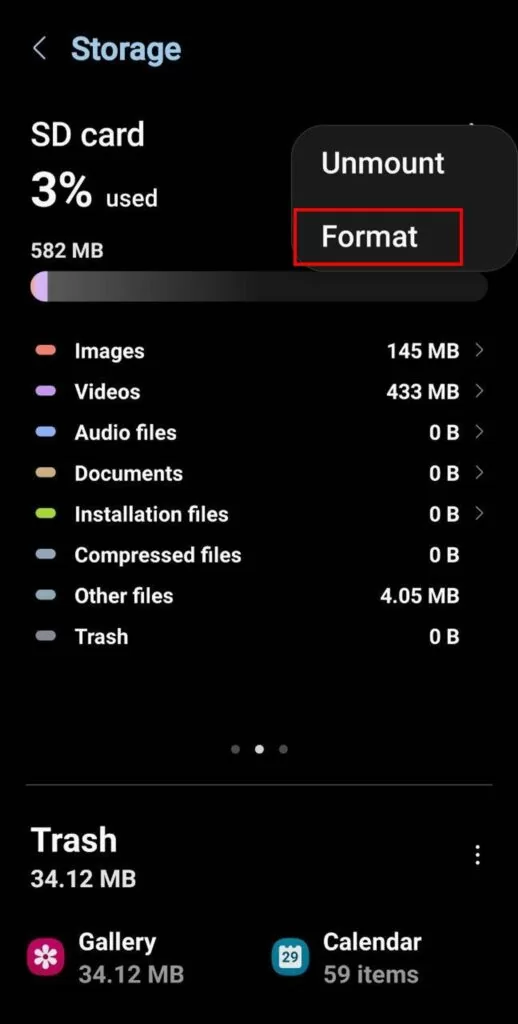
- Go to Settings > Device care > Storage.
- Tap on your SD card.
- Tap the three-dot menu in the top right and select Format or Format as portable.
- Confirm by tapping Format SD card.
Recovering Data After Accidental Formatting
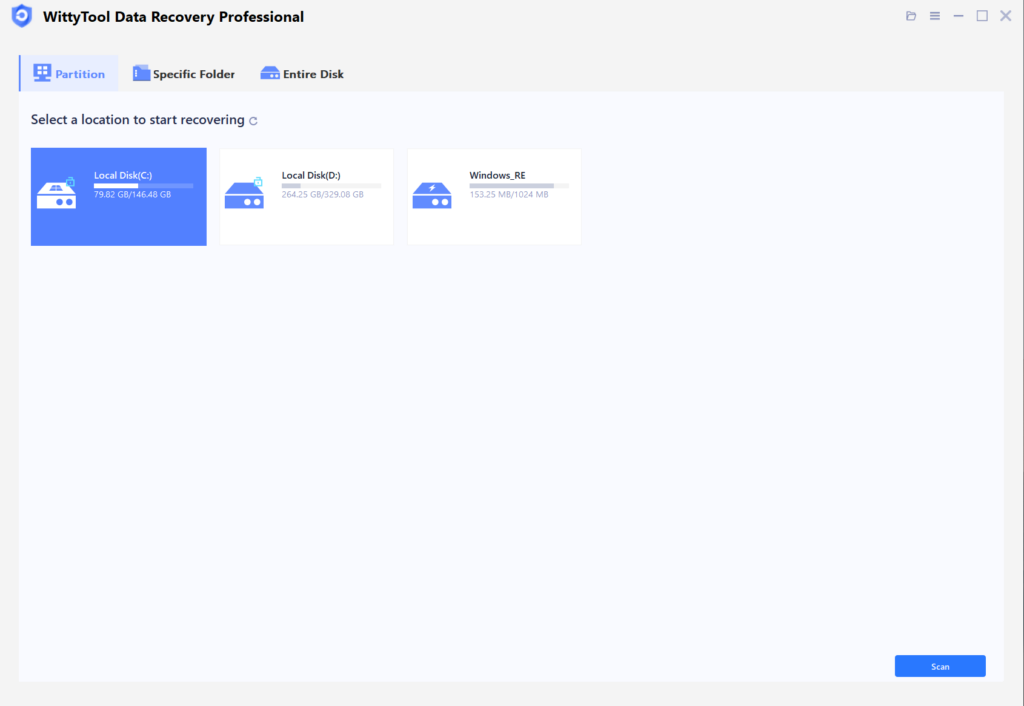
Made a mistake and formatted without a backup? Don’t panic. Stop using the card immediately to prevent overwriting data. You can use data recovery software like Wittytool Data Recovery.
For instructions on how to perform a formatted recovery, please refer to the video and text steps below:
Step 1: Start by launching Wittytool Data Recovery. Once open, select the specific hard drive partition that was accidentally formatted and click the ”Scan” button.
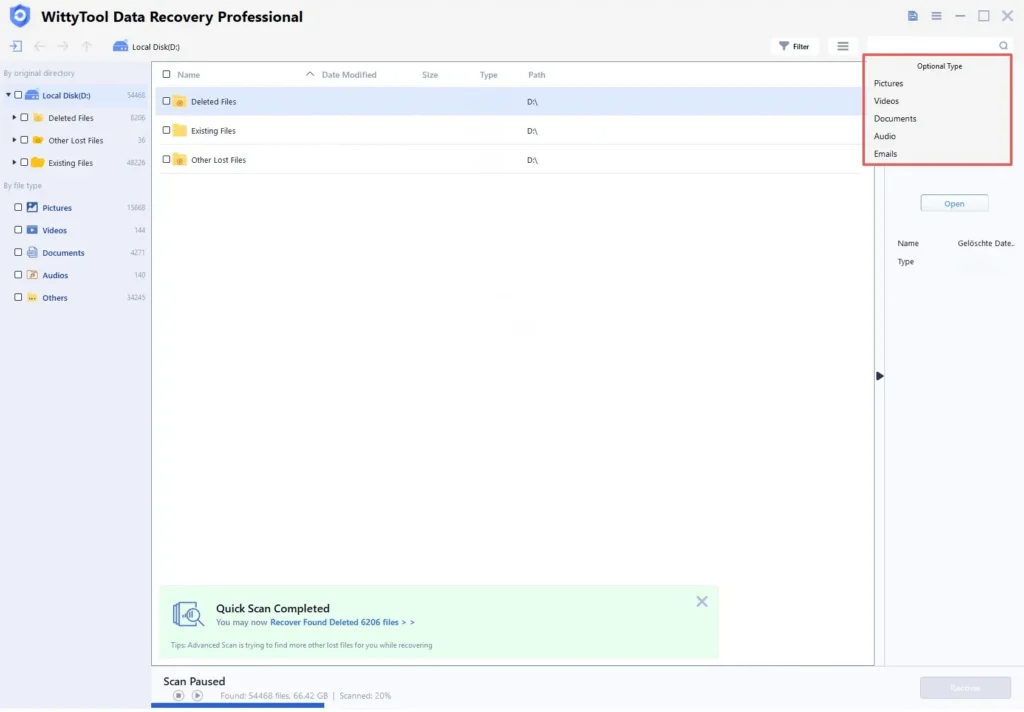
Step 2: Let WittyTool do the heavy lifting with a comprehensive Quick and Deep Scan. Spotted your files early? Just pause and jump straight to the next step. You can use the Filter tool to sort by file type or the Search bar for a direct hit. Select the files you need, and you’re ready for recovery!
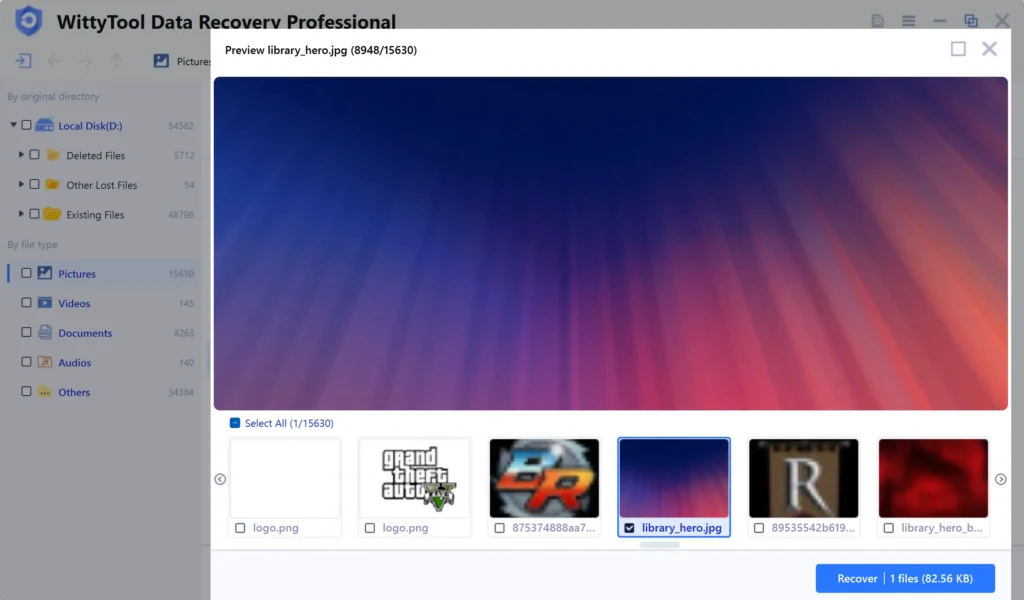
Step 3: You can preview the files to verify they are intact. Next, simply click the ”Recover” button. A dialog will appear asking you to choose a safe location (ideally on a different drive from the one being recovered) to save the files; select the desired location and confirm by clicking ”OK”.
What Really Happens When You Format an SD Card?
Formatting is not just about erasure. It primarily initializes the card with a new file system (like FAT32 or exFAT), which is like creating a new, empty library catalog for your data. It marks the space as available but doesn’t necessarily wipe the old data bits until new data needs the space. This is why a formatted hard drive recovery is sometimes possible, but it’s never a guarantee.
Frequently Asked Questions (FAQ)
Q: How can I be 100% sure my backup worked?
A: After creating the backup, open the destination folder and spot-check a few files, especially the largest ones like videos, to ensure they open and play correctly.
Q: What’s the difference between “Copy-Paste” and “Clone”?
A: Copy-paste duplicates your visible files. Cloning creates an exact sector-by-sector image of the entire card, including hidden system files and the folder structure, making it a more robust backup.
Q: Can I format an SD card without losing data?
A: No. Formatting, by definition, will make existing data inaccessible. Always back up first.
Q: My SD card is write-protected. How can I format it?
A: Check the physical lock switch on the side of the SD card adapter and slide it to the unlock position.
Q: How often should I format my SD card?
A: There’s no set rule, but formatting a card in the device you use it most in (e.g., your camera) every few months can help prevent file system errors and maintain performance. Always back up first!