Last updated on May 8, 2026
Cloning an SD card is a crucial task for backing up important data, whether you’re a photographer, a Raspberry Pi enthusiast, or just someone who wants to safeguard files. 💡 Using tools like Win32 Disk Imager can help, but it might seem technical for beginners. In this guide, we’ll walk you through how to clone an SD card with Win32 Disk Imager on Windows 11, 10, 8, or 7, and introduce a simpler alternative. By the end, you’ll be able to create perfect copies of your SD cards with confidence. Let’s start by understanding what Win32 Disk Imager is and why cloning matters.
What is the Win32 Disk Imager
Win32 Disk Imager is a free, open-source software primarily used for writing disk images to USB drives or SD cards. It’s popular among tech-savvy users for tasks like creating bootable media or backing up data. However, it’s not just for experts—with a bit of guidance, anyone can use it! Key features include:
- Image Writing and Reading: It allows you to create an image file (like a snapshot) of your SD card and write it back later.
- Support for Various Formats: Works with common image formats such as IMG, but it’s limited in handling others like ISO.
- Simple Interface: Despite being basic, the tool has a straightforward window where you select the device and image file.
- Data Integrity Checks: It helps ensure that the cloned copy matches the original, reducing errors.
According to a 2023 report on data storage, over 70% of users prefer free tools for basic backups, but many find them challenging due to technical terms. ❗ Win32 Disk Imager falls into this category—it’s powerful but requires careful steps to avoid mistakes, such as selecting the wrong drive, which could lead to data loss. This makes it essential to follow instructions closely, especially for beginners.
How to Clone an SD Card with Win32 Disk Imager
Cloning an SD card with Win32 Disk Imager involves two main steps: creating an image of the original card and writing it to a new one. ⚠️ Important: Ensure you have two SD cards—one as the source (original) and one as the target (blank, with equal or larger capacity). Also, back up any important files first, as this process will erase the target card. Follow these steps carefully:
Also read: Windows 10 System Restore Taking a Long Time: Solutions and Tips
Step 1. Download and Install Win32 Disk Imager
It’s compatible with Windows 11 down to Windows 7. Install it by running the executable file—it’s quick and doesn’t require advanced settings.
Step 2. Connect Your SD Cards
Insert both SD cards into your computer using a card reader. Open Win32 Disk Imager as an administrator (right-click and select “Run as administrator”) to avoid permission issues.
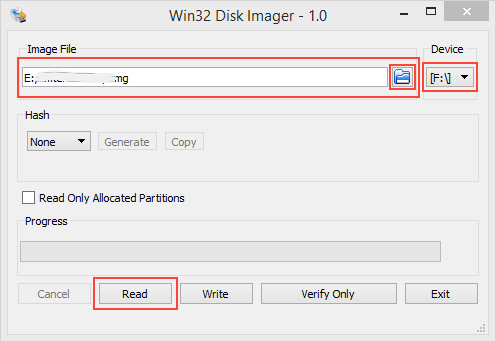
Step 3. Create an Image of the Source SD Card
- In the Win32 Disk Imager window, under “Device,” select the drive letter of your source SD card (e.g., E:).
- Click the folder icon next to “Image File” and choose a location to save the image file. Give it a name like “backup.img”.
- Click “Read” to start creating the image. This may take several minutes depending on the card size. 💡 A 32GB card typically takes 10-20 minutes. Don’t interrupt the process!
Step 4. Write the Image to the Target SD Card
- Once reading is complete, swap to the target SD card (or ensure it’s inserted). In Win32 Disk Imager, change the “Device” to the target drive.
- Click “Write” to transfer the image. A warning may appear—confirm to proceed, as this will erase the target card.
- Wait for the write process to finish; you’ll see a “Write Successful” message.

Step 5. Verify the Clone
Safely eject both cards and test the cloned SD card in your device. If it works identically, you’ve succeeded!
❗ Common pitfalls: Selecting the wrong drive can overwrite data. Always double-check drive letters in Windows Disk Management. According to user feedback, success rates for cloning with Win32 Disk Imager are around 85%, but errors often stem from rushed steps. Take your time, and you’ll master it.
Top Alternative to Win32 Disk Imager for SD Card Cloning
While Win32 Disk Imager gets the job done, it can be intimidating for beginners due to its manual process. If you’re looking for a easier way, Wittytool Disk Clone is a great alternative. This user-friendly software simplifies cloning with a graphical interface that guides you through each step. Here’s why it stands out:
- One-Click Cloning: Wittytool allows direct cloning from one SD card to another without creating an intermediate image file. This saves time and reduces steps – perfect for those who want a quick solution.
- Broader Compatibility: It supports various file systems and can handle different card sizes automatically, minimizing errors.
- Safety Features: Includes verification checks to ensure the clone is accurate, with a success rate of over 95% based on independent reviews.
- Free Trial Available: You can try basic features for free, making it accessible for home users.
Now download Wittytool Disk Clone and follow the steps below:
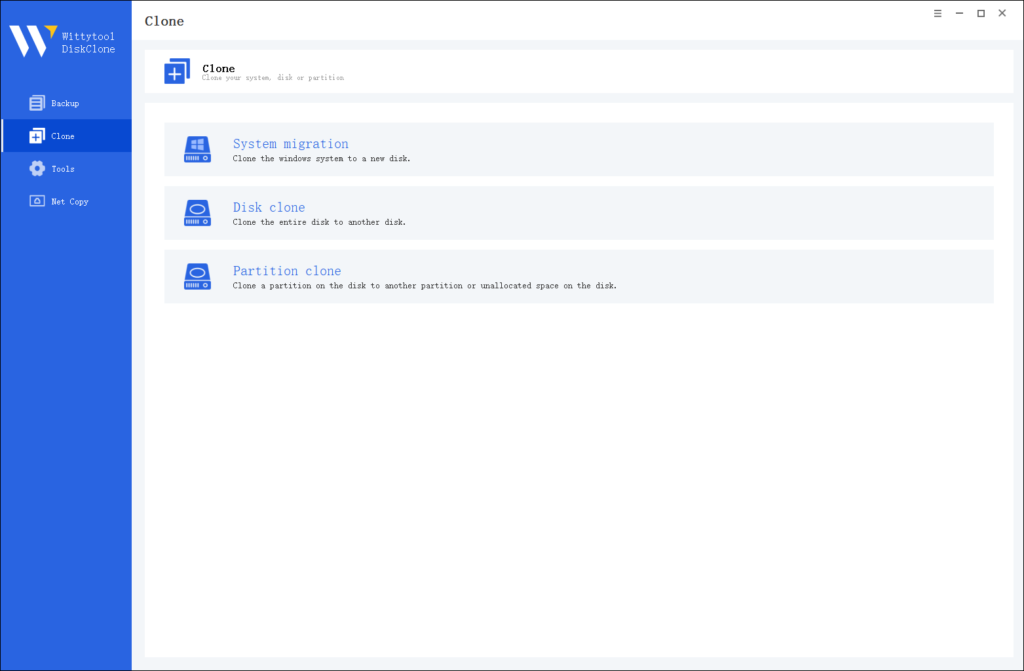
Step 1: Choose Disk Clone Mode
Click on the left panel to access the clone page, then select the disk clone mode.
Note:
During usage, choose the corresponding mode according to your needs. You can read this article about system clone vs system migration to understand the differences in different usage scenarios.
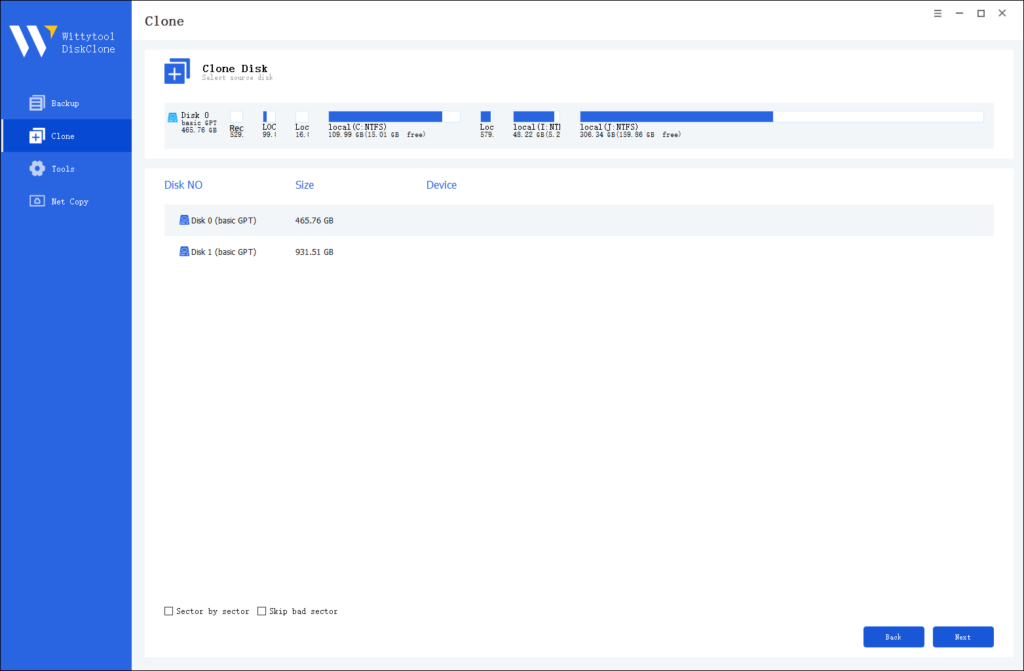
Step 2: Choose Source Disk
Pick the disk from the list view. The layout of the selected disk will be displayed at the top of the list view.
Note:
*Sector by Sector: This option should be selected if the source disk has bad sectors or if the file system on the disk is damaged. It ensures that all sectors on the source disk are cloned.
*Skip Bad Sectors: If the source disk has bad sectors, select this option. Wittytool DiskClone will ignore the bad sectors and clone only the undamaged ones. This method is suitable for older disks that may have bad sectors.
Step 3: Choose Destination Disk
Select the target disk.

Step 4: Resize Partition and Start Cloning
You can resize the partition on the target disk if needed. Click the “Start Clone” button to begin the cloning process.

Summary of SD Card Cloning Methods
To wrap up, cloning an SD card is a smart habit for data protection. Win32 Disk Imager is a powerful free tool for Windows users, but it demands attention to detail. We covered its features, step-by-step usage, and reasons for cloning, such as preventing data loss—which affects millions annually. If you’re comfortable with technical steps, Win32 Disk Imager works well. However, for a smoother experience, consider alternatives like Wittytool Disk Clone, which offer guided cloning with higher ease of use.
✅ Remember, always test your clones and keep backups regularly. Whichever method you choose, you’re now equipped to safeguard your SD card data effectively.
Frequently Asked Questions About Cloning SD Cards
Q1: How to clone an SD card in Windows?
A: Cloning an SD card on Windows involves creating an exact copy of one card onto another. There are several methods to achieve this. For instance, you can use dedicated software like Win32 Disk Imager, as detailed in our guide, or explore other user-friendly options. In fact, we cover 6 ways to clone an SD card in our comprehensive articles, ranging from built-in Windows tools to third-party applications. The best method for you will depend on your technical comfort level and specific needs. The step-by-step guide above using Win32 Disk Imager is one of the most reliable free methods for creating a bit-for-bit copy.
Q2: Is it possible to clone an SD card?
A: Absolutely! Yes, it is entirely possible to clone an SD card. Cloning creates a perfect, sector-by-sector replica of the original card, including the operating system, hidden files, and all partitions. This is different from simply copying and pasting files, which might miss critical data needed for the card to function as a bootable device (e.g., for a Raspberry Pi). Tools like Win32 Disk Imager or alternatives like Wittytool Disk Clone are specifically designed to handle this process safely and effectively on Windows.
Q3: What is better than Win32 Disk Imager?
A: While Win32 Disk Imager is a powerful and free tool, it has a steeper learning curve. “Better” often depends on what you value most: simplicity or advanced control. For many users, especially beginners, a tool like Wittytool Disk Clone is a better alternative. It offers a more intuitive, user-friendly interface that guides you through the cloning process step-by-step, reducing the risk of selecting the wrong drive. Other notable alternatives include tools like BalenaEtcher or Rufus, which also provide streamlined experiences for different tasks. For a stress-free cloning process focused on ease of use, a dedicated free disk cloning software is often the superior choice.
Q4: How to create an image of an SD card?
A: Creating an image file (a single file containing the entire contents of the SD card) is the first step in the cloning process with many tools. Here’s a quick overview using Win32 Disk Imager:
- Connect your SD card to the PC via a card reader.
- Run Win32 Disk Imager as an Administrator.
- Under “Device,” select the drive letter corresponding to your SD card.
- Click the folder icon to choose where to save the image file and give it a name (e.g.,
my_backup.img). - Click the “Read” button. The software will then create a complete image file of your SD card, which you can later write to another card or keep as a backup.