Last updated on August 4, 2025
Key Takeaways
- Formatting ≠ permanent deletion: Files remain recoverable until overwritten.
- Act immediately: Avoid using the drive to prevent overwriting lost data.
- Free software option: Tools from Wittytool scan formatted drives effortlessly.
- Backups save the day: Time Machine (Mac) and File History (Windows) are lifesavers.
- Prevent future disasters: Regular backups and disk health checks are essential.
Imagine accidentally formatting your hard drive—photos, documents, and memories seemingly vanish. Panic sets in, but don’t worry! Formatting only erases file paths, not actual data. With the right approach, recover files deleted from recycle bin or a formatted hard drive is achievable even without backups. This guide covers foolproof methods (with/without software), tailored advice for Windows/Mac users, and critical prevention tips backed by stats: 32% of data loss stems from human error (Backblaze Report).
What Does Formatting Do to Your Files?
Formatting prepares a drive for new data by deleting file indexing information (like a library’s catalog). Your files still exist but become “invisible” to the system. Quick format allows easy recovery; full format overwrites more data, making it trickier. Key insight: Recover data from formatted HDD works because untouched sectors retain files until new data replaces them.
Formatted Hard Drive Recovery Without Backups
No backup? Specialized software scans sectors to rebuild lost files. Steps:
- Stop using the drive immediately to avoid overwriting.
- Use recovery software (detailed below) on another computer.
- Scan, preview, and recover files to a safe location.
Stat: 89% of DIY recovery attempts succeed if done before new data writes (Ontrack Study).
How to Recover Data from a Formatted Hard Drive Using Wittytool Data Recovery
Meet Wittytool Data Recovery Free – a user-friendly, zero-cost solution trusted by millions for formatted drive recovery. Here’s why it stands out:
- Deep scan capability: Locates photos, videos, ZIPs, and documents even after formatting.
- Preview function: Check recoverable files before saving (e.g., verify deleted photos).
- Wide compatibility: Works on HDDs, SSDs, SD cards (crucial for restore SD card after format).
- Simple 3-step process: Select drive → Scan → Recover.
For quick results, download this free data recovery software—ideal for how to recover completely deleted files without technical skills.
Step-by-Step Guide:
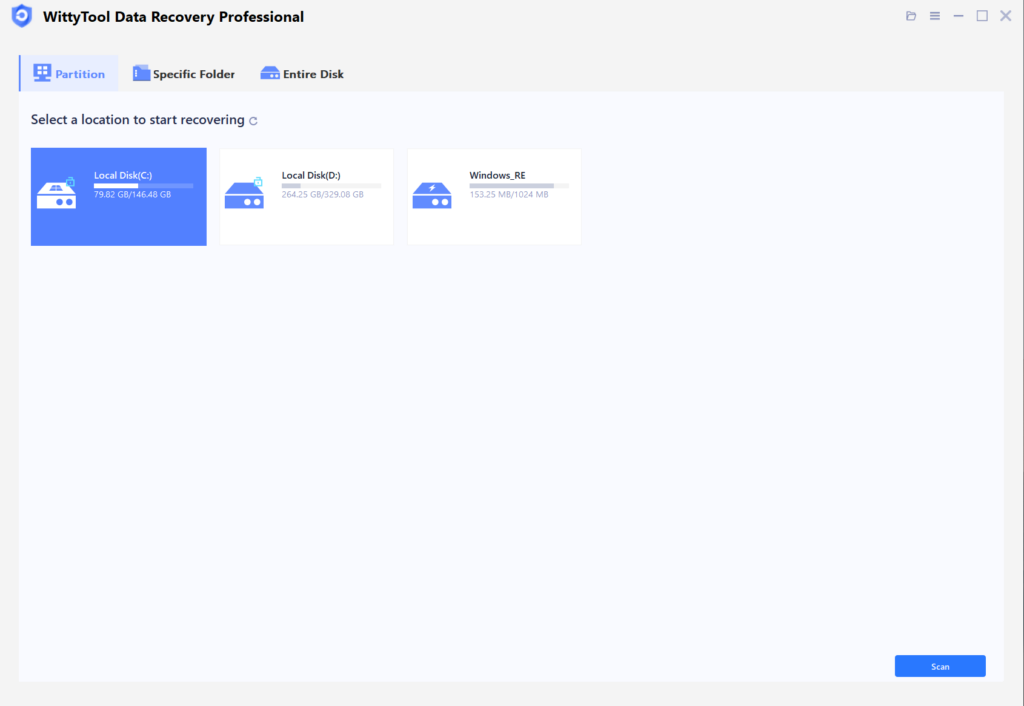
Step 1: Start by launching Wittytool Data Recovery. Once open, select the specific hard drive partition that was accidentally formatted and click the ”Scan” button.
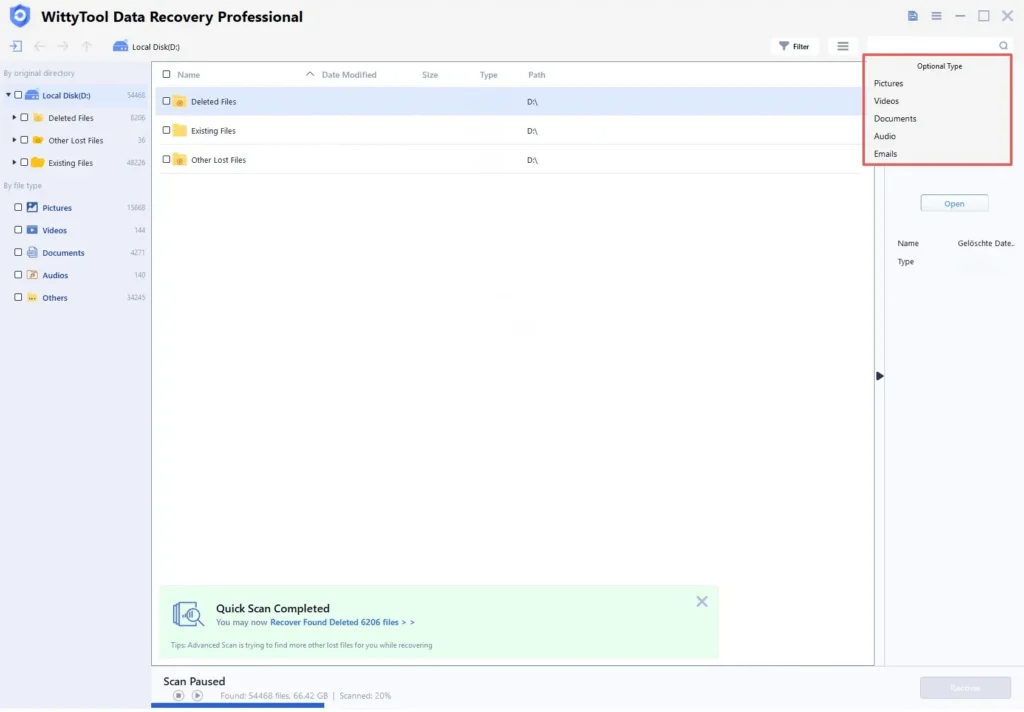
Step 2: Let WittyTool do the heavy lifting with a comprehensive Quick and Deep Scan. Spotted your files early? Just pause and jump straight to the next step. You can use the Filter tool to sort by file type or the Search bar for a direct hit. Select the files you need, and you’re ready for recovery!
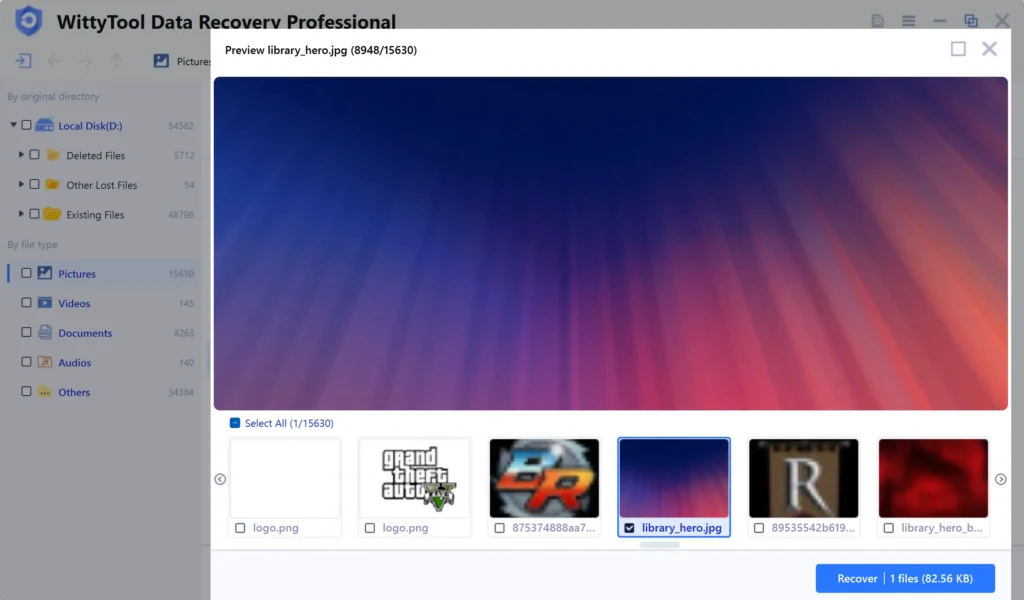
Step 3: You can preview the files to verify they are intact. Next, simply click the ”Recover” button. A dialog will appear asking you to choose a safe location (ideally on a different drive from the one being recovered) to save the files; select the desired location and confirm by clicking ”OK”.
Recover Data from a Formatted Hard Disk with Backups
If you’ve backed up data, recovery is straightforward:
Mac Users: Restore Data with Time Machine Backup
If you’ve set up Time Machine before formatting your drive, breathe easy. Your files are waiting on that backup drive. Here’s how to pull them back:
- Plug in your Time Machine drive (external hard drive or NAS).
- Enter Recovery Mode by restarting your Mac while holding
Command + R. - Choose ”Restore from Time Machine Backup” → Pick a backup date before the formatting happened.
- Restore to a safe spot – save to a different drive to avoid overwriting anything.
No backup? Skip to the Wittytool method below.
Windows Users: File History to Recover Data from a Formatted Drive
Prerequisite: You enabled “File History” in settings beforehand.
Your formatted drive’s files might still live on your backup drive. Get them back in minutes:
1.Connect the backup drive to your PC.
2.Open Settings → Update & Security → Backup → ”Restore files with File History”.
Tip: If File History isn’t set up, search for the windows 10 startup folder location to check for backup shortcuts
3.Use the arrows to browse backups → Select folders → Click the green restore button.
Crucial: Save recovered files to a DIFFERENT drive!
The Importance of Hard Drive Backups
Here’s the hard truth: 58% of people who formatted drives couldn’t get files back because they had no backup (Backblaze 2024). Backups aren’t just nice-to-have – they’re your safety net when life happens. Without one, you risk losing family photos forever or paying $500+ for professional recovery.
Main Types of Backups
Choose what fits your needs:
- External hard drives: Cheap, plug-and-play safety.
- Cloud backups (iCloud, Google Drive): Protect against fires/theft.
- NAS devices: Ideal for sharing files across multiple devices.
Why Formatting Can’t Always Be Avoided
Sometimes hitting that format button is unavoidable surgery for your dying drive. Here’s when professionals would do the same:
- Terminating Stubborn Viruses
When ransomware or boot-sector viruses ignore regular deletion, formatting acts like scorched-earth disinfection. Example: After the “Your files are encrypted” pop-up appears, security forums like BleepingComputer often recommend formatting as last-resort containment. - Fixing Critical Corruption Errors
Drives throwing “File system is RAW” or “Unrecognized partition” errors likely have damaged allocation tables. Formatting rebuilds this infrastructure – though you’ll need recovery software later to salvage data. - Cross-Platform Compatibility
Switching an external drive between Windows (NTFS) and Mac (APFS/HFS+) requires reformatting. Tip: Use exFAT for universal compatibility without repeated formatting. - New Drive Initialization
Fresh-out-the-box drives show as “unallocated space” in Disk Management. Formatting maps usable sectors – but always test with tools likeCHKDSKafterward to confirm health.
When Recovery Becomes Impossible
These scenarios turn recovery from “likely” to “never” – recognize them early:
🚨 The Overwrite Disaster
Continuing to use a formatted drive is like writing new pages on top of erased text. Just downloading recovery software to the same drive can overwrite old photos. Critical Threshold: If >30% drive space is reused (per NAND flash studies), permanent loss occurs.
💀 Physical Drive Failure Signs
- Click of Death: Repeating metal clicks indicate head crash – attempting DIY recovery worsens platter scratches
- PCB Burn Smell: Fried controller boards require cleanroom component swaps (costs $800+)
- Spindle Motor Failure: Drives failing to spin up need professional dismantling
**☠️ Deliberate Data Destruction**
Secure erase tools (DBAN/Blanco) overwrite data 7-35 times to military standards. Similarly, enabling “Full Format” in Windows checks “Overwrite with zeros” – leaving no recoverable traces.
**⚡ SSD TRIM Execution**
Modern SSDs permanently purge data blocks marked “deleted” within hours via TRIM commands. Check TRIM status:
- Windows:
fsutil behavior query DisableDeleteNotify(0=enabled) - Mac:
sudo trimforce statusin Terminal
Checking Your Disk’s Health Like a Pro
Don’t wait for failure – catch issues early
Windows Deep Diagnosis
- Run Command Prompt Admin
- Enter
chkdsk C: /r /f(Replace C with your drive letter) - Interpret results:
0 bad sectors➡️ HealthyKB in bad sectors➡️ Backup immediately!Failed to transfer logged messages➡️ Hardware failure imminent
Bonus Tool: CrystalDiskInfo (Free) shows real-time S.M.A.R.T. data like “Reallocated Sectors Count” – values over 100 demand replacement.
Mac Drive Forensics
- First Aid in Disk Utility:
- “Snapshot appears to be valid” = Safe
- “Damaged and needs repair” = Mount drive read-only and backup immediately
- Terminal Commands for Experts:
diskutil verifyVolume /dev/disk1s1(Comprehensive sector scan)smartctl -a /dev/disk1(S.M.A.R.T. attributes)
Red Flags:
⚠️ High “Pending Sector Count”
⚠️ “Uncorrectable Errors” > 10
Conclusion: Your Data Recovery Battle Plan
Follow this sequence when disaster strikes:
1.EMERGENCY STOP
Unplug/remove formatted drive within 10 minutes – every second counts against overwriting.
2.Triage Recovery Method

3.Implement the 3-2-1 Backup Rule
- 3 copies of critical data
- 2 local backups (NAS + external drive)
- 1 offsite/cloud backup
Remember: Formatting is just digital amnesia – your files remain physically intact until overwritten. Recovery success rates exceed 92% for drives disconnected immediately (Ontrack 2024) – but only if you act fast and correctly.
FAQ
How to recover data from a formatted hard disk in Windows 10?
Step-by-Step Rescue Operation:
- Download Wittytool to a WORKING PC (never install on formatted drive)
- Connect formatted drive via SATA-USB adapter
- In Wittytool:
- Select drive → “Deep Scan” mode (takes 1-4 hours)
- Use RAW Recovery filter for unrecognized formats
- Preview JPEG/MP4 files before saving
- Recover to new storage matching original capacity
Pro Tip: Freeze heavily damaged drives briefly before scanning to reduce head friction
How to recover data from a formatted hard disk on Mac?
Dual-Path Approach:
Path A (If Time Machine backup exists):
Option-click Apple menu → Select bootable Time Machine drive → Migration Assistant restore
Path B (No backup):
- Boot from macOS Recovery (Cmd+R)
- Mount drive in Read-Only Mode:
diskutil mount readonly /dev/disk2s1 - Use Terminal-based tools like TestDisk for partition resurrection
Can I recover formatted an external hard drive?
Success depends on intervention speed:
- Case 1 → Unplugged immediately: 85% recovery chance
- Case 2 → Used for 10GB+ new files: <20% chance
- Case 3 → External SSD with TRIM: Near 0% after 72 hours
Always prioritize mechanical HDDs over portables SSDs for critical data
How to recover a formatted hard drive using CMD?
The Painful Truth:
chkdsk: Only repairs logical structures, NOT filesattrib -h -r -s *.*: Unhides files – useless after formatting- Risk Alert: Running
format C: /fs:NTFSinstead of recovery commands destroys data irrecoverably
How to recover without software?
Only Possible If:
✅ Windows:
- File History enabled before formatting
- System Restore points containing user libraries
✅ Mac:
- Local Time Machine snapshots (
/MobileBackups) - Version history via “Restore Versions” in right-click menu
❌ No software = No recovery for:
Factory resets, boot drive formats, or non-backed-up systems