Last updated on May 8, 2026
Upgrading your ASUS laptop from a traditional hard disk drive (HDD) to a solid-state drive (SSD) is one of the most effective ways to breathe new life into your device. 💡 According to a comprehensive 2024 performance review by PCMag, upgrading to an SSD can result in up to 10x faster data access speeds and reduce system boot times from minutes to mere seconds. However, the thought of transferring your operating system, applications, files, and settings can be intimidating. Many users worry about the risk of data loss during the process.
This guide is specifically designed for ASUS laptop owners, especially those with limited technical experience, and will walk you through the entire process of disk cloning—a method that creates a perfect, bootable copy of your old drive onto the new SSD, ensuring you don’t lose anything.
TL;DR
In a hurry? Here’s the essential takeaway:
- The Goal: To create an exact, byte-for-byte copy (a “clone”) of your ASUS laptop’s existing hard drive onto a new Solid-State Drive (SSD).
- The Key Tool: Use reliable SSD cloning software. For most users, especially beginners, Wittytool Disk Clone offers an excellent balance of simplicity, power, and safety.
- The Critical Step: ❗ Always backup your important data to an external drive or cloud service before starting the cloning process. This is your safety net.
- The Result: After swapping the drives, your ASUS will boot from the SSD, running exactly as it did before—but significantly faster, more responsive, and more reliable.
Choosing the Right Disk Cloning Software to Upgrade Your ASUS Hard Drive
Selecting the appropriate cloning tool is the most critical decision you’ll make. The right software simplifies the process, while the wrong one can lead to frustration or data loss. We have objectively evaluated several well-known cloning products to help you make an informed choice.
Evaluation Criteria
We rated each software on a scale of 1 to 5 (5 being highest) based on the following criteria, crucial for non-technical users:
- Ease of Use: Is the interface intuitive and beginner-friendly?
- Feature Set: Does it support features like automatic partition resizing and sector-by-sector cloning?
- Reliability & Safety: Does it include verification steps to ensure the clone is bootable and error-free?
- Value for Money: Is the pricing model fair, and are there good free options?
- ASUS Compatibility: Does it work seamlessly with various ASUS laptop models and a wide range of SSD brands (e.g., Samsung, Crucial, WD)?
Final Result: Our Top Software Recommendation
After thorough evaluation based on the criteria above, here is a comparative overview of the top contenders:
| Software | Ease of Use | Key Features | Cost | Best For |
|---|---|---|---|---|
| Acronis True Image | 4 | Very powerful, integrated backup & cloning, cloud features | Subscription-based | Users wanting an all-in-one backup and cloning suite |
| Clonezilla | 2 | Extremely powerful, open-source, highly customizable | Free | Tech-savvy users and IT professionals comfortable with command lines |
| RescueZilla | 3 | GUI-based front-end for Clonezilla, good for recovery | Free | Users familiar with Linux-like interfaces seeking a free tool |
| Macrium Reflect | 4 | Reliable, good scheduling options, strong feature set | Free & Paid versions | Intermediate users who need advanced backup features |
| Wittytool Disk Clone | 5 | Extremely simple wizard, one-click operation, high success rate | One-time purchase | Beginners and anyone wanting a hassle-free, guaranteed process |
Final Recommendation: For most ASUS users looking for a straightforward, stress-free cloning experience, Wittytool Disk Clone is our top pick. Its interface is designed to prevent user error, which is vital. A 2023 study by data recovery firm Secure Data highlighted that over 60% of disk cloning failures stem from user error during setup. Wittytool’s guided workflow minimizes this risk, making it the safest and easiest choice for a successful upgrade.
A Safer Guide to Cloning Your ASUS HDD to SSD Successfully
Wittytool Disk Clone simplifies the process to clone HDD to SSD. Its user-friendly wizard guides you through each step, making it easy to replace HDD with SSD safely. The software automatically handles partition resizing, which is essential when you need to clone M.2 SSD to M.2 SSD of a different size. With a built-in verification check, it ensures a bootable clone for a successful upgrade every time.This step-by-step guide will walk you through the entire process. ⚠️ Before you begin, ensure you have:
- Your new SSD (with capacity equal to or larger than the usedspace on your current HDD).
- A SATA-to-USB adapter or an external USB enclosure to connect the SSD to your ASUS laptop.
- A full backup of your critical data.
- Your ASUS laptop plugged into a power source.
Then, download the software and follow the steps below:
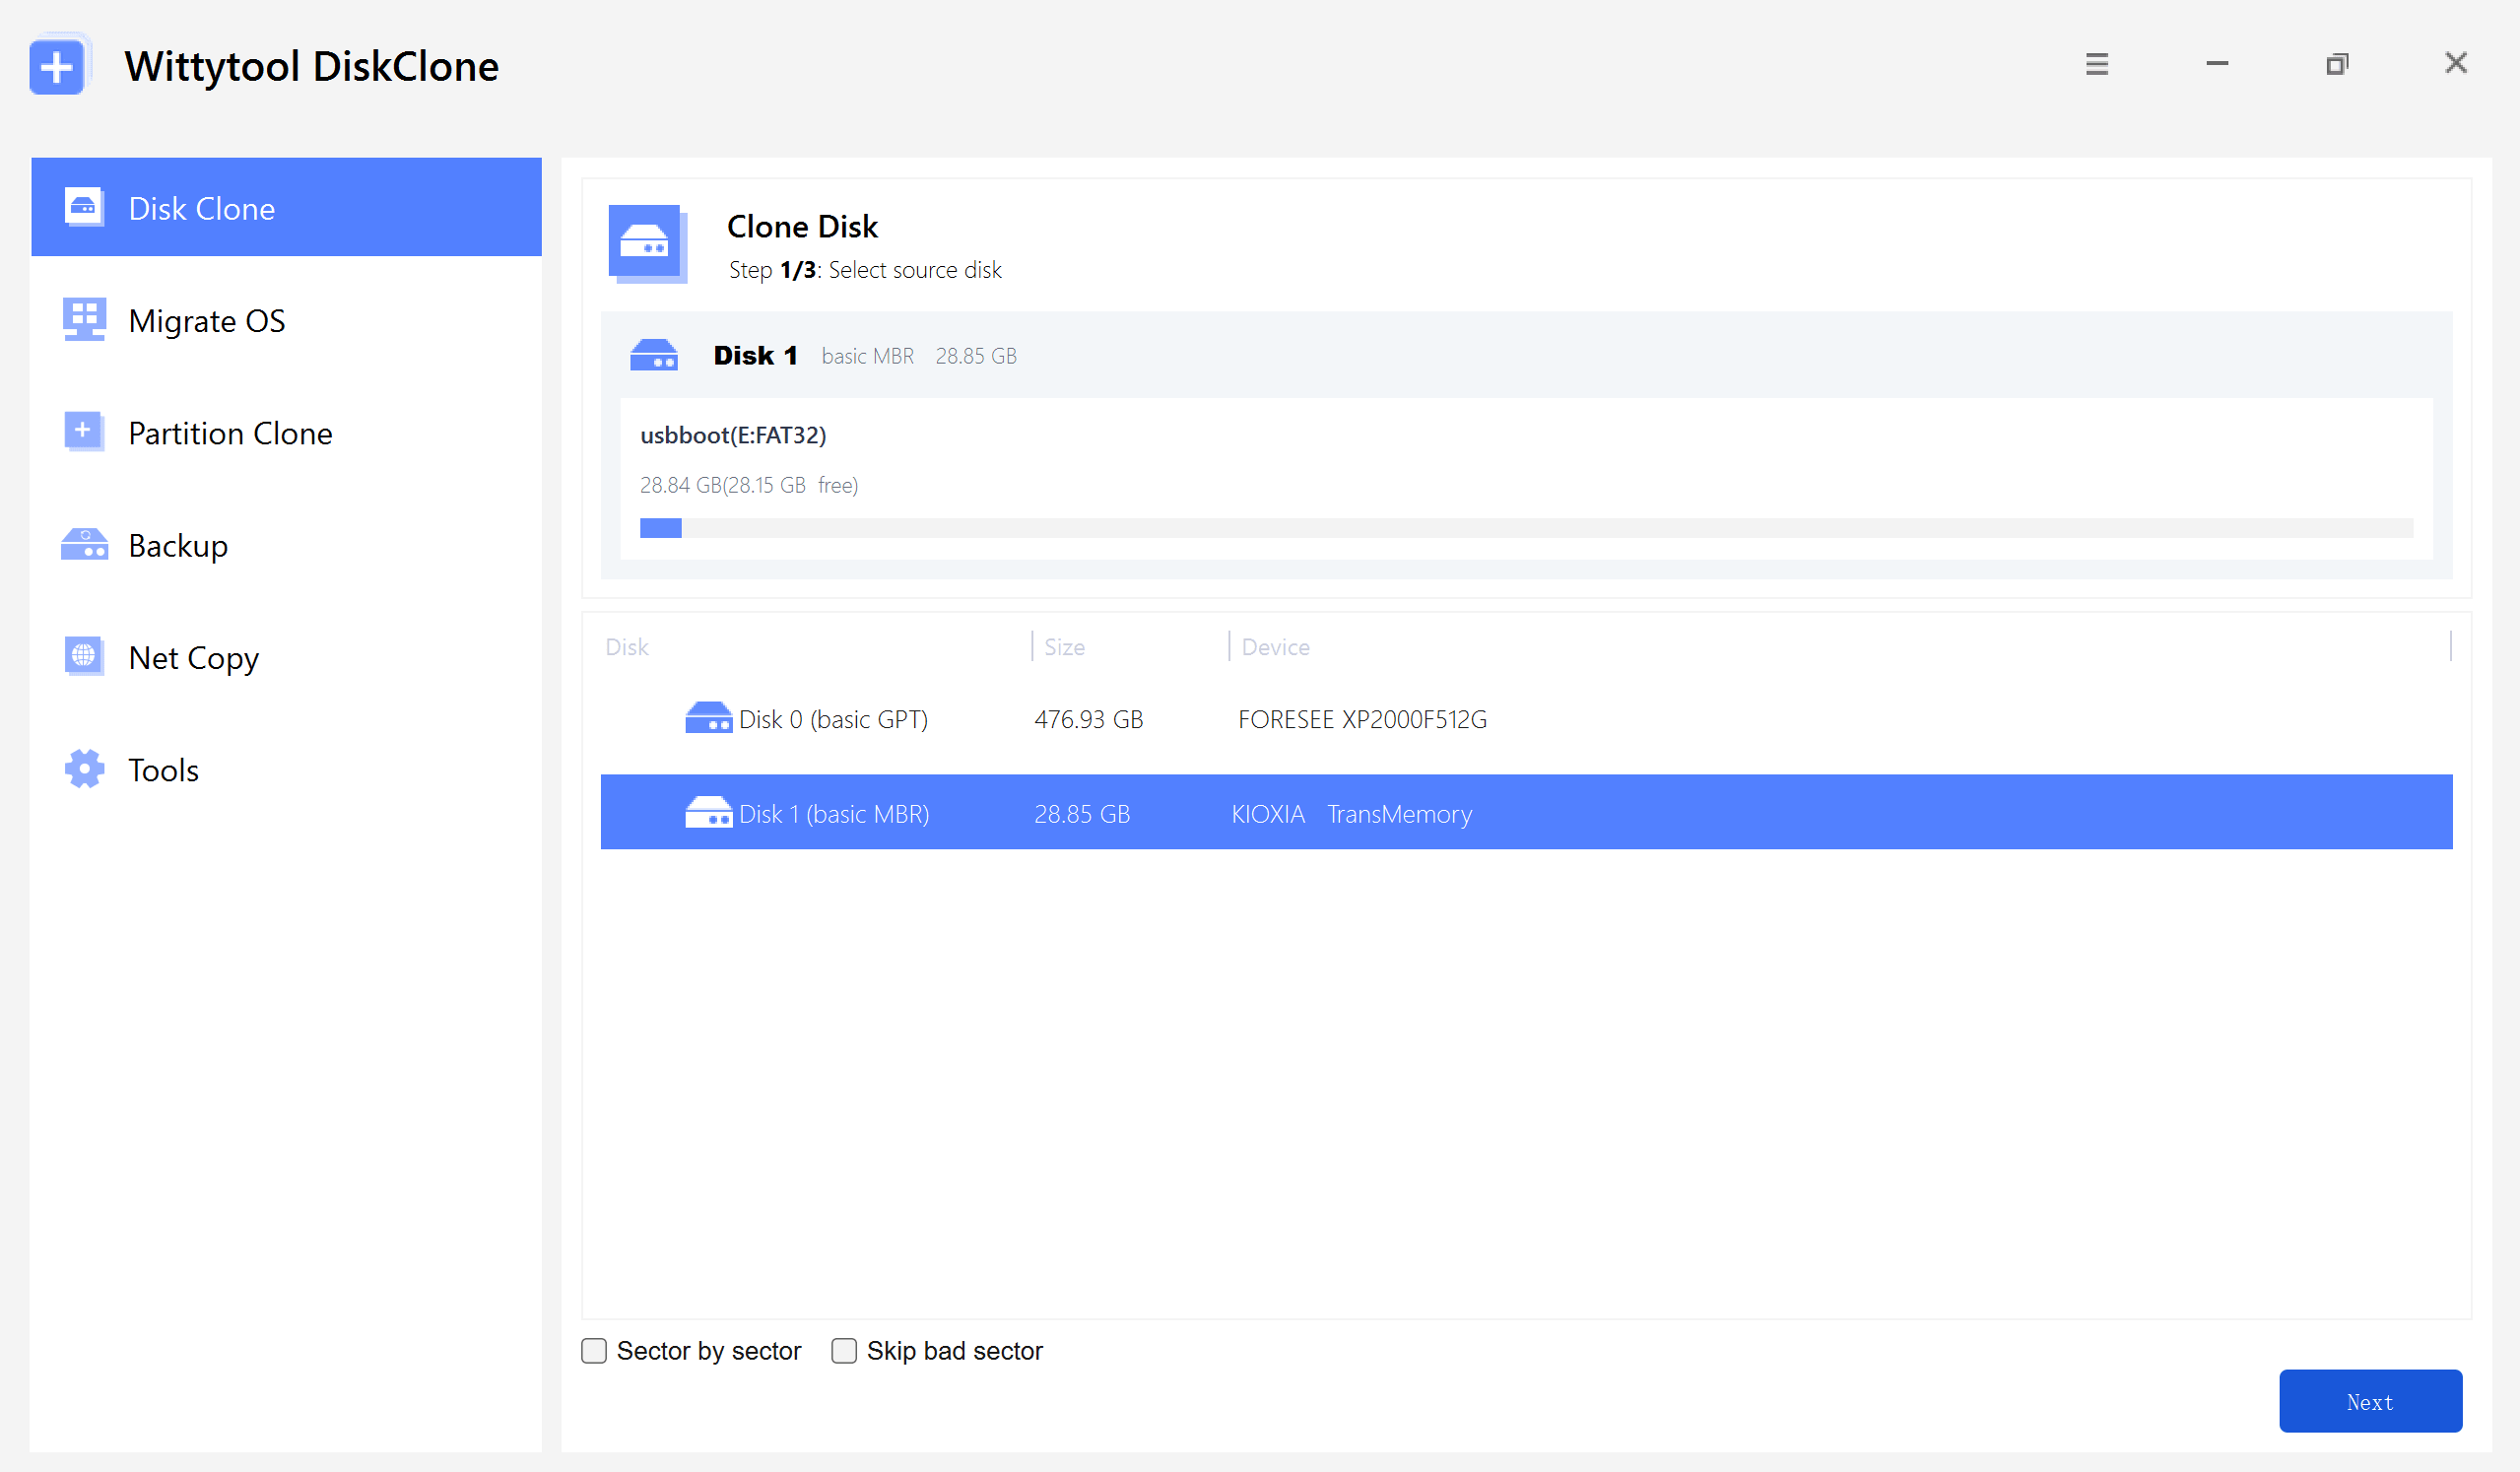
Step 1: Select Disk Clone (or Partition Clone for a nearly identical workflow), then choose your source disk and click Next.
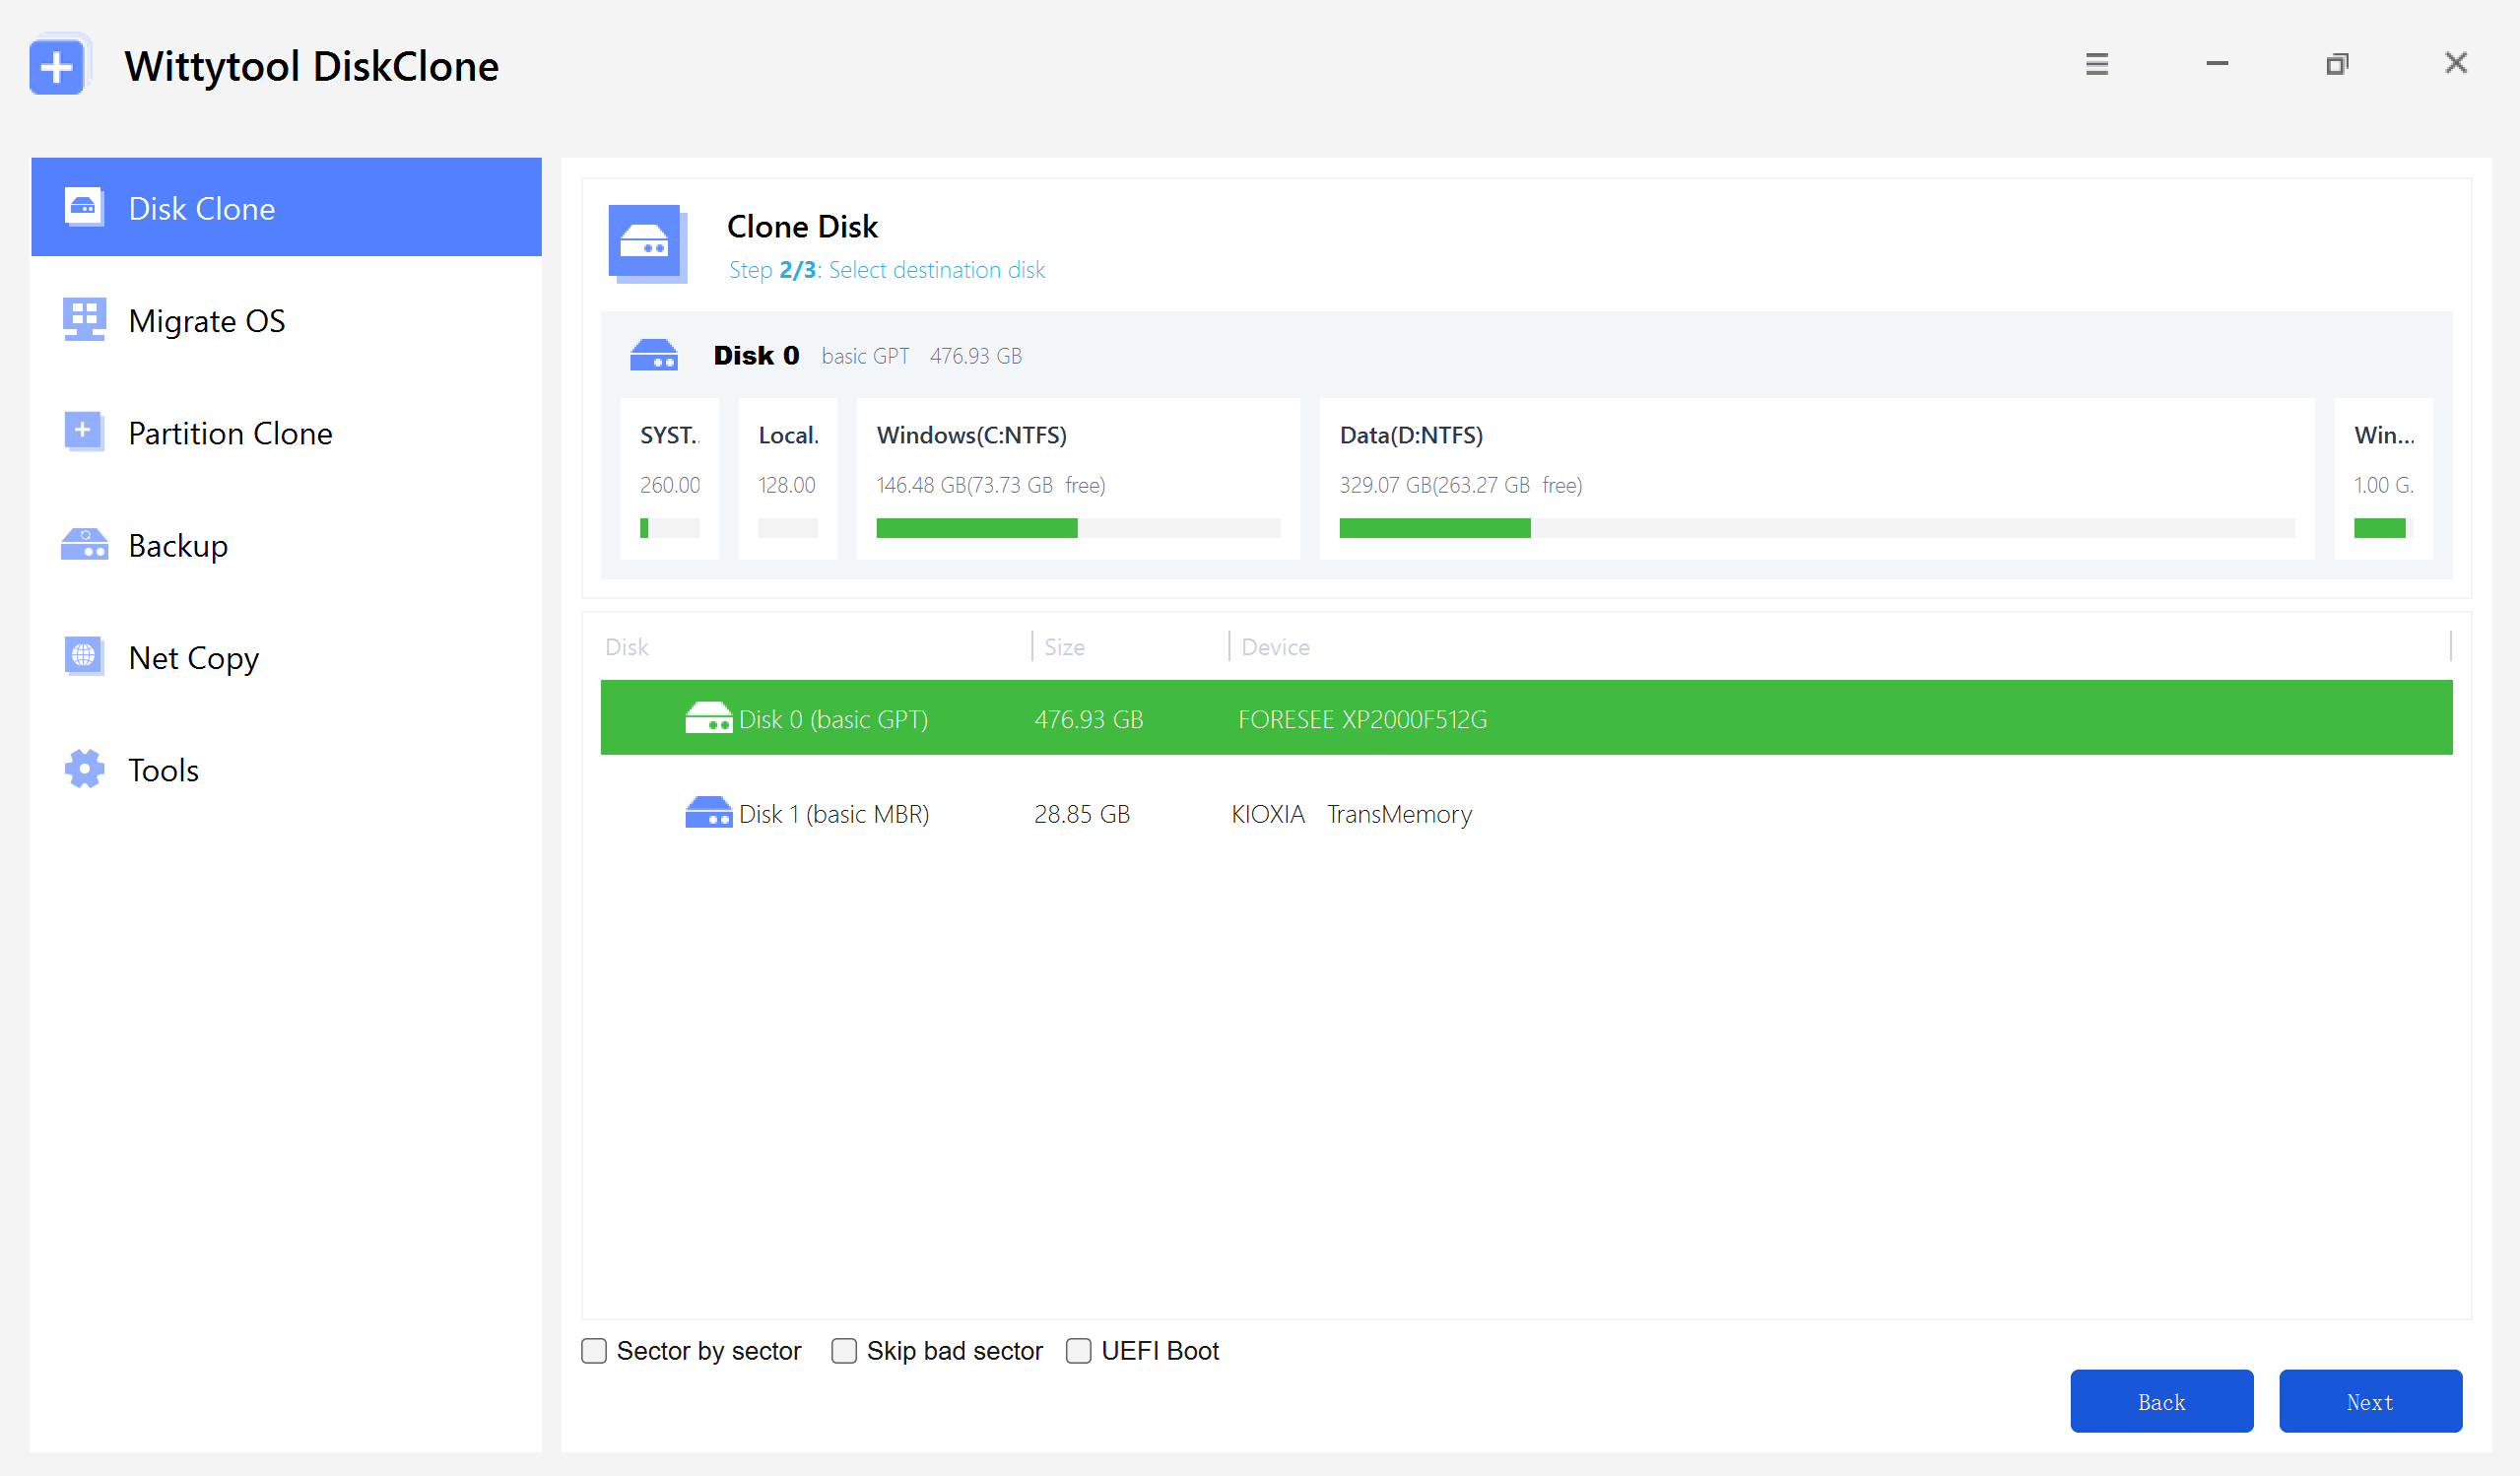
Step 2: Choose your destination disk and click Next to access the configuration settings.
Here, you can enable sector-level cloning, skip bad sectors, or check the UEFI BOOT option to convert the boot mode, ensuring the drive is fully compatible with the UEFI firmware of modern motherboards.
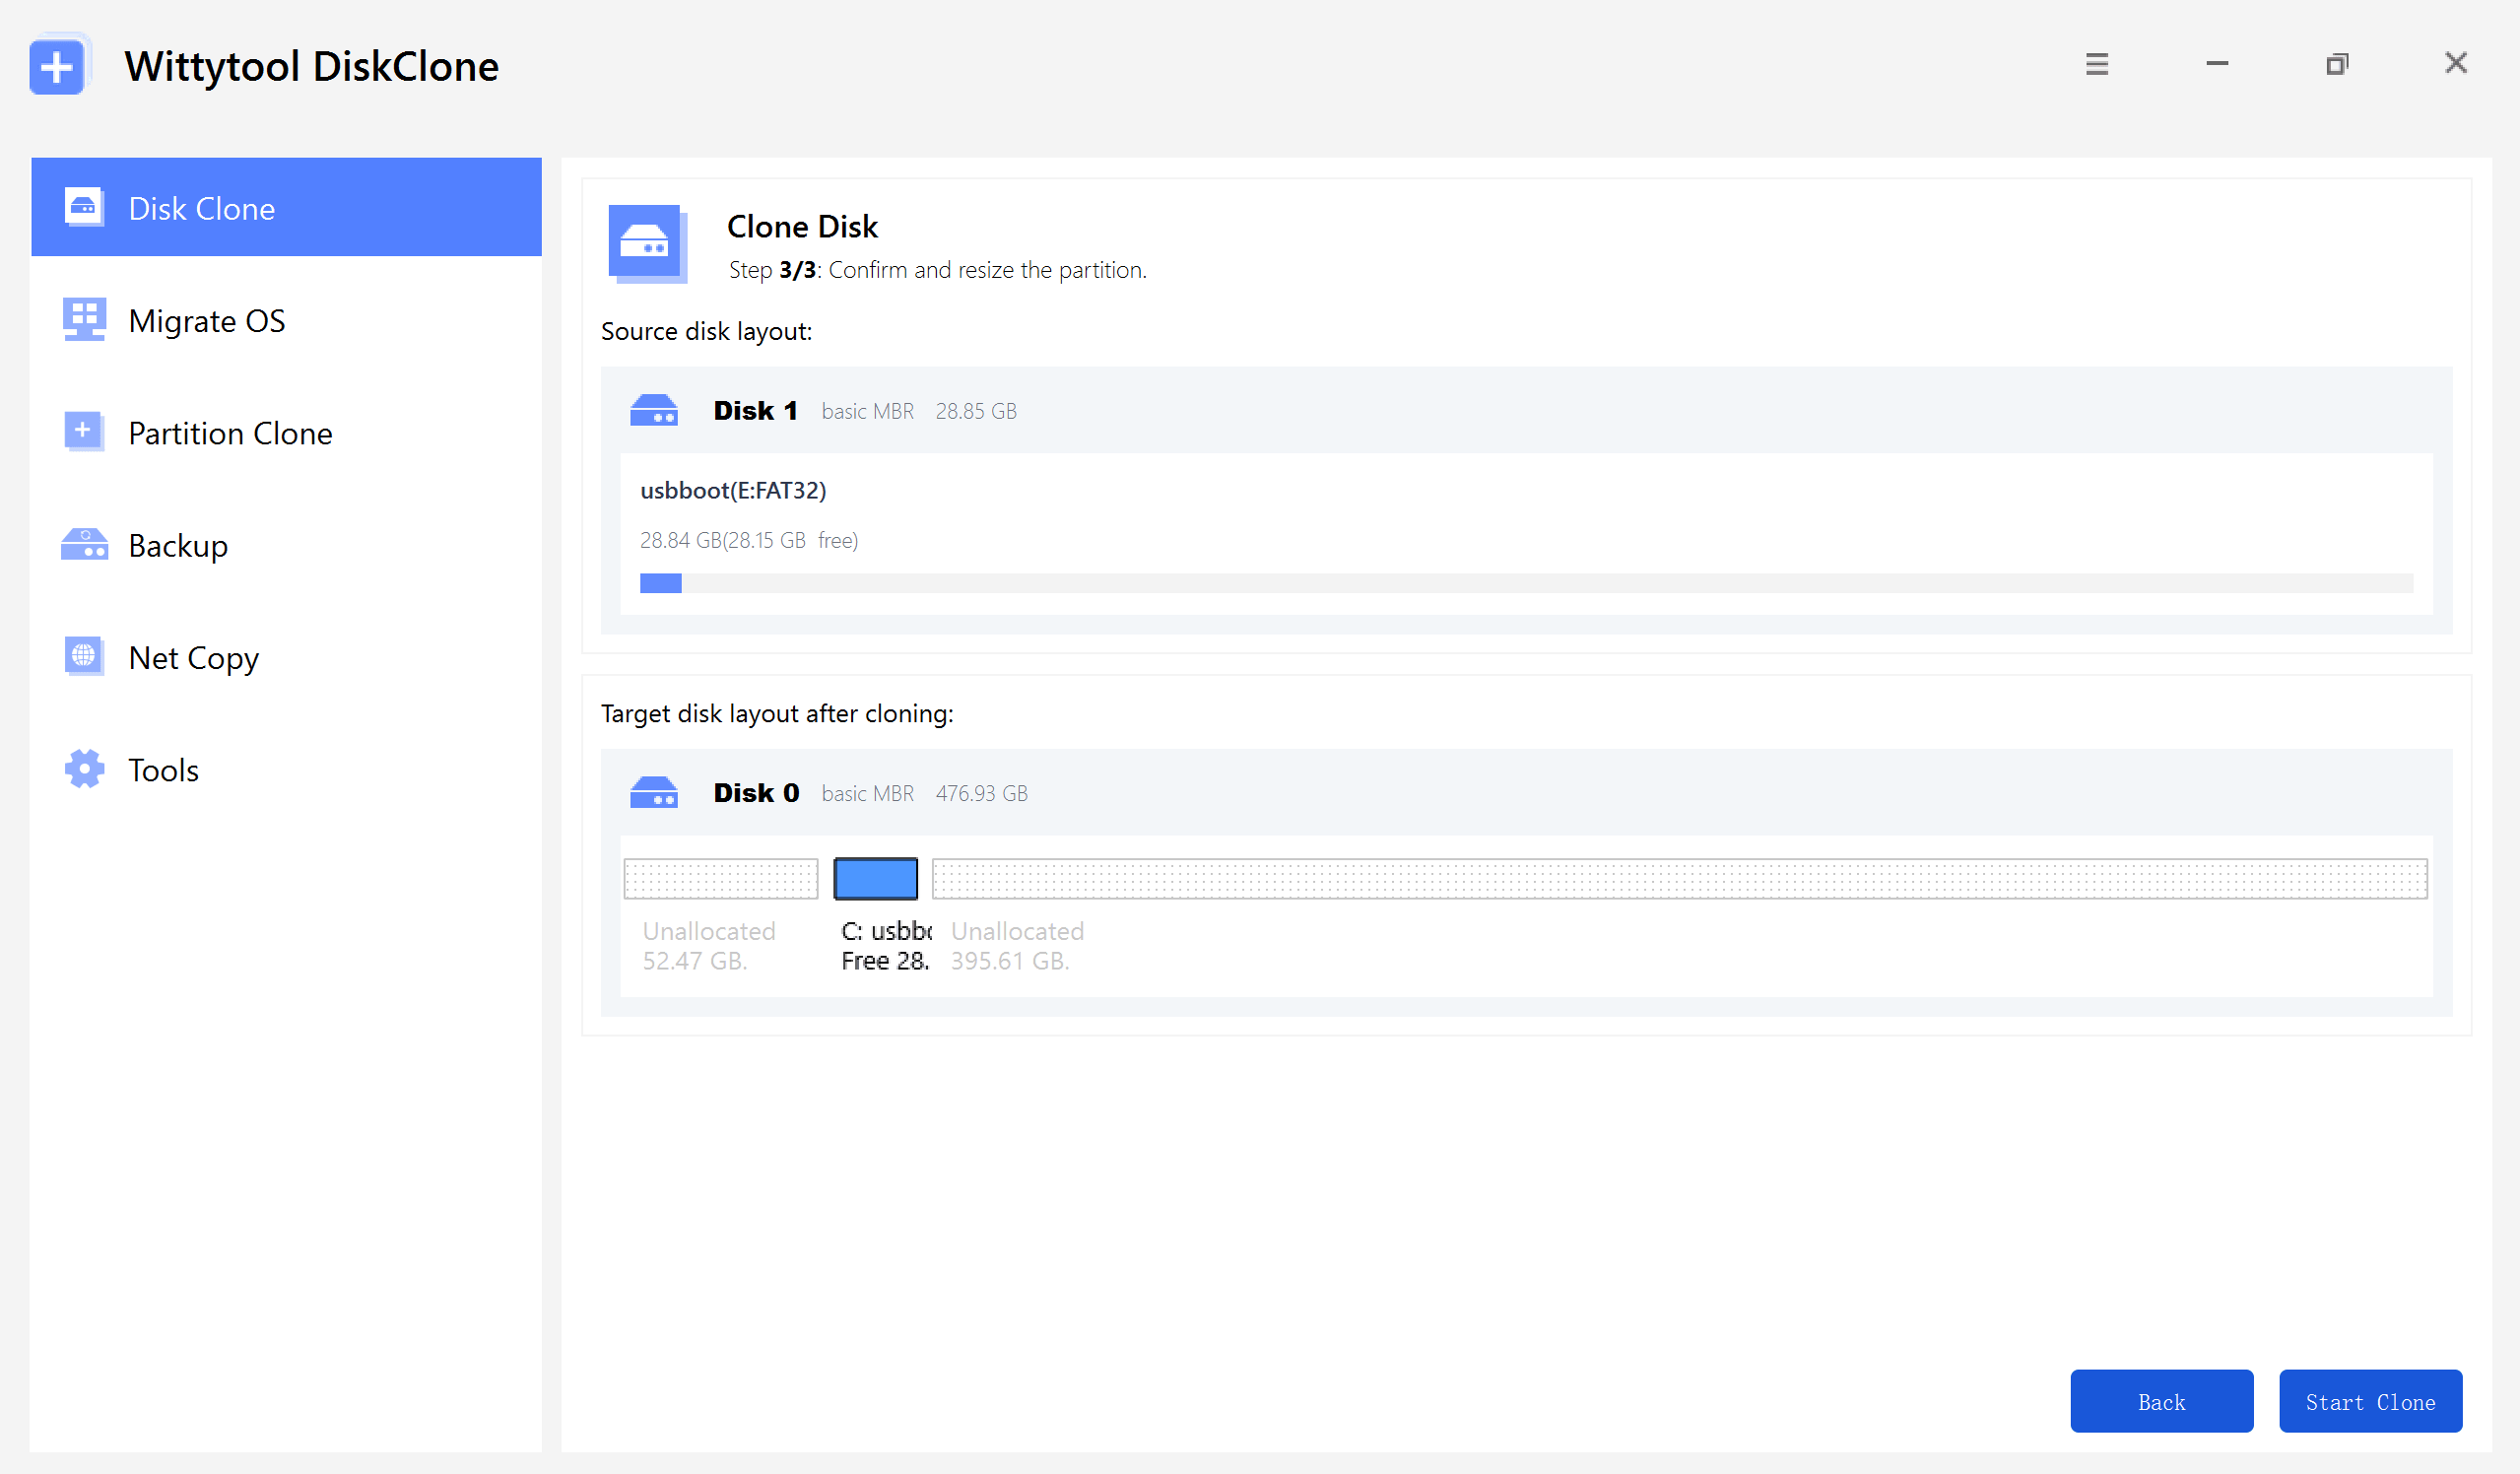
Step 3: Resize the partitions on the target disk layout as needed to fit your requirements, then click the “Start Clone” button to begin the cloning process.
Watch the Disk Cloning Video Guide with Wittytool Disk Clone:
Optimizing Your ASUS After SSD Cloning
Cloning is only half the battle; post-cloning steps are vital to get your ASUS running optimally. After swapping the drives, boot up your device. You might need to enter BIOS/UEFI (by pressing F2 or Del during startup) to set the SSD as the first boot device. Once booted, check that all files are intact. It’s also a good practice to know how to undelete files in case you accidentally remove something during the cleanup process later. Run a disk check to ensure data integrity. Update your ASUS system drivers and enable TRIM for SSD maintenance (Windows typically handles this automatically).
💡 When you’re ready to wipe the old hard drive for reuse, remember that if you encounter an error stating the disk is write protected, you will need to remove the protection first before formatting. This final cleanup ensures a clean transition and maximizes the performance and lifespan of your new SSD.
Conclusion
Cloning your ASUS hard drive to an SSD is a smart upgrade that revitalizes your device. By using tools like Disk Clone from Wittytool and following this guide, you can do it safely without data loss. Remember, preparation is key, and post-cloning checks ensure long-term benefits. If you’re a beginner, take it slow—this process is very achievable. I’ve helped many readers through similar upgrades, and the positive feedback confirms its worth. Don’t let an old hard drive hold back your ASUS; give it a speed boost today!
FAQs Related to ASUS Hard Drive to SSD Cloning
Here are common questions based on real user scenarios:
Q: My new SSD is smaller than my old HDD. Can I still clone to it?
A: Yes, but only if the amount of data you have on the HDD is less than the total capacity of the SSD. The cloning software needs enough space to copy everything. Tools like Wittytool Disk Clone can automatically shrink the partitions on the HDD to fit the smaller SSD, as long as the data fits.
Q: After cloning and swapping the drives, my ASUS laptop says “No bootable device found.” What’s wrong?
A: This is a common issue. The most likely cause is that the boot order in the BIOS/UEFI is still set to the old HDD. Enter the BIOS (press F2 or Del at startup), go to the “Boot” tab, and set your new SSD as the first boot priority. Save changes and exit.
Q: Is it better to do a clean installation of Windows on the SSD instead of cloning?
A: A clean install can eliminate system clutter and is excellent for a fresh start. However, it requires reinstalling all your applications and manually transferring your files. Cloning is faster and preserves your exact setup, preferences, and installed software, making it the best choice for most users who want a seamless transition.
Q: Do I need to format the new SSD before cloning?
A: No, the cloning software will automatically handle the formatting and partitioning of the target SSD during the process. You just need to ensure it is connected and detected by Windows.
Q: Can I use the old HDD alongside the new SSD in my ASUS laptop?
A: This depends on your laptop model. Some ASUS laptops have space for both a 2.5-inch drive (HDD/SSD) and an M.2 SSD. If you have an open slot, you can keep the old HDD as secondary storage for extra files after confirming the clone works perfectly. Otherwise, use it with a USB enclosure as an external backup drive.