Last updated on May 8, 2026
Is your brand new or trusted old SSD not showing up on your Windows 11 or 10 PC? You’re not alone. This is a common yet frustrating issue, much like dealing with a laptop screen black but still running, that prevents you from accessing your files or setting up a new drive. The good news is that the problem is often solvable with some straightforward troubleshooting.
Solid State Drives (SSDs) are renowned for their speed and reliability, with failure rates as low as 1-2% during their first four years of use, according to a comprehensive study by cloud provider Backblaze. However, they are not immune to connection, configuration, or software-related problems that can make them invisible to your operating system.
This comprehensive guide will walk you through the seven most effective methods to fix an SSD that is not being detected, including issues where a cloned hdd or ssd wont boot. We’ll start with simple software checks and move towards more advanced solutions, ensuring you can get your precious data back or finally get that new drive up and running.
7 Ways to Fix an Old or New SSD Not Detected in Windows
Before we dive into the specific cases, it’s important to understand the basic steps you should always take first. These quick checks can save you a lot of time.
- Check Physical Connections: Completely power down your computer. Open your case and ensure the SATA and power cables (for 2.5″ SSDs) are firmly connected to the drive and motherboard. If you’re using an M.2 NVMe SSD, gently reseat it in its slot.
- Try a Different Port/Cable: A faulty SATA cable or motherboard port is a common culprit. Try connecting the drive with a different cable to a different port.
- Test in Another Computer: If possible, connect the SSD to another PC. If it’s not detected there either, you can be more certain the issue is with the drive itself and not your computer’s configuration.
If these initial checks don’t work, proceed with the detailed methods below.
Recover Your SSD Data with Data Recovery Software
⚠ When to use this method: This is your first and most important step if an older SSD containing precious photos, documents, or other files suddenly disappears from File Explorer. If the drive appears in Windows Disk Management but shows as “Unallocated,” “Not Initialized,” or “RAW,” your file system is likely corrupt. The goal here is to rescue your data beforeyou attempt any repairs that might erase it.
Trying to initialize, format, or run chkdsk on a drive in this state can overwrite your data, making partition recovery much harder or impossible. Specialized data recovery software is designed to read the raw data from the drive without needing a healthy file system, giving you the best chance to successfully perform partition recovery and get your files back.
💡 Our Recommendation: For a balance of powerful features and user-friendly operation, we suggest using a free data recovery software – Wittytool Data Recovery. It’s a trusted Windows application that excels at helping you recover deleted files from SSDs, HDDs, and other storage media, even when the drive isn’t accessible through normal Windows features.
Follow these steps to recover your data:
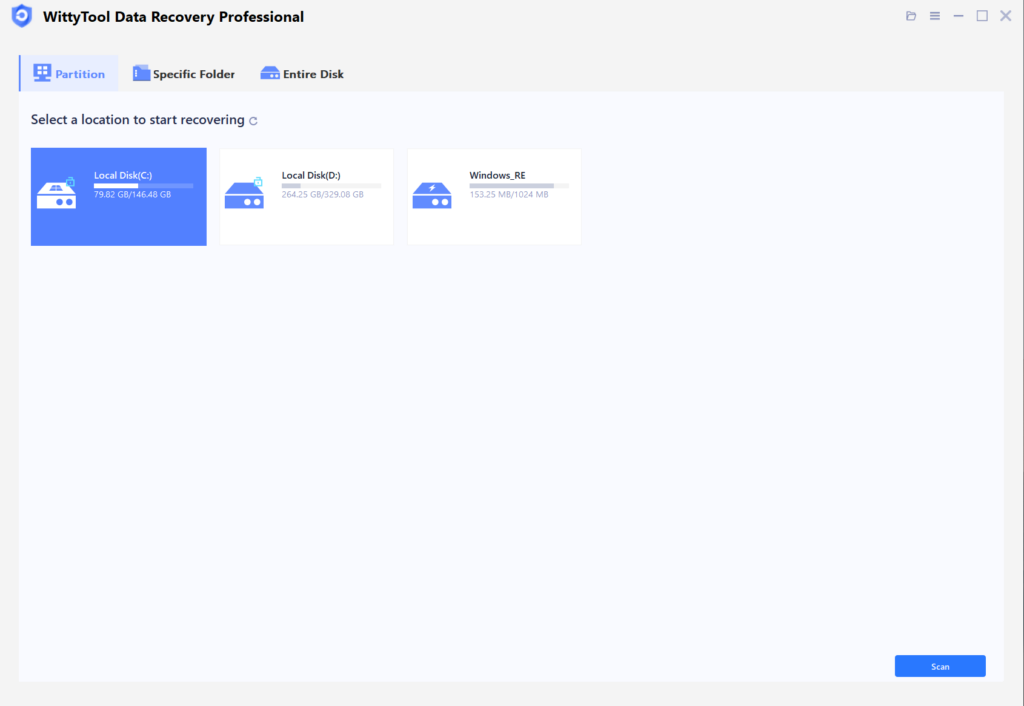
Step 1: Select Location and Initiate Scan
Launch Wittytool Data Recovery. Select the partition or drive where your deleted files were originally stored. Click “Scan” to begin searching for lost files.
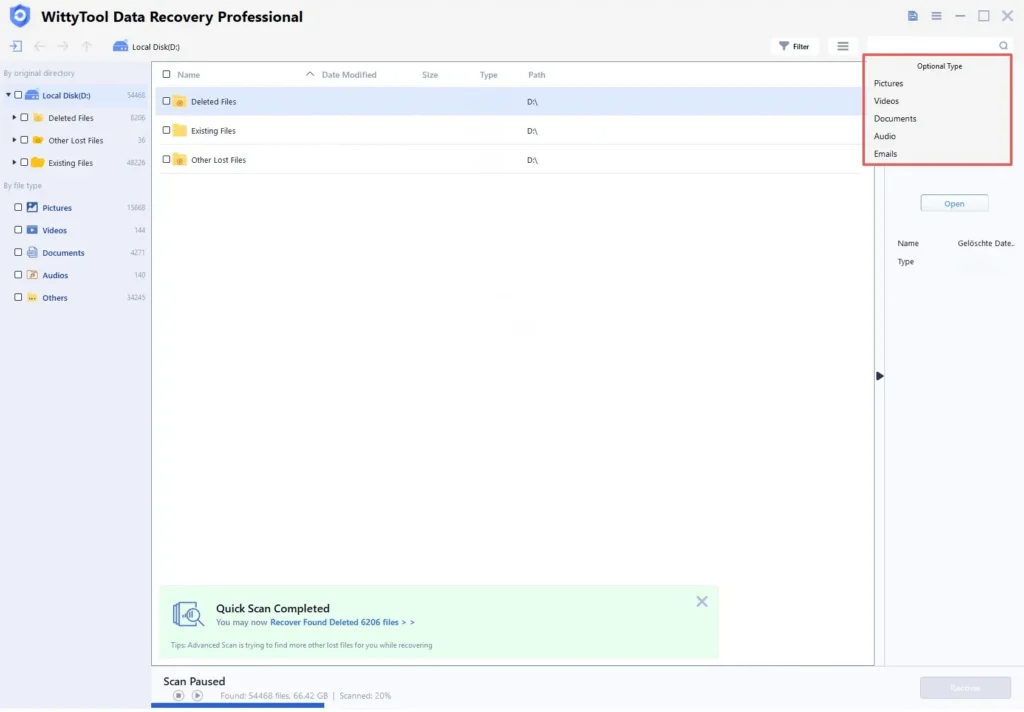
Step 2: Identify Files for Recovery
Once the scan completes, browse the results and select files you wish to recover. Utilize these options to locate files efficiently:
- Search by filename using the search box for fastest results
- Click the filter icon to display specific file types
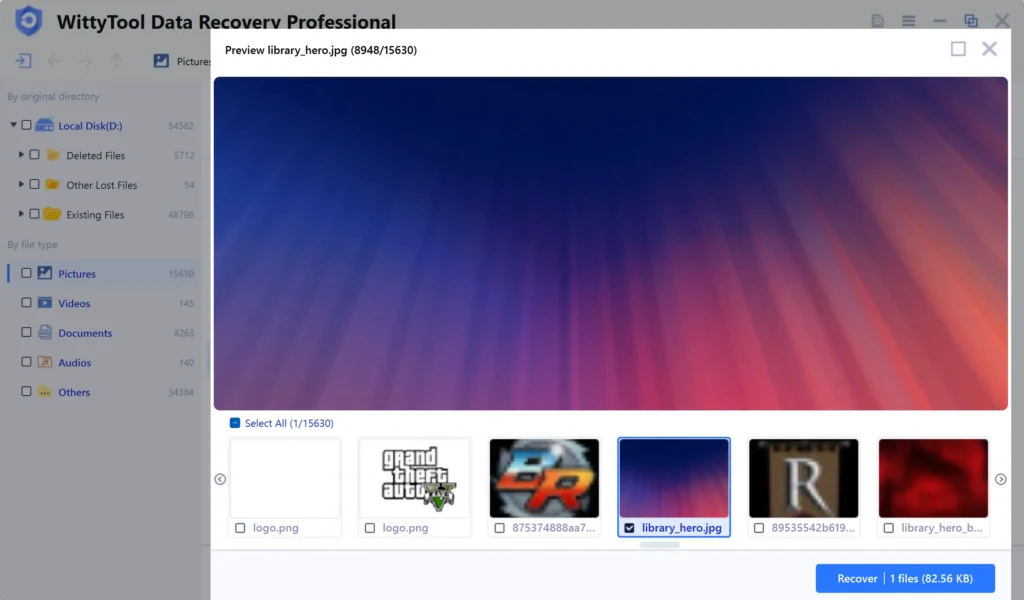
Step 3: Preview and recover your files
After previewing your recoverable files to verify content, select the target files and click “Recover”. Immediately choose a new storage location for saving recovered files.
CRITICAL: DO NOT select the original drive where data loss occurred to prevent overwriting – then click “Save” to complete the restoration.
Case 1: Solve Complex SSD Issues with Professional Data Recovery Services
❗ When to use this service: If your SSD is not detected in Disk Management or BIOS/UEFI at all, and you have tried all other methods in this guide without success, the drive may have a physical or hardware failure. This could be a damaged controller, failed NAND chips, or a corrupted firmware module.
- You hear unusual sounds (though less common in SSDs than HDDs).
- The SSD feels physically damaged (e.g., from liquid, shock, or power surges).
- The drive gets extremely hot when connected.
In these scenarios, DIY software tools will not work, and further attempts could permanently destroy your data. This is when you need to contact a professional data recovery service.
These specialists work in certified cleanrooms to physically repair drives and extract data directly from the memory chips. While this is the most expensive option, it is the only hope for recovering data from a physically failed drive. Look for companies with strong reviews, free evaluations, and a “no data, no fee” policy.
Case 2: SSD Not Detected Due to a Missing Drive Letter
📌 The Problem: Your SSD appears in Windows Disk Management as “Healthy” but doesn’t show up in File Explorer. This is one of the most frequent reasons why your SSD is not appearing in Windows 11/10.
The Fix:
1. Press Win + Xand select Disk Management.
2. In the bottom pane, find your SSD. If it has a healthy partition but no drive letter (e.g., “D:”, “E:”), it will be visible here.
3. Right-click on the primary partition of the SSD and select Change Drive Letter and Paths….
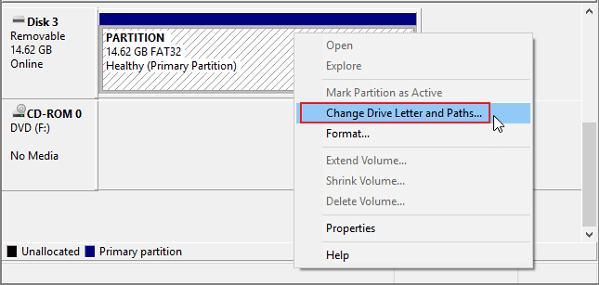
4.Click Add….
5. Assign an available drive letter (e.g., “D”) and click OK.
Your SSD should now be visible in File Explorer and ready to use.
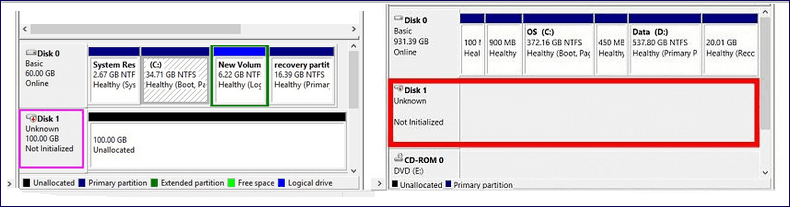
Case 3: SSD Not Showing Up Because It Is Not Initialized
🛠 The Problem: A new SSD will often appear in Disk Management as “Not Initialized” and show all its space as “Unallocated”. Before Windows can use it, it must be initialized and partitioned.
The Fix:
❗ Warning: Initializing a drive will erase all data on it. Only do this on a brand-new drive or one where you have already recovered your data (as shown above).
- Open Disk Management (
Win + X). - If the drive is not initialized, a pop-up window will appear asking you to initialize it. If it doesn’t, right-click on the disk name (e.g., “Disk 1”) on the left and select Initialize Disk.
- Choose a partition style:
- GPT (GUID Partition Table): For modern computers using UEFI firmware (most PCs from the last decade). This is the recommended standard, and you may need to convert mbr to gpt when upgrading from an older system.
- MBR (Master Boot Record): For older computers using legacy BIOS.
- Click OK. The disk status will change to “Online”.
- Now, right-click on the Unallocated space and select New Simple Volume….
- Follow the wizard to create a new volume, assign a drive letter, and format it with the NTFS file system.
Your new SSD should now be fully accessible.
Case 4: SSD Not Detected Due to an Unsupported File System
🔍 The Problem: If a drive was formatted on a macOS or Linux machine, it might use a file system (like APFS/HFS+ or EXT4) that Windows cannot read natively. It may show up in Disk Management as “RAW” or with an unrecognized file system.
The Fix:
- Open Disk Management and identify the SSD.
- To use it in Windows, you must reformat it to NTFS or exFAT (which is compatible with both Windows and macOS).
- 💡 Important: Right-click on the partition and select Format….
- Choose NTFS for use only in Windows, or exFAT if you plan to move the drive between Windows and macOS systems.
- Give the volume a label, ensure “Perform a quick format” is checked, and click OK.
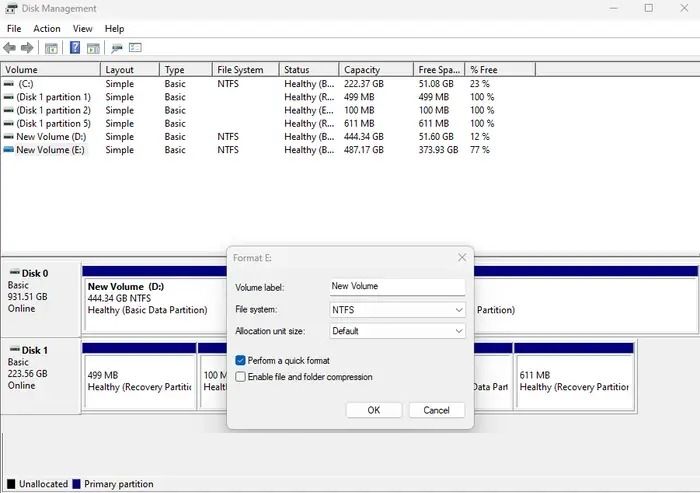
Again, this process will erase all data on the drive.
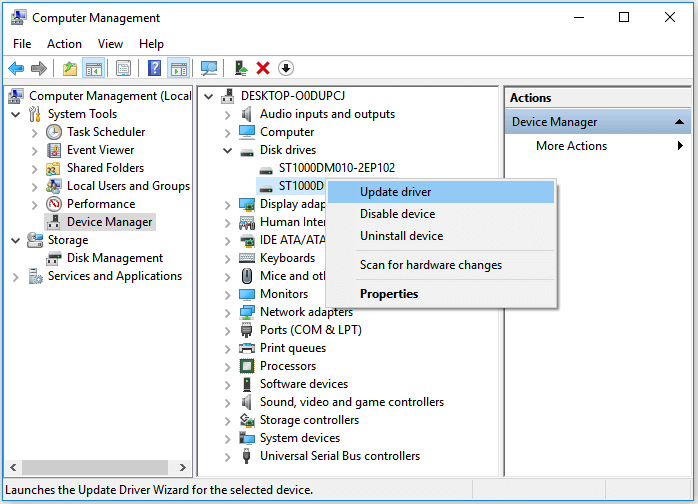
Case 5: SSD Not Showing Up Because of Disk Driver Issues
⚙ The Problem: Outdated, corrupt, or missing storage drivers can prevent Windows from communicating properly with your SSD, especially newer models.
The Fix:
- Press
Win + Xand select Device Manager. - Expand the Disk drives category and look for your SSD (it might be listed with a generic name if the driver is missing).
- Right-click on the SSD and select Update driver.
- Choose Search automatically for drivers and let Windows look online.
- If that doesn’t work, visit the website of your SSD’s manufacturer (Samsung, Crucial, WD, etc.) or your motherboard manufacturer to download the latest storage controller or NVMe driver and install it manually.
- Restart your computer.
Case 6: SSD Not Detected Because of Disk Errors
🧹 The Problem: Underlying disk errors or bad sectors (even on an SSD) can sometimes cause detection issues.
The Fix: Use the CHKDSK Utility
- Press
Win + Sand typecmd. - Right-click on Command Prompt and select Run as administrator.
- Type the following command and press Enter (replace “X” with the drive letter if it has one, or see note below):
chkdsk X: /f /r- If the drive has no letter, you can use its disk number in Disk Management through the
diskpartcommand, but this is more advanced.
- If the drive has no letter, you can use its disk number in Disk Management through the
This command will attempt to find and repair file system errors, including issues that may be caused by a shortcut virus (remove shortcut virus). For severe hardware errors, it may not be successful, but it remains a valuable diagnostic tool for identifying such problems.
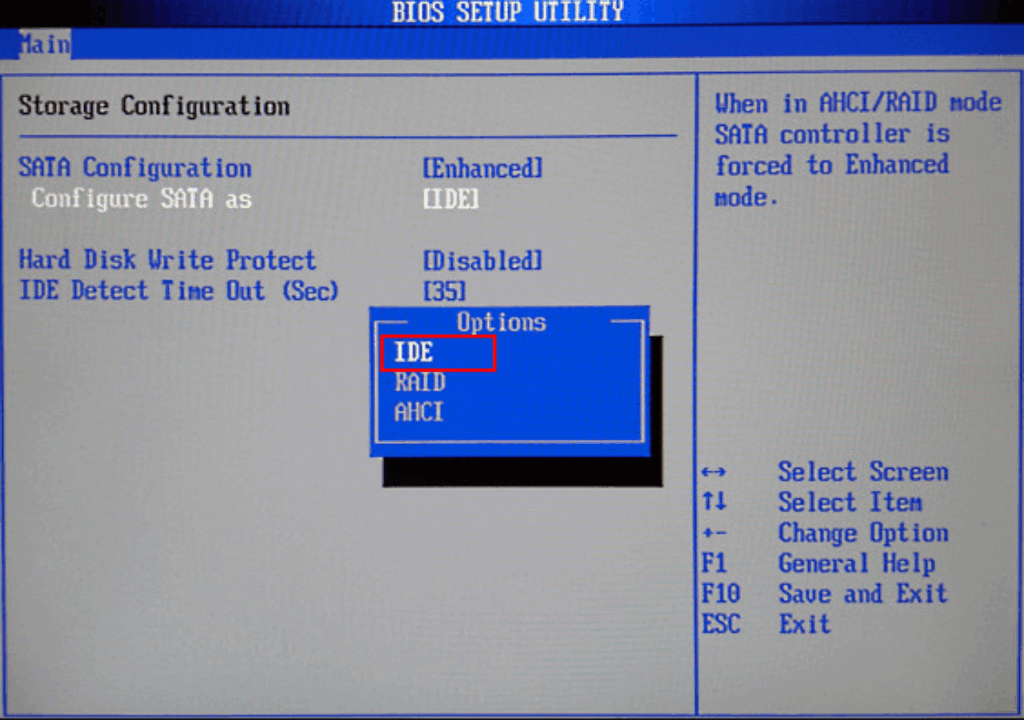
Case 7: SSD Not Detected Due to Incorrect BIOS/UEFI Settings
⚡ The Problem: Your BIOS/UEFI (the low-level software that starts your computer) might have settings that prevent it from recognizing the SSD. This is a key area to check if a drive is not detected anywhere in Windows.
The Fix:
- Restart your computer and repeatedly press the key to enter BIOS/UEFI setup (common keys:
Del,F2,F10,F12; it usually shows on the boot screen). - Navigate to the Storage or SATA Configuration menu.
- Ensure the SATA port your drive is connected to is enabled.
- Look for the SATA Mode or Storage Option setting. The common options are:
- AHCI: The standard mode for modern SSDs and HDDs. This should be selected.
- RAID: For multiple drives set up in a RAID array.
- IDE/Legacy: An old, compatibility mode that severely limits SSD performance.💡 Ensure AHCI is selected.
- For M.2 NVMe SSDs: Some motherboards disable certain SATA ports when an M.2 slot is in use. Consult your motherboard manual and try plugging your SATA drives into different ports.
- Save changes and exit BIOS/UEFI (usually
F10).
Conclusion
Figuring out why your new SSD won’t work or why an old one has disappeared can be stressful, but by following this structured approach, you can almost always find a solution. Start with the physical connections, then move through the software and configuration fixes in Windows like checking Disk Management, assigning drive letters, and updating drivers. For drives with valuable data, always attempt recovery before formatting. And remember, for physical hardware failure, professional data recovery services are your best and safest option.
By understanding these common issues, you can confidently get your SSD back online and enjoy the speed and reliability it’s meant to provide.
SSD Not Showing Up: Frequently Asked Questions
Q1: Why is my new SSD not showing up at all?
A: A new SSD often requires initialization and formatting before it appears in File Explorer. Open Windows Disk Management, and you will likely find it there as “Uninitialized.” Follow the steps in Case 3 to set it up.
Q2: My SSD was working fine and just disappeared. What happened?
A: This could be caused by a loose cable, a recent driver update that went wrong, a corrupted file system, or, in worst-case scenarios, impending drive failure. Start by checking physical connections and then follow the software-based solutions in this guide.
Q3: Should I format my SSD as NTFS or exFAT?
A: Use NTFS if the drive will only be used with Windows computers. Use exFAT if you need to move the drive between Windows and macOS systems frequently, as it is widely supported by both operating systems.
Q4: My SSD is detected in BIOS but not in Windows. What does this mean?
A: This is a very good sign! It means the drive is physically connected and working, but there is a software or configuration issue within Windows itself. The problem is almost certainly solvable by following the methods in Cases 2, 3, 4, and 5 (Drive Letter, Initialization, File System, Drivers).
Q5: Can a dead SSD be recovered?
A: If the SSD has suffered a complete hardware failure (e.g., a fried controller), DIY software cannot recover it. However, professional data recovery labs (Case 1) may still be able to recover the data by directly accessing the NAND flash memory chips.