Last updated on June 25, 2026
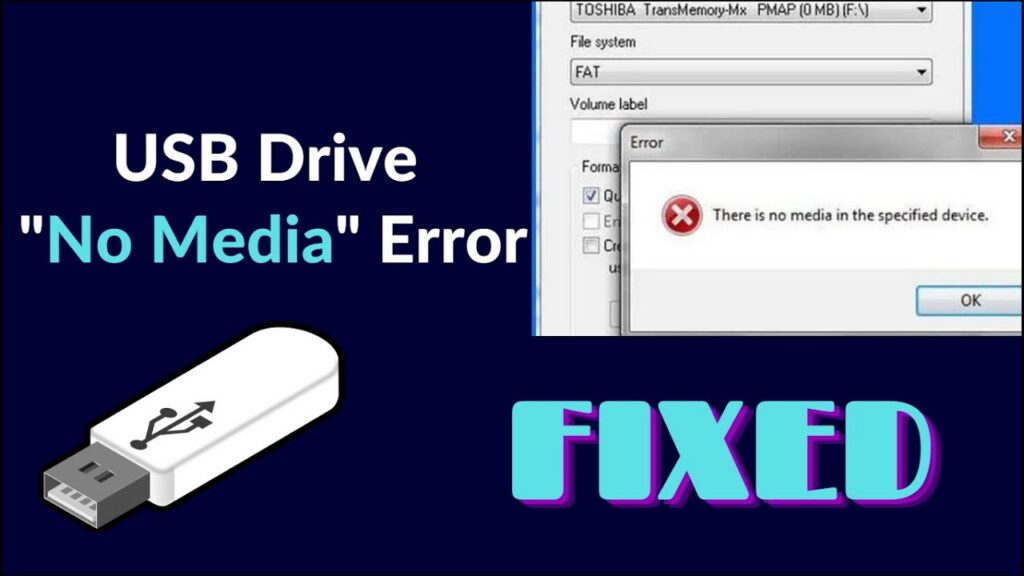
Plugged in your flash drive only to see the dreaded USB drive no media error and “0 bytes” in Disk Management? Don’t panic – this common error usually means your computer detects the drive’s “shell” but has lost contact with the memory chip inside. In this guide, I will show you exactly how to bypass this communication breakdown to rescue your data and fix the drive, using proven methods I have refined over 10 years in the data recovery industry.
What Does “No Media” Actually Mean on a USB Drive?
To fix the problem, you need to understand what is happening under the hood.
When a USB drive shows no media, it is fundamentally different from a drive that is not recognized at all.
- Not Recognized: Windows doesn’t know a device is plugged in.
- No Media: Windows sees the device shell, but the storage container appears empty.
Think of it like a CD-ROM drive. The “No Media” error is your computer telling you, “I see the CD Player (the USB Controller), but there is no Disc inside (the NAND Flash Memory).”
Common Causes of the “No Media” State
1. Mishandling: Removing the drive while data was being written (we are all guilty of ignoring the “Safely Remove Hardware” button).
2. Port Power Issues: The USB port isn’t supplying enough voltage to wake up the NAND chip.
3. Corrupted MBR: The Master Boot Record, which acts as the map for your files, is damaged.
4. Flash Controller Firmware Failure: This is the big one. The internal software running the USB stick has crashed or entered “read-only” mode to protect itself.
5. NAND Failure: The memory chip itself is physically dead. (This is the worst-case scenario).
💡 Industry Insight: According to a reliability study regarding removal storage, nearly 30% of USB failures are logical corruptions caused by improper ejection or power surges, meaning they can be fixed via software without expensive lab equipment.
Critical First Step: Recover Data from the “No Media” USB
❗STOP! READ THIS BEFORE FIXING: Many tutorials will tell you to “Format the drive” or run CHKDSK immediately. Do not do this yet. Formatting wipes the file system index, making recovery much harder. If your data is valuable, your priority is extraction, not repair.
If your computer can still detect the drive letter (even if it says it is empty), we can attempt to bypass the Windows file system and read the raw data sectors directly.
For this specific ‘No Media’ scenario, if you are looking to recover deleted photos or lost documents, I recommend using a free data recovery software – WittyTool Data Recovery. I have found its deep scanning algorithm particularly aggressive at latching onto drives that Windows considers ’empty.
Now download and follow the steps to restore your files:
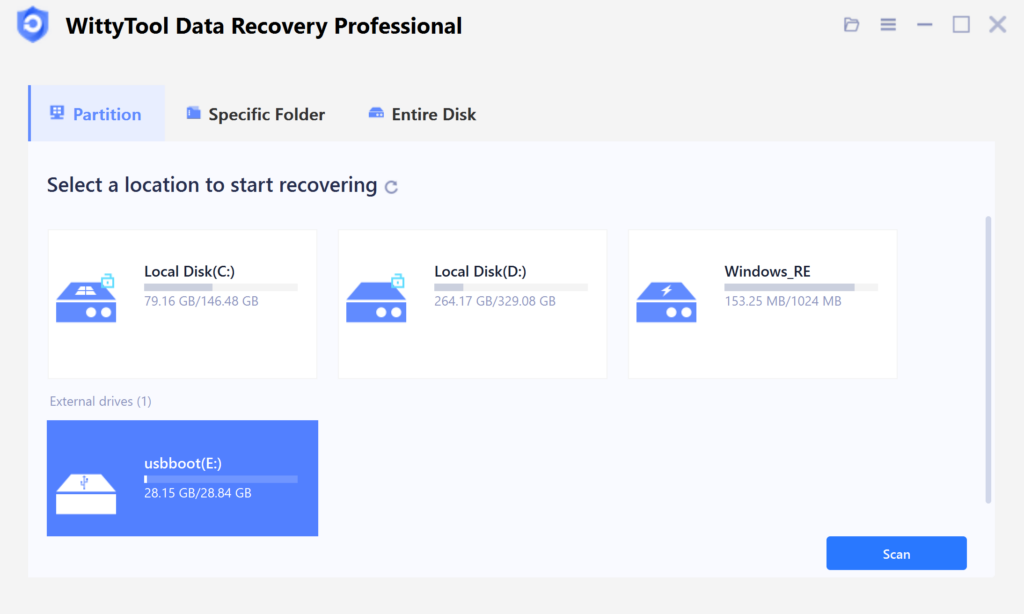
Step 1. Connect Drive and Start Scan
Connect your USB drive to the computer and launch Wittytool’s USB Data Recovery software. Select the correct external drive from the list and begin the scan.
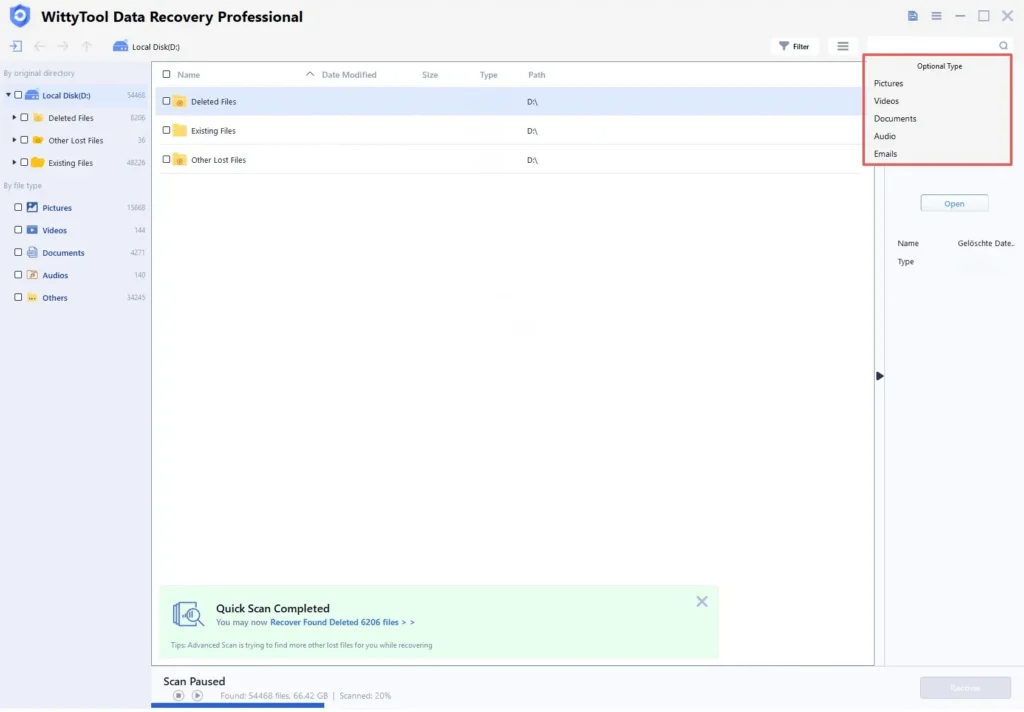
Step 2. Locate and Filter Files
Wittytool performs both Quick and Deep scans to ensure no file is left behind. Spotted your data early? Simply pause and proceed – use the filter tools to find specific files without waiting for the full scan to conclude.
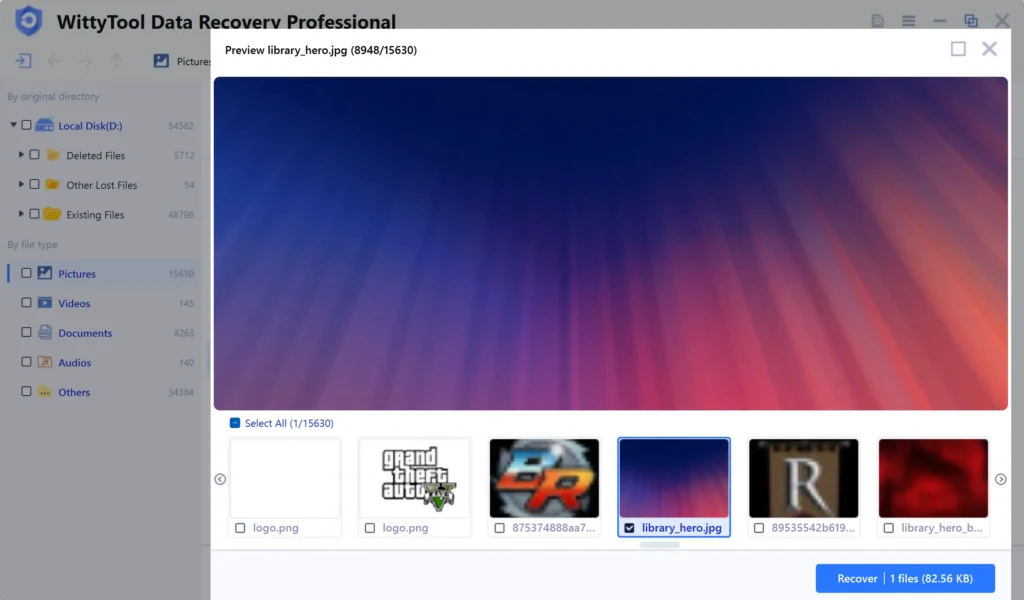
Step 3. Preview and Save Files
Preview files to confirm they are intact. Then, select the desired items and restore them to a secure location on your computer or another storage device.
Once your data is safe, we can take the gloves off and try to fix the drive.
Part 1: Quick & Non-Destructive Fixes (Try These First)
Before we get technical, let’s rule out the stupidly simple hardware glitches. You would be surprised how often a “dead” drive is just a power issue.
Method 1: The “Physical” Check (Port Swapping)
USB drives, especially older ones, are sensitive to voltage drops.
- Desktop Users: Do not use the front panel USB ports. They connect to the motherboard via a long cable which causes voltage drop. Plug the drive directly into the rear USB ports on the back of your PC case.
- Laptop Users: Ensure your laptop is plugged into wall power, not running on battery.
- Clean the Contacts: Look inside the USB connector. Is there dust or lint? blow it out gently.
Method 2: Update or Reinstall USB Drivers
Sometimes the driver controlling the USB mass storage gets corrupted.
- Right-click the Start button and select Device Manager.
- Expand Disk Drives. If you see your USB drive here with a yellow triangle, that’s your culprit.
- Right-click the drive and choose Uninstall device.
- Next, expand Universal Serial Bus controllers.
- Locate USB Mass Storage Device. Right-click and Uninstall.
- Restart your computer. Windows will automatically reinstall clean drivers upon boot.
Note: If after restarting, your device is completely missing from Device Manager (not even showing as an unknown device), you might have a different issue. Check our specific guide to fix usb drive not showing up in Windows before proceeding with the “No Media” fixes below.
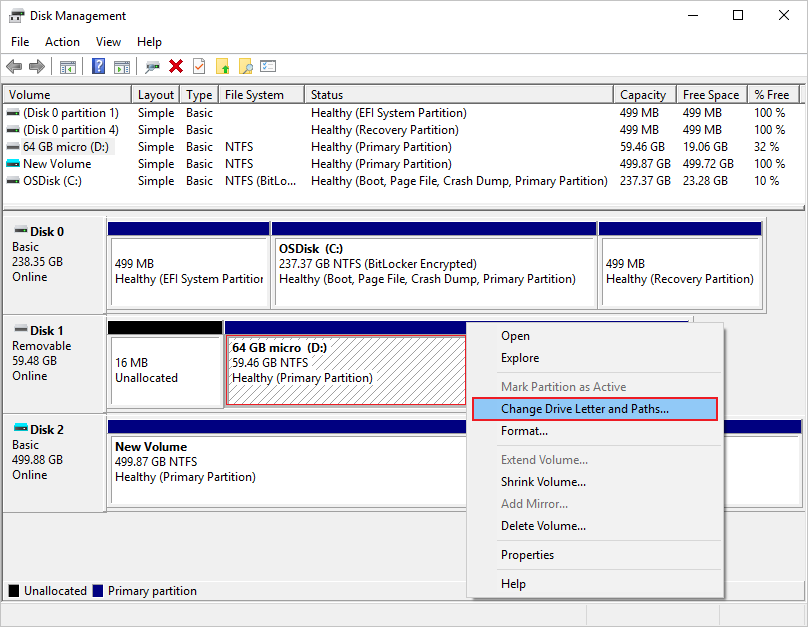
Method 3: Change the Drive Letter
If Windows is trying to assign a drive letter (like E:) that is already taken by a network drive, it might show “No Media.”
- Press Win + X and select Disk Management.
- Locate your USB drive (It will likely say “Removable” and “No Media”).
- Right-click the box and select Change Drive Letter and Paths.
- Click Change, and pick a letter from the end of the alphabet, like Z: or X:.
- Click OK and check if the drive contents appear.
Part 2: Advanced Technical Fixes (For Stubborn Drives)
If the basics didn’t work, we are dealing with logical corruption or partition table errors. We need to force Windows to recognize the storage container.
Method 4: Fix Logical Errors with CHKDSK
CHKDSK (Check Disk) is a powerful Windows command tool that verifies the file system integrity of a volume and fixes logical file system errors. If the drive letter exists but shows 0 bytes, we are likely dealing with logical corruption. We can use Command Prompt to repair damaged usb drive file structures and force Windows to mount the volume correctly.
- Press Win + S, type cmd, right-click Command Prompt, and select Run as Administrator.
- Type the following command (replace X with your USB drive letter): chkdsk X: /f /r
- Press Enter.
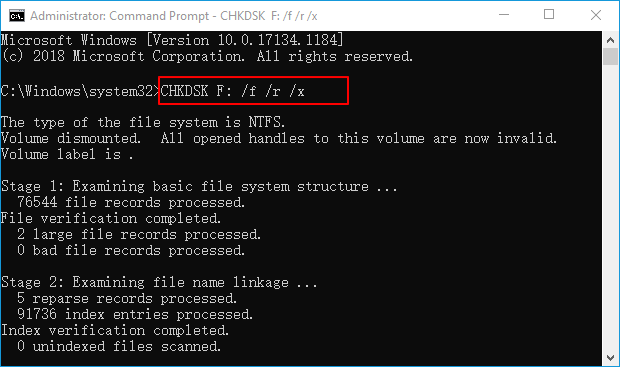
Possible Outcomes:
- It runs: Great! It’s fixing bad sectors.
- Error: “Cannot open volume for direct access”: This confirms the “No Media” status is blocking access. Proceed to Method 5.
Method 5: Enable the USB Drive in Device Manager
Hidden settings sometimes disable the drive.
- Go back to Device Manager > Disk Drives.
- Double-click your USB drive.
- In the popup window, check the Device Status box.
- If it says “This device is disabled,” click the Enable Device button.
- Go to the Volumes tab and click Populate. If it populates with “Capacity: 0 MB,” the partition table is gone.
Part 3: The “Expert” Fix – Reprogramming the USB Firmware
💡 Expert Opinion: This is the section most competitors leave out. When a USB controller detects a severe error, it locks itself into a “panic mode” (Read-Only) to prevent further damage.
This is why standard formatting fails. You might see an error claiming the disk is write protected, or simply the “No Media” status. In both cases, Windows cannot override this hardware-level lock; we need to factory reset the controller using “Mass Production Tools” (MP Tools).
Warning: This process will definitely erase all data on the drive. Ensure you have tried WittyTool (Step 1) first.
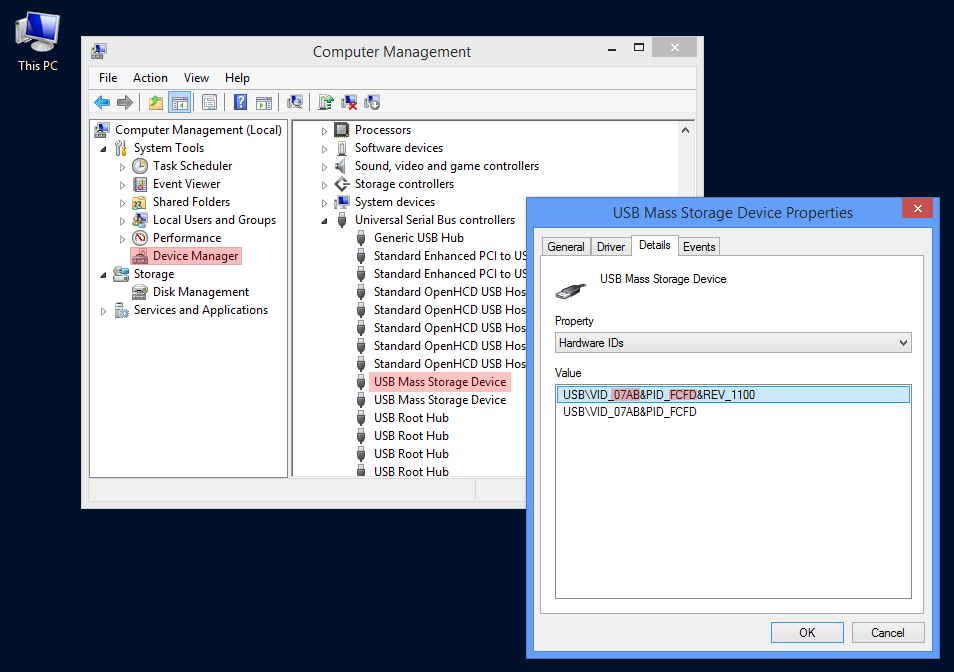
Step 1: Identify the VID and PID
Every USB drive has a Vendor ID (VID) and Product ID (PID). We need these to find the right software.
- Download a free tool called ChipGenius (ensure you download from a reputable source).
- Run the tool and select your USB drive.
- Look for the lines USB Device ID, VID, and PID.
- Also, note the Controller Vendor and Controller Part-Number.
Step 2: Find the Mass Production Tool
- Go to a repository like the FlashBoot.ru (iFlash database).
- Input your VID and PID.
- Look for a tool that matches your Controller Part-Number.
- Download the specific MP Tool for your drive.
Step 3: “Low-Level” Format
- Run the MP Tool you downloaded.
- It should detect your USB drive.
- Click Start or Auto-Burn (interface varies by manufacturer).
- This tool will rewrite the firmware and reset the USB to its factory state.
If this works, your USB will act like a brand-new drive. You will need to format it in Windows to use it again.
Part 4: Format the USB Drive
If you don’t want to mess with firmware and just want to try a brute-force format, standard Windows formatting often fails on “No Media” drives. Instead, you should try specialized usb and pen drive repair tools that ignores the OS limits.
Use Diskpart (The Nuclear Option)
- Open Command Prompt as Administrator.
- Type diskpart and press Enter.
- Type list disk. Identify your USB drive number (e.g., Disk 2). Be extremely careful not to pick your hard drive.
- Type select disk 2 (replace 2 with your USB number).
- Type clean. (If this fails with an I/O error, the hardware is physically dead).
- Type create partition primary.
- Type format fs=ntfs quick.
- Type assign.
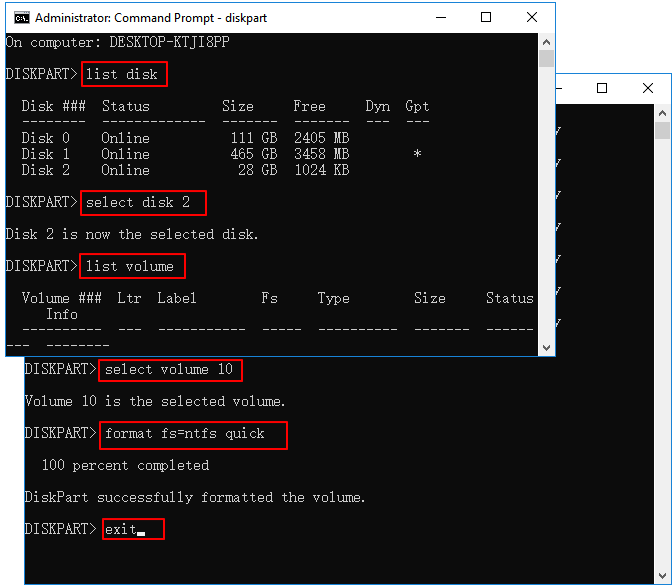
If clean returns an error saying “There is no media in the device,” your NAND flash memory chip is likely physically disconnected from the circuit board.
When to Call a Professional
Sometimes, no software in the world can fix the issue. You are dealing with hardware failure if:
- Heat: The USB drive gets extremely hot to the touch within seconds of plugging it in.
- Smell: You smell burning plastic or ozone.
- Physical Damage: The USB connector is bent or wobbles significantly.
- Strange Sounds: While rare for flash drives, clicking sounds indicate power regulation failure.
If your data is critical (business documents, crypto wallets, sentimental photos) and the software methods above failed, do not try to solder it yourself.
Professional data recovery services generally charge between $200 and $500 for flash media recovery. They physically remove the NAND memory chip and read it using a specialized device called a NAND reader, bypassing the broken USB controller entirely.
Conclusion
The USB drive no media error is frustrating because it sits in that gray area between “software glitch” and “hardware death.”
Here is the takeaway:
- Don’t panic. The data is often still there.
- Scan first. Use tools like WittyTool data recovery before you attempt any fixes.
- Check power. Try rear ports.
- Go Pro. Use ChipGenius and firmware tools if standard formatting fails.
If you have managed to fix your drive, do yourself a favor: buy a cloud storage subscription or a secondary backup drive today. Flash memory is finite, and it doesn’t warn you before it dies.
FAQ about USB Drive No Media Error
Here are the most common questions I get asked by clients when they encounter the USB no media issue.
Why does my USB drive say “No Media” and 0 bytes?
This indicates a communication failure between the USB controller (the plug) and the NAND flash memory (the storage). The computer recognizes the device is plugged in, but the controller cannot access the storage area, reporting it as an empty “shell” with 0 capacity.
Can I fix the “No Media” error without losing my data?
Yes, but you must prioritize data recovery before attempting repair. Using tools like WittyTool Data Recovery allows you to scan the drive even in this state. However, fixes like formatting or flashing firmware (Method 3 above) will erase data, so extract your files first!
Why can’t I just format the USB drive to fix it?
You will often get a “Windows was unable to complete the format” error. This is because the USB controller has likely locked itself into a “ReadOnly” or “Panic” mode to prevent further damage. Windows cannot override this hardware-level lock; you often need specific Manufacturer Production Tools (MP Tools) to reset it.
Is “No Media” the same as “Device Not Recognized”?
No. “Device Not Recognized” usually means Windows doesn’t see the device at all (often a driver or physical port issue). “No Media” means Windows sees the drive letter, but thinks the drive is empty (like a CD-ROM drive with no disc inside). “No Media” is usually a firmware or flash memory issue.
How do I fix “There is no media in the device” in Command Prompt?
If you see this error while trying to format via Diskpart, it confirms the controller cannot talk to the memory chip. Skip standard formatting and try Method 3 (ChipGenius/Firmware Flashing) outlined above, as this is a controller-level issue.