Last updated on August 4, 2025
Ever wonder why some programs automatically launch when you turn on your Windows 10 PC? It’s all thanks to the Startup Folder. Knowing its location and how to manage it is key to optimizing your computer’s boot time and overall performance. Slow startups are a common frustration; a recent study by Gartner indicated that nearly 30% of Windows users experience noticeable boot delays, often due to too many unnecessary programs loading. This comprehensive guide will clearly show you where is the Windows 10 Startup folder, how to change what programs run at startup, troubleshoot common issues, and even how to recover accidentally deleted files within the Startup folder.
Key Takeaways
- Two Key Locations: The main Windows Startup Folder (
C:\ProgramData\Microsoft\Windows\Start Menu\Programs\StartUp) affects all users, while your personal Startup Folder (C:\Users\[YourUsername]\AppData\Roaming\Microsoft\Windows\Start Menu\Programs\Startup) applies just to your account. - Manage Startup Easily: Add programs by creating shortcuts in the appropriate Startup Folder; remove them by deleting the shortcuts.
- Not the Only Way: Use Task Manager’s Startup tab for broader control over all startup items (including background services).
- Troubleshooting Solved: Fix issues like startup programs not running by checking Task Manager status, unhiding folders, copying shortcuts manually, using batch files, or (carefully) editing the Registry.
- Safety First: Before troubleshooting registry edits, consider backing up your startup folders. If files are lost accidentally, use free data recovery software like WittyTool Data Recovery Free.
Where Is the Startup Folder in Windows 10
Contrary to what you might expect, there isn’t just one single “Startup Folder” in the traditional sense within File Explorer. Instead, Windows 10 manages startup applications through a few specific locations. The primary folder that affects startup behavior for your specific user account is hidden by default.
Here’s how to find the main Windows startup folder location for your user profile:
- Press the
Windows Key + Rto open the Run dialog box. - Type the exact path:
shell:startup - Click “OK” or press Enter.
This will instantly open File Explorer directly to the user-specific Startup directory path, which is typically: C:\Users\[Your User Name]\AppData\Roaming\Microsoft\Windows\Start Menu\Programs\Startup. Any shortcut file (.lnk) placed in this folder will automatically launch its associated program when you log into Windows.
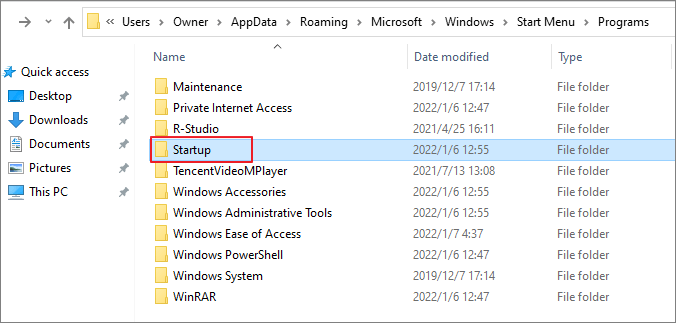
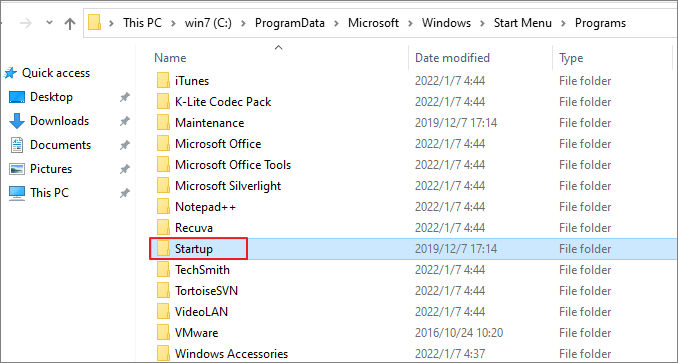
There’s also a system-wide Windows startup directory (C:\ProgramData\Microsoft\Windows\Start Menu\Programs\Startup), but using shell:common startup in the Run box is easier. Programs placed here launch for every user on the computer, but modifying this usually requires administrator privileges.
Finding Windows 10 Startup Folder Using Command Prompt
If you prefer using the command line or need to script something, you can locate the Windows 10 Startup folder using Command Prompt.
- Type
cmdin the Windows search bar and open Command Prompt. - Enter the command:
echo %appdata%\Microsoft\Windows\Start Menu\Programs\Startup - Press Enter. Command Prompt will display the full file path to your user’s Startup folder.
This command reveals the path stored in the %appdata% environment variable, making it easy to reference the startup folder location programmatically.
Showing Hidden Files on Windows 10 to See Startup Folder
Because the AppData folder (where your personal Windows startup folder resides) is hidden by default in File Explorer, you might need to enable the viewing of hidden files and folders to navigate there manually.
- Open File Explorer (click the folder icon on your taskbar or press
Windows Key + E). - Click the “View” tab at the top.
- In the “Show/hide” section, check the box next to “Hidden items”.
- (Optional but Recommended) Click “Options” on the far right, then select the “View” tab in the Folder Options window. Under “Advanced settings”, find “Hidden files and folders” and select “Show hidden files, folders, and drives”. Click “Apply” and then “OK”.
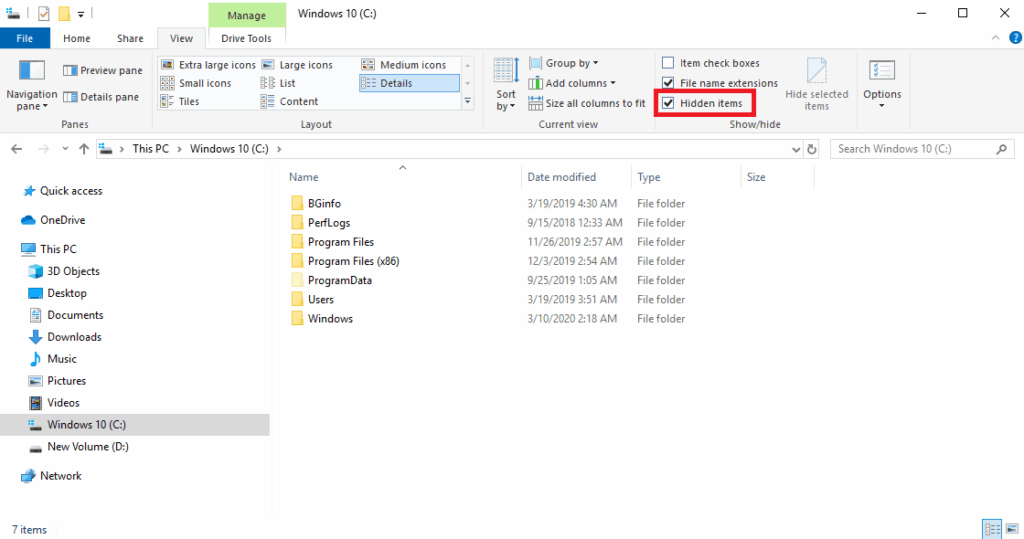
Once you do this, you can navigate manually to C:\Users\[Your Username]\AppData\Roaming\Microsoft\Windows\Start Menu\Programs\Startup and see the Windows startup folder contents directly.
How to Change What Programs Run in Startup Folder on Windows 10
Managing the programs that launch automatically when Windows starts is crucial for speeding up your boot process and saving system resources. A study by PC Magazine found that disabling just a few non-essential startup items can often shave 20-30 seconds off boot time on older or heavily loaded systems.
Adding an App to Run at Startup via the Startup Folder
Adding a program to launch automatically at startup is straightforward once you know the startup folder location.
- Locate the Program: Find the program you want to run automatically. This could be an application (.exe file) or its shortcut, usually found in the Start Menu or on your Desktop.
- Create a Shortcut (If Needed): Right-click the program file (.exe). If you’re using the main program file, not a shortcut, select “Create shortcut”. A shortcut file will appear next to the original. You can also usually just right-click a shortcut already on your Desktop or in the Start Menu.
- Open Your User Startup Folder: Press
Windows Key + R, typeshell:startup, and click OK. - Copy the Shortcut: Drag the shortcut file you created (or the existing shortcut) from its current location into the open Startup Folder window. You can also right-click the shortcut, select “Copy”, then right-click inside the Startup Folder and select “Paste”.
The next time you restart your computer or log back in, that program will launch automatically. This method gives you direct control over specific applications via the Windows startup directory.
Removing Windows 10 Startup Programs from the Startup Folder
Removing programs from automatic startup is just as simple as adding them.
- Open Your User Startup Folder: Press
Windows Key + R, typeshell:startup, and click OK. - Delete Shortcuts: Inside the Startup Folder, you will see shortcuts representing the programs that launch at login. Find the shortcut for the program you want to stop. Right-click on the shortcut and select “Delete”. Confirm deletion if prompted.
Important Note: Deleting the shortcut here only stops the program from launching automatically via the Startup folder. It does not uninstall the program itself.
How to Fix Windows 10 Startup Folder Not Working in 4 Simple Ways
Sometimes, programs you place in the Startup folder just don’t launch. This can be frustrating, but here are the most common fixes:
Fix 1: Check Windows Startup in Task Manager
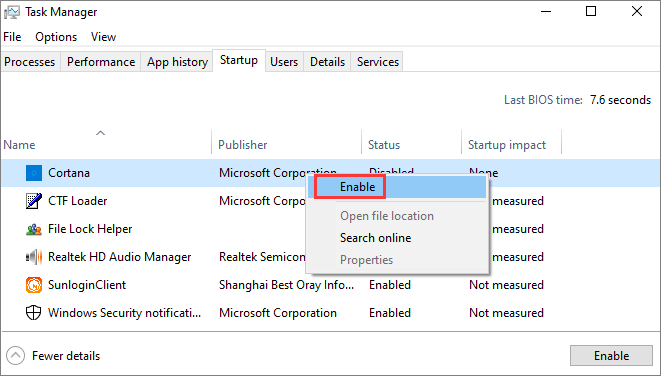
Modern Windows versions (including Win 10 & 11) offer superior startup management via Task Manager, which can sometimes override the traditional folder.
- Press
Ctrl + Shift + Escto open Task Manager. - Click on the “Startup” tab. Here you’ll see a comprehensive list of all applications, drivers, and services configured to run at startup, regardless of whether they use the Startup folder, registry, or other methods.
- Find your program. Look for your application in the list. The “Status” column shows if it’s enabled or disabled.
- Enable if Disabled: If your program is listed but its Status is “Disabled”, right-click on it and select “Enable”. This often resolves conflicts where the Task Manager setting is preventing the startup folder shortcut from working.
Fix 2: Copy the App’s Shortcut Manually
Placement can be tricky. Use the direct method instead.
- Find the Correct Program Location: Navigate to the actual folder where the program’s executable (.exe) file is installed (e.g.,
C:\Program Files\...). - Create a New Shortcut: Right-click the main .exe file and choose “Create shortcut”. Click “Yes” when asked if you want the shortcut placed on the desktop.
- Open Startup Folder: Use
shell:startupin the Run box. - Copy the New Shortcut: Drag the brand new shortcut you just created on the desktop into the Startup folder. This ensures you aren’t accidentally moving a broken shortcut.
Fix 3: Create a Batch File to Force a Program to Start
If shortcuts fail, a simple batch command can sometimes force the issue.
- Open Notepad.
- Type the following command, replacing
"Full Path to Program.exe"with the exact location and name of your program’s executable file (enclosed in quotes if the path has spaces):start "" "Full Path to Program.exe"
Example:start "" "C:\Program Files\MyApp\myapp.exe" - Go to File > Save As.
- Navigate to your user’s Windows startup folder (
shell:startup). - In the “Save as type” dropdown, select “All Files (.)”.
- Name the file
StartMyApp.bat(or something descriptive with.batextension). - Click Save. This batch file will run the specified program on startup.
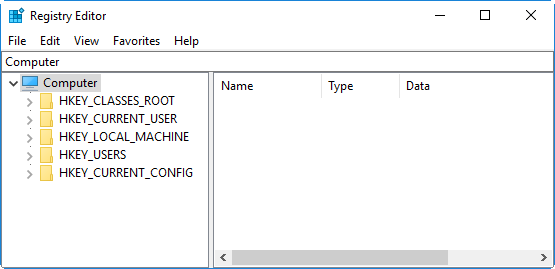
Fix 4: Edit Windows 10 Registry (Advanced – Proceed with Caution)
The Windows Registry contains powerful startup keys. Editing the registry incorrectly can seriously damage your system. Back up your registry or create a system restore point before proceeding.
- Press
Windows Key + R, typeregedit, and press Enter. Click Yes if prompted by UAC. - Navigate to the current user startup key:
HKEY_CURRENT_USER\Software\Microsoft\Windows\CurrentVersion\Run - To manually add your program:
- Right-click in the right pane -> New -> String Value.
- Name it something meaningful (e.g., “MyAppStartup”).
- Double-click the new value.
- In “Value data”, enter the full, exact path to the program’s .exe file, enclosed in quotes (e.g.,
"C:\Program Files\MyApp\MyApp.exe"). - Click OK.
- Close Registry Editor. The program should now launch at login via the registry mechanism, bypassing any startup folder issues.
How to Restore Startup Folder on Windows 10/11 with Wittytool Data Recovery Free
Mistakes happen. If you accidentally deleted crucial shortcuts or even the entire Startup folder itself, all is not lost! That’s where a reliable free data recovery software like Wittytool Data Recovery Free comes in. This powerful tool can scan your drive for deleted files, including those shortcut (.lnk) files or folder structures that were once in your AppData\Roaming\Microsoft\Windows\Start Menu\Programs\Startup path.
Why Use Wittytool Data Recovery Free?
- Deep Scan Technology: Finds and helps recover files deleted from recycle bin or lost via accidental Shift+Delete – even after they’ve been emptied.
- Recover Critical Folders: Specifically targets lost folders like your Windows startup directory, helping you get those essential shortcuts back quickly.
- Multiple File Type Support: Recovers not just shortcuts (.lnk) but also documents, photos, videos, emails, and more.
- Free to Use: Offers robust data recovery capabilities completely free of charge – perfect for retrieving accidentally deleted startup items.
- User-Friendly Interface: Designed with simplicity in mind, guiding even novice users through the recovery process step-by-step. No complex commands needed.
- Safe & Secure: Read-only operation ensures your existing files aren’t overwritten during the scan or recovery process.
Restoring Your Deleted Startup Folder or Shortcuts:
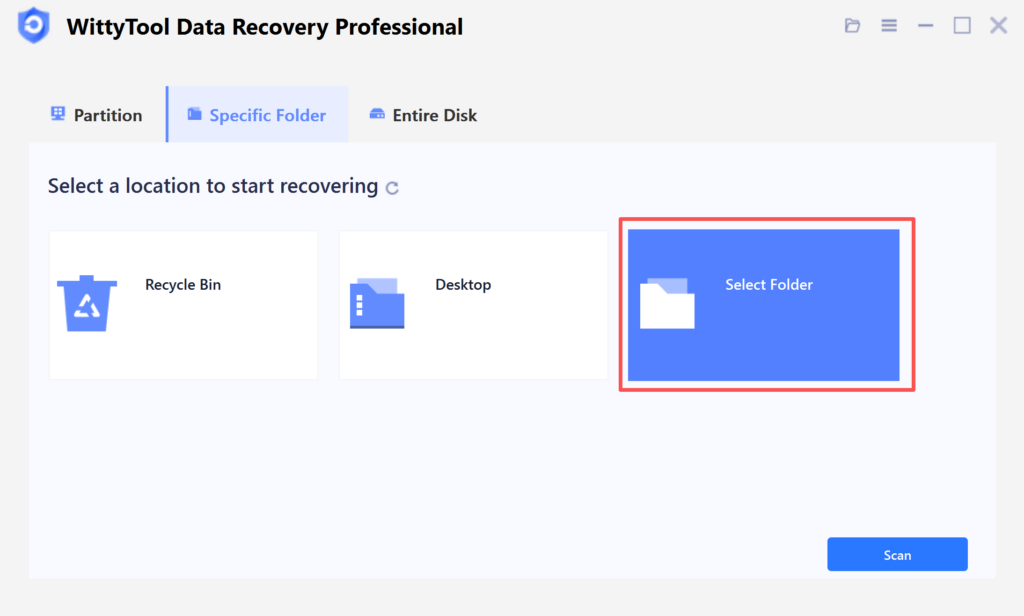
Step 1: Initiate Folder Scan
Download and Open Wittytool Data Recovery. Navigate to the target directory by clicking “Select Folder“, locate the missing folder’s original path, and confirm with “OK” to begin the search operation.
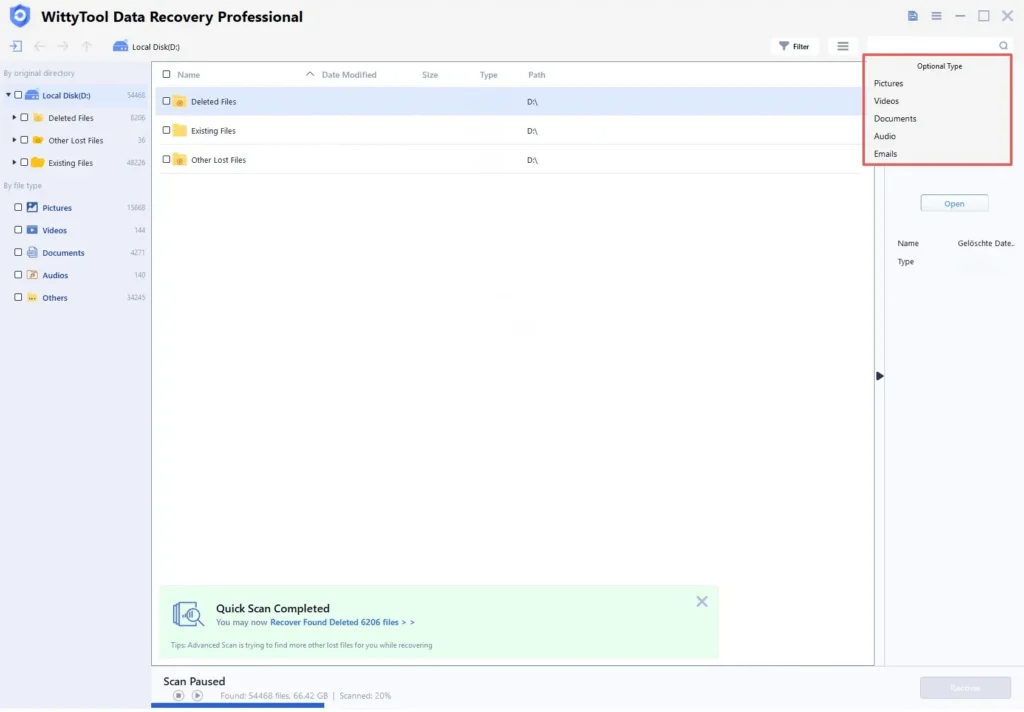
Step 2: Locate and Verify Content
If the folder name is known, input it in the search field for rapid results. Examine files within discovered folders by double-clicking to view previews. Alternatively, employ the Filter tool to narrow results by specific file formats.
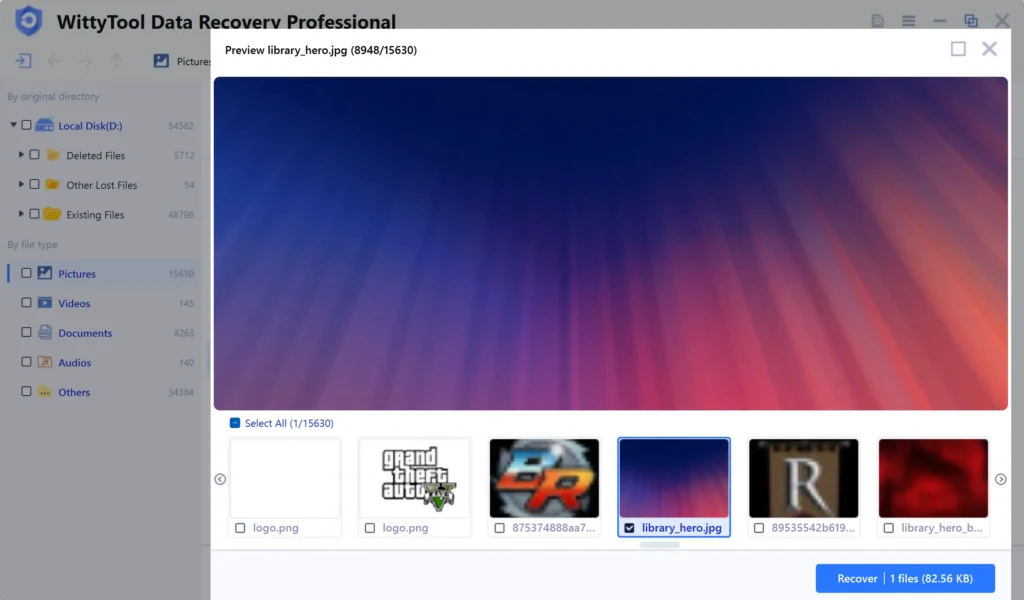
Step 3: Restore Data to Safety
Mark necessary folders/files, execute “Recover“, then designate a new destination where data security is ensured – crucially NOT the original partition or directory – to preserve recovered content.
Conclusion
Mastering your Windows 10 Startup folder location (shell:startup) and understanding how to change what programs open on startup empowers you to significantly enhance your PC’s performance and boot speed. By using the techniques outlined in this guide – navigating the folder, adding/removing shortcuts via File Explorer or command line, and applying practical troubleshooting fixes – you can take control of your startup process. And if the unexpected happens and items disappear, remember that a capable data recovery software like Wittytool Data Recovery Free provides a lifeline to get everything back swiftly and safely. Regularly managing your startup programs is a simple yet highly effective way to keep your Windows 10 experience running smoothly.