

WINDOWS IMAGE DEPLOYMENT FOR EDUCATION
Windows Image Deployment for School Computer Labs
Prepare a tested Windows environment for the next term. Reuse course apps and settings across lab PCs, then verify each classroom before handover.
Download Wittytool Disk CloneOne lab. A consistent course environment.
Prepare your PCs for the apps, local accounts, and settings your courses require. Start with a tested baseline for a new lab, a term refresh, or a course update.
New to the process? Intel's introduction to computer imaging explains how a prepared system image can be reused.
Set up a new lab
Deploy a tested Windows image to PCs in a new classroom.
Refresh for a new term
Update the approved course setup before the next term begins.
Update a course environment
Prepare the required apps, settings, and lesson files for the next course.
Plan the lab before you deploy
Confirm the course setup, protect student work, and choose a suitable maintenance window.
Course apps and local account settings
Check the required applications, local accounts, and course settings on the source PC.
Student files backed up and checked
Back up the files you need and confirm that you can open the saved copies.
Target PCs, disks, and network confirmed
Verify the target list, disk layout, storage capacity, and client connection plan.
Representative hardware selected for a pilot
Choose a PC that reflects the hardware and teaching devices used in the lab.
For a Windows 11 source, check Microsoft's system requirements against the target PCs before imaging.
Capture the course setup you have already prepared
With Wittytool Disk Clone, create a system image from the reference PC that has the required course apps, local accounts, and settings. Our Windows image deployment feature lets you reuse that source environment on the lab PCs.
Ready to turn your configured lab PC into a reusable course image? Start with Wittytool Disk Clone, then create and test the image for your classroom.
Prepare your lab image01 / Create the image
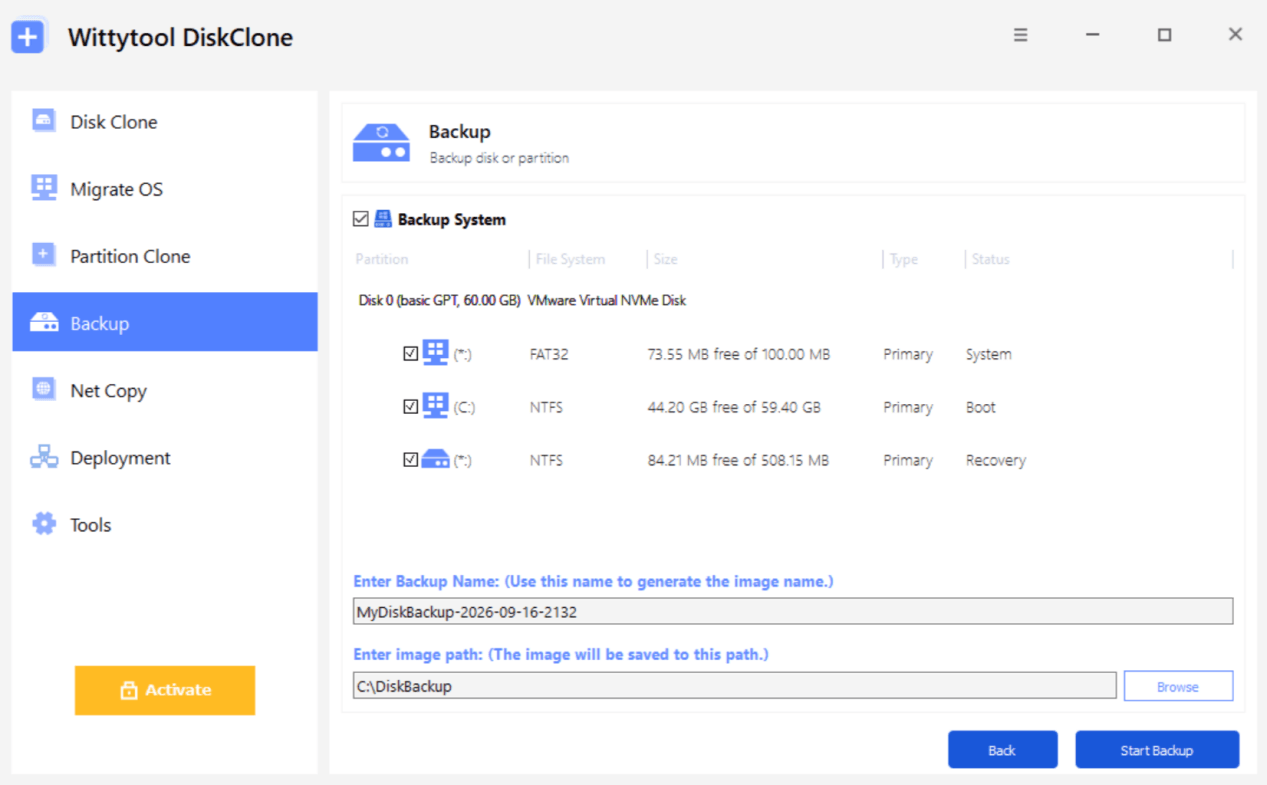
- Open Backup > Add Backup and select Backup System.
- Review the system-related partitions, enter a clear backup name, and choose the image storage path.
- Select Start Backup, then label the finished image with its course and version.
Choose the deployment settings for your lab
02 / Configure the targets
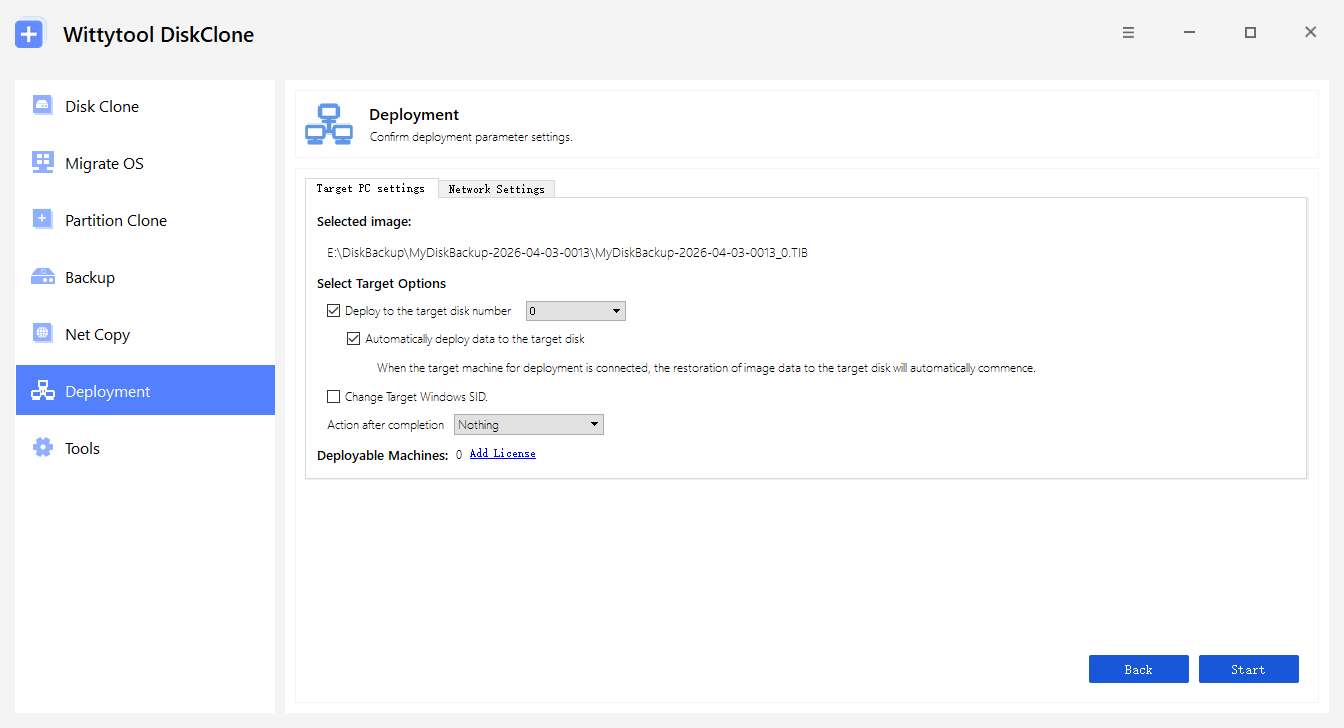
On the image-hosting PC, open Deployment > Start as Server and select the image you created with Wittytool Disk Clone. Review the image and target settings before starting the server.
-
Confirm the target disk
Choose the intended target disk and whether deployment should start automatically when a client connects. For manual deployment, connect the client and review its selected target disk before selecting Start.
-
Choose SID handling when needed
Use the separate Change Target Windows SID option when your rollout requires it. Include machine SID checks in your validation plan when relevant.
Automatic deployment can start as soon as a client connects. Check all target settings first.
Test one PC. Then deploy the lab.
03 / Pilot, deploy and monitor
Validate the image on a representative lab PC before expanding deployment. Run a real teaching task so you can check the course environment as well as Windows startup.
- Launch the course apps
- Open a sample lesson file
- Check sign-in, devices, and network
Follow each client's deployment progress
Monitor client status and progress from the deployment server in Wittytool Disk Clone. Use the displayed MAC and IP details to reconcile the connected clients with your target list.
Review completed and failed tasks, then verify each target PC before classroom handover.
Read the complete multi-PC deployment guide →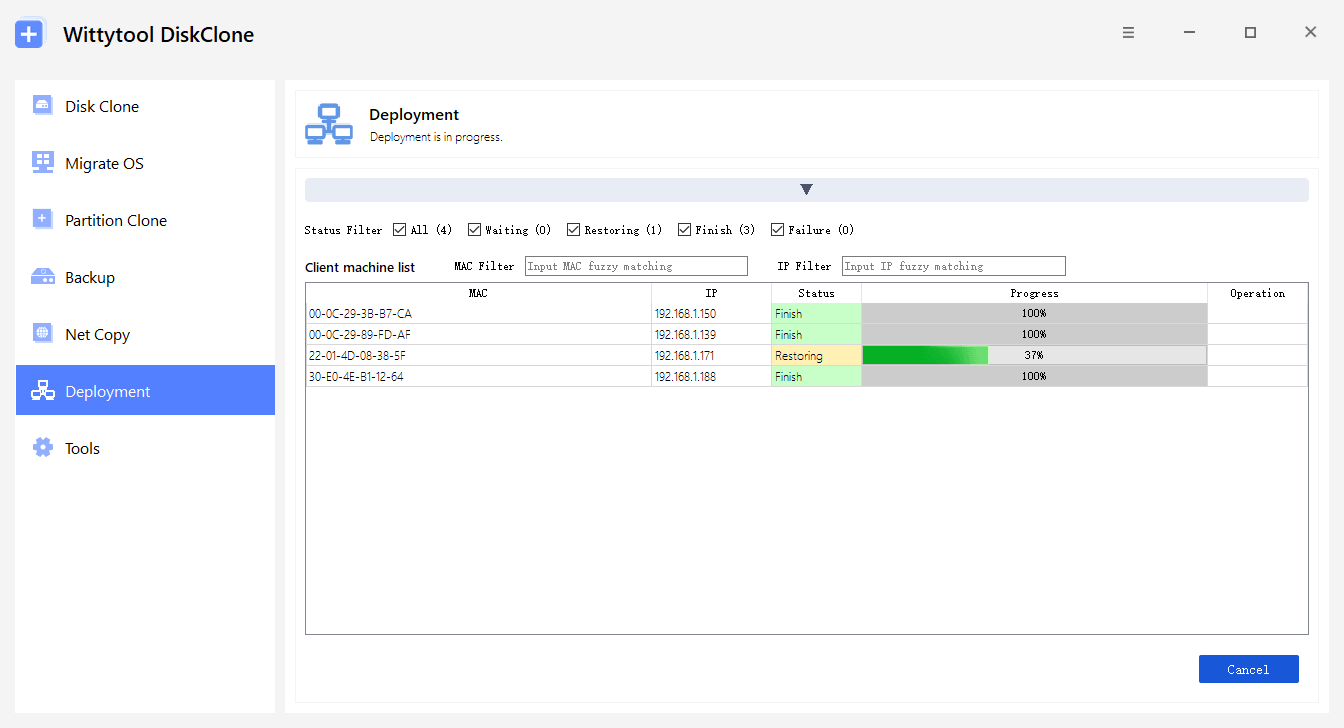
Ready for class means more than a completed deployment.
After deployment, check the actual teaching setup. Confirm that students can sign in, use the required apps, and access the devices and network resources needed for the course.
Record the image version and any exceptions. When the course changes, update the reference setup and test a new image before reuse.
- Windows starts correctly
- Required course apps work
- Teaching devices and network are available
- Image version and handover checks are recorded
School computer imaging FAQs
Can we use an existing classroom PC as the source?
Yes. With Wittytool Disk Clone, you can create a system image from an existing classroom PC that already has the required course apps, local accounts, and settings. Check the source environment and test the image on a representative lab PC before deploying it more widely.
Will deployment keep files already on the target PCs?
No. Deployment overwrites the selected target disk and deletes its existing partitions. Back up the student, teacher, or other files you need to keep, and verify the backup before connecting deployment clients.
Can the lab include different PC models?
Wittytool Disk Clone supports deployment to dissimilar hardware through Universal Restore. Test the image on representative hardware and verify startup, drivers, course apps, activation, and peripherals before deploying across the lab.
How do we prepare the image for the next term?
Update the reference PC for the next course or term, create and label a new image, and test it before reuse. Keep a previously tested image and a clear handover checklist.