


To deploy a Windows 11 image to multiple computers, prepare a source PC with the applications and settings you need, create a compatible system image, and distribute it to the target PCs through a deployment server. Test the image on one computer before expanding the deployment, then check each PC before handing it over.
This approach is useful when you want to give an office, classroom, or lab a consistent Windows environment without reinstalling and configuring every application on each device.
Back up the target computers first. Image deployment replaces the destination system. In the Wittytool Disk Clone workflow covered here, deployment deletes the target disk’s partitions and writes the image to that disk. Automatic deployment can begin when a client connects, so you must confirm the destination disk and protect existing files before connecting it.
Choose the Right Windows 11 Deployment Workflow
Start with the result you need. Installing Windows, configuring an existing installation, and restoring a complete system image solve different problems.
| Your goal | Suitable approach | What to prepare |
|---|---|---|
| Copy a configured Windows environment, including applications and accounts, to multiple PCs | Network image deployment with Wittytool Disk Clone | A system image created by Wittytool Disk Clone, a deployment server, and target clients |
| Build and deploy a custom Windows WIM image using Microsoft tools | Sysprep, WinPE, and DISM | A generalized reference installation, boot environment, partition layout, and deployment procedure |
| Configure devices that already have an appropriate Windows installation | Windows Autopilot with your device management environment | Device registration, deployment profiles, applications, and policies |
Microsoft’s WIM deployment documentation covers capturing and applying Windows, including the supporting partition and boot configuration. A WIM file is not interchangeable with every imaging tool’s backup format.
For initial deployment, Windows Autopilot configures the existing OEM Windows installation with applications and policies. It also supports reset and recovery scenarios, but it is a different workflow from distributing your own captured system image.
If you only need a fresh Windows installation, installation media may be enough. If you need to upgrade existing PCs while keeping their individual environments, plan an upgrade process rather than overwrite them with a shared image.
If you are replacing an existing Windows Deployment Services setup, review the WDS alternatives guide to identify which network boot and image deployment functions you need to retain.
Before You Deploy a Windows 11 Image
Prepare the Source Computer and Check Target Hardware
Use a source computer that contains the environment you actually want to distribute. Confirm the Windows edition and build, install the required updates and applications, and test the settings that every target PC should receive.
Review the accounts and files in the image. Remove personal documents, saved credentials, and other content that should not appear on every deployed computer. A configured source PC can save setup work, but it can also distribute an unwanted configuration to every target.
Check each target against the current Windows 11 requirements, including processor compatibility, TPM 2.0, and UEFI firmware that is Secure Boot capable. Restoring an image does not remove those requirements.
Also check the target hardware and available storage against your planned image. Windows 11’s minimum storage requirement alone does not establish that a disk can accommodate your configured system and its partition layout. For mixed hardware, use a representative pilot computer for each hardware group and confirm that storage and network drivers work.
Prepare the Deployment Server, Network, and Boot Environment
Keep the three computer roles clear:
| Role | Purpose |
|---|---|
| Source computer | Contains the Windows installation you capture |
| Deployment server | Makes the image available and monitors deployment |
| Target computer | Receives the image on its selected destination disk |
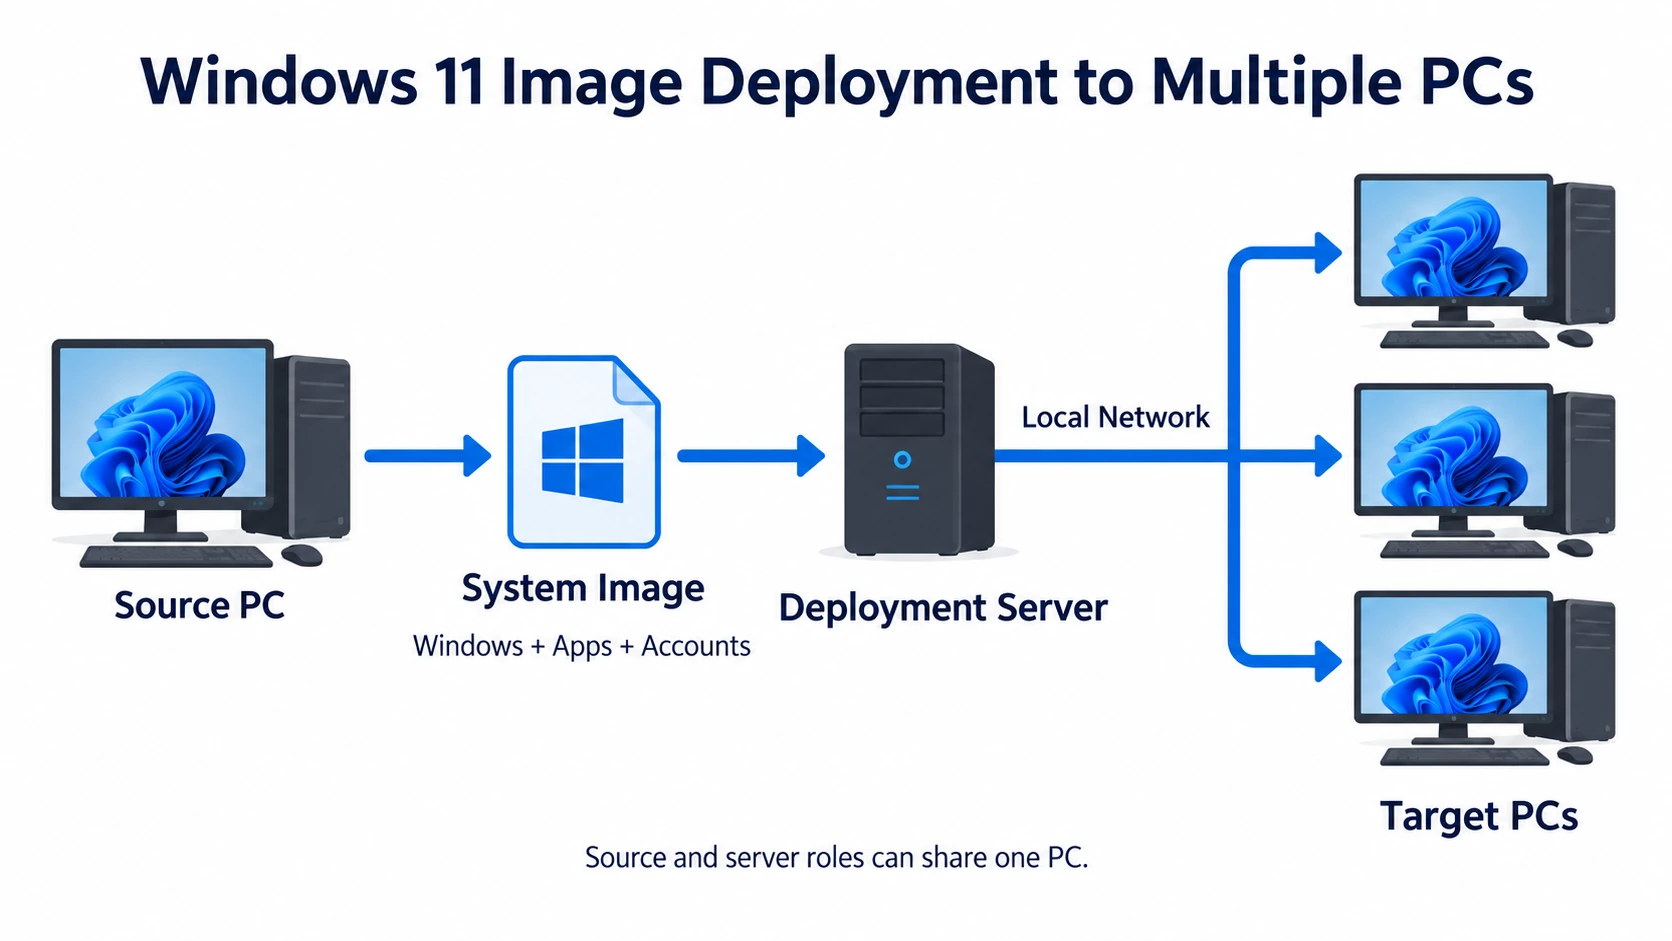
The server role is a function of Wittytool Disk Clone. A compatible PC with the software installed can act as the deployment server; the role does not require the Windows Server operating system.
Make sure the deployment server can access the image file and that the targets can reach the server over the network. Use a wired connection for the WinPE client environment. Microsoft’s WinPE networking guidance explains that general wireless networking is not supported and that some network adapters need additional drivers.
Prepare a working WinPE environment that can run the target client and detect its network adapter and storage. Wittytool Disk Clone supports WinPE bootable media and PXE. PXE gives you a network boot option; it does not replace the need to verify that the client environment works on your target hardware.
Back Up Target Data and Verify Each Destination Disk
Before deployment, copy any target files you need to retain to separate storage and check that you can access the backup. The applications and accounts preserved by the image come from the source computer. They do not preserve the target computer’s existing files.
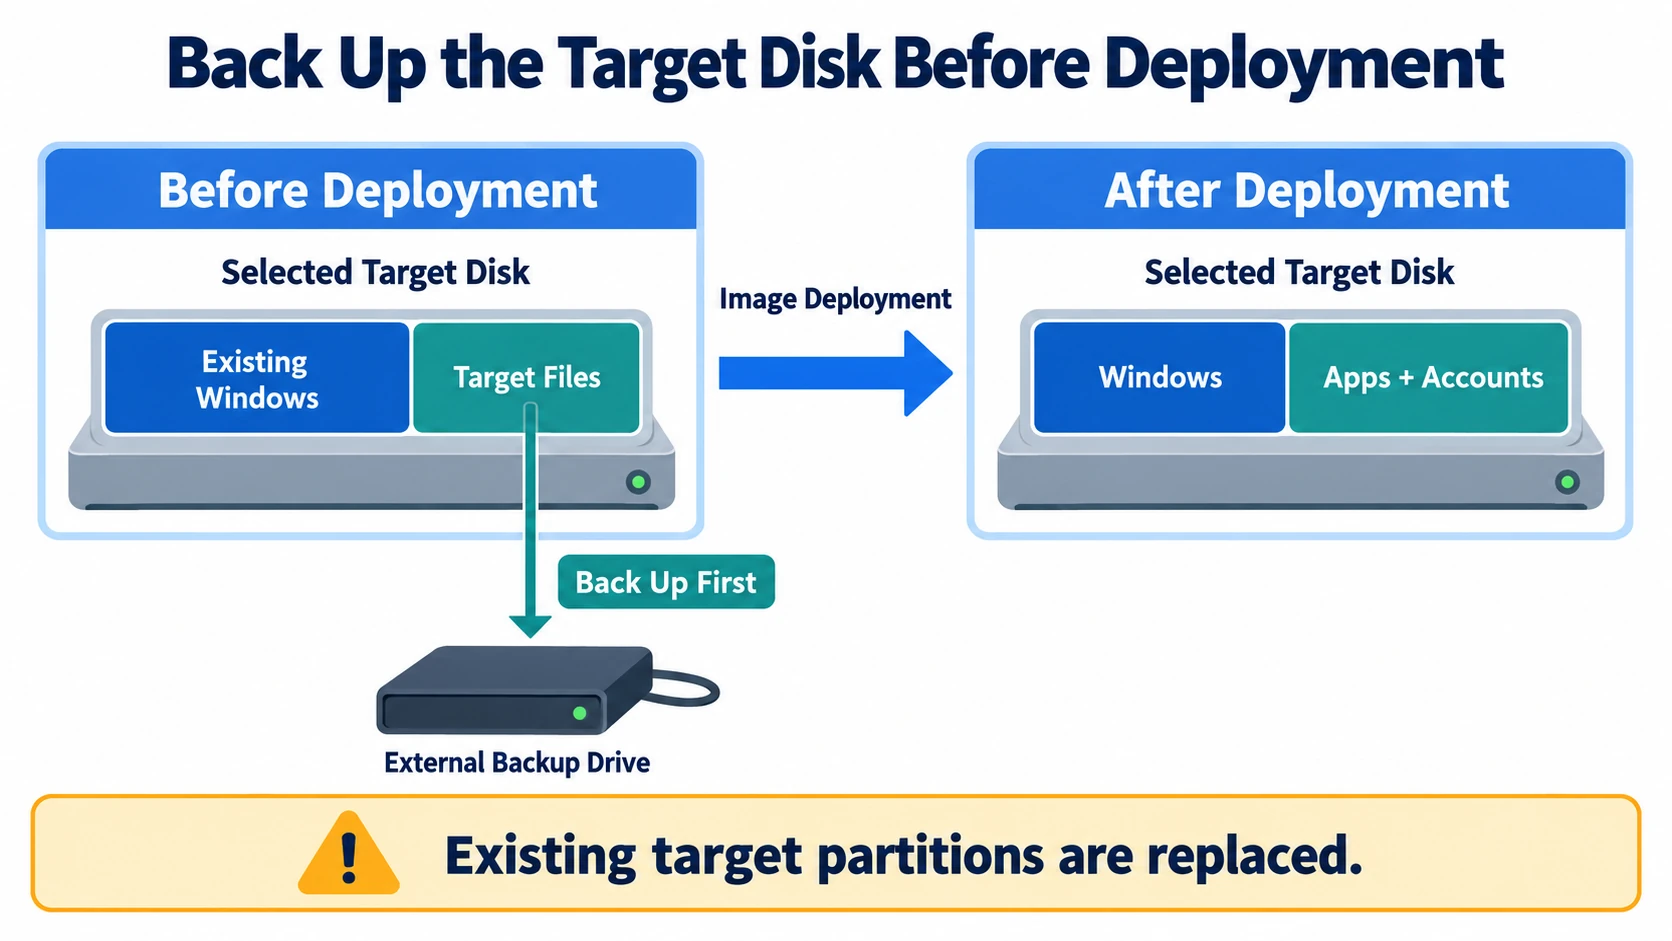
For every target, record its device identifier, disk number, disk capacity, and intended destination. Do not assume that a disk number identifies the same drive on every PC, especially when machines have several disks or attached USB storage.
Start with a manual pilot deployment so you can review the destination before writing data. Consider automatic deployment only after the pilot passes and you have checked the disk mapping for every machine in the batch. Complete these checks before an automatically configured client connects.
Confirm that your deployment software plan covers the intended devices. You should also plan how to verify Windows and application activation on each PC; copying the environment does not perform that check for you.
Use Wittytool Disk Clone for Network Image Deployment
Wittytool Disk Clone’s image deployment feature supports a graphical server/client workflow for distributing its system or disk images to multiple PCs. You can use manual or automatic deployment, monitor client status from the server, and change target Windows SIDs during deployment. Universal Restore supports deployment to dissimilar hardware.
The product workflow lets you back up the current system without running Sysprep first, preserving the applications and accounts included in the image. Keep that capability separate from Microsoft’s generalization requirements. Changing a SID does not perform all the preparation handled by Sysprep or establish Microsoft support for a deployment method.
Use an image created by Wittytool Disk Clone for this workflow. Its deployment feature accepts its own system and disk image files, rather than WIM files or backups from other imaging products.
Download Wittytool Disk Clone to prepare your source image and deployment server, then validate the workflow on one target PC before expanding the rollout. The current plan comparison lists image deployment in paid plans.
How to Deploy a Windows 11 Image to Multiple Computers
Follow the steps below to configure the server and deploy a backup image to multiple target PCs.
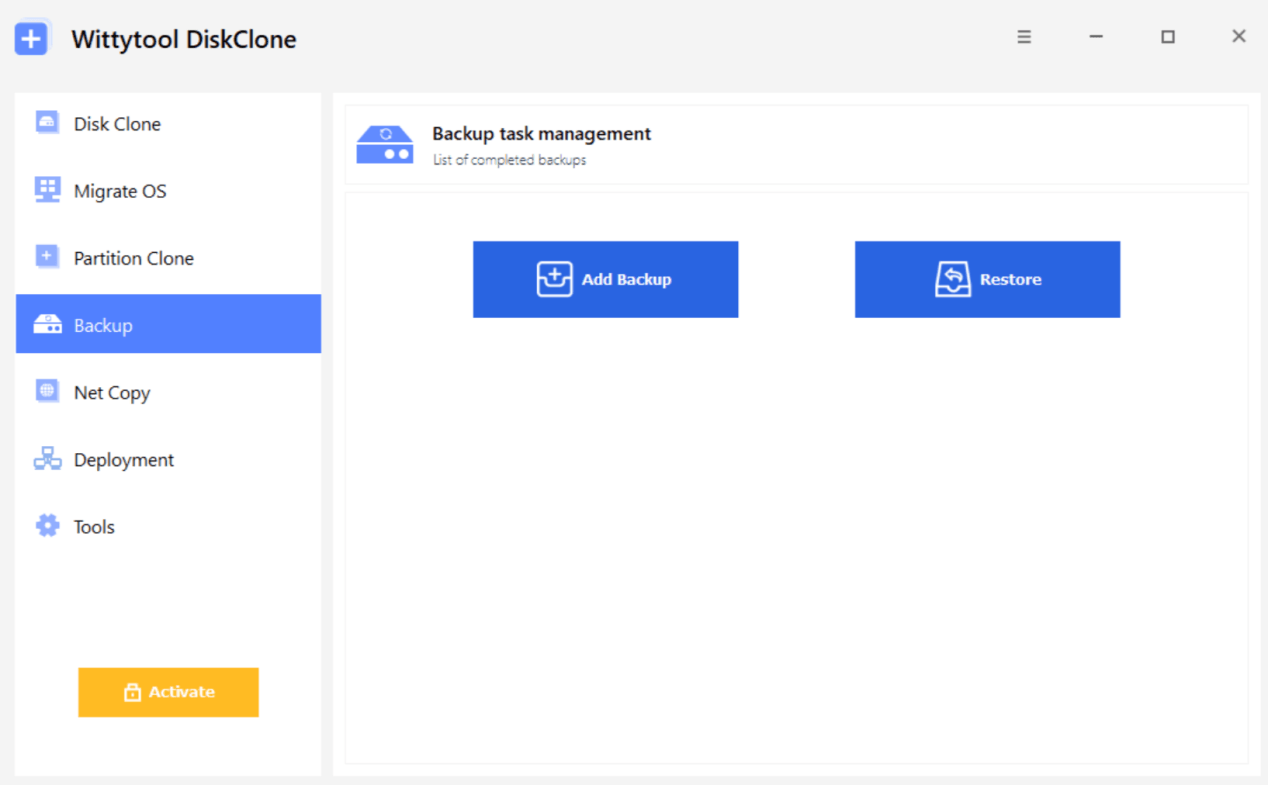
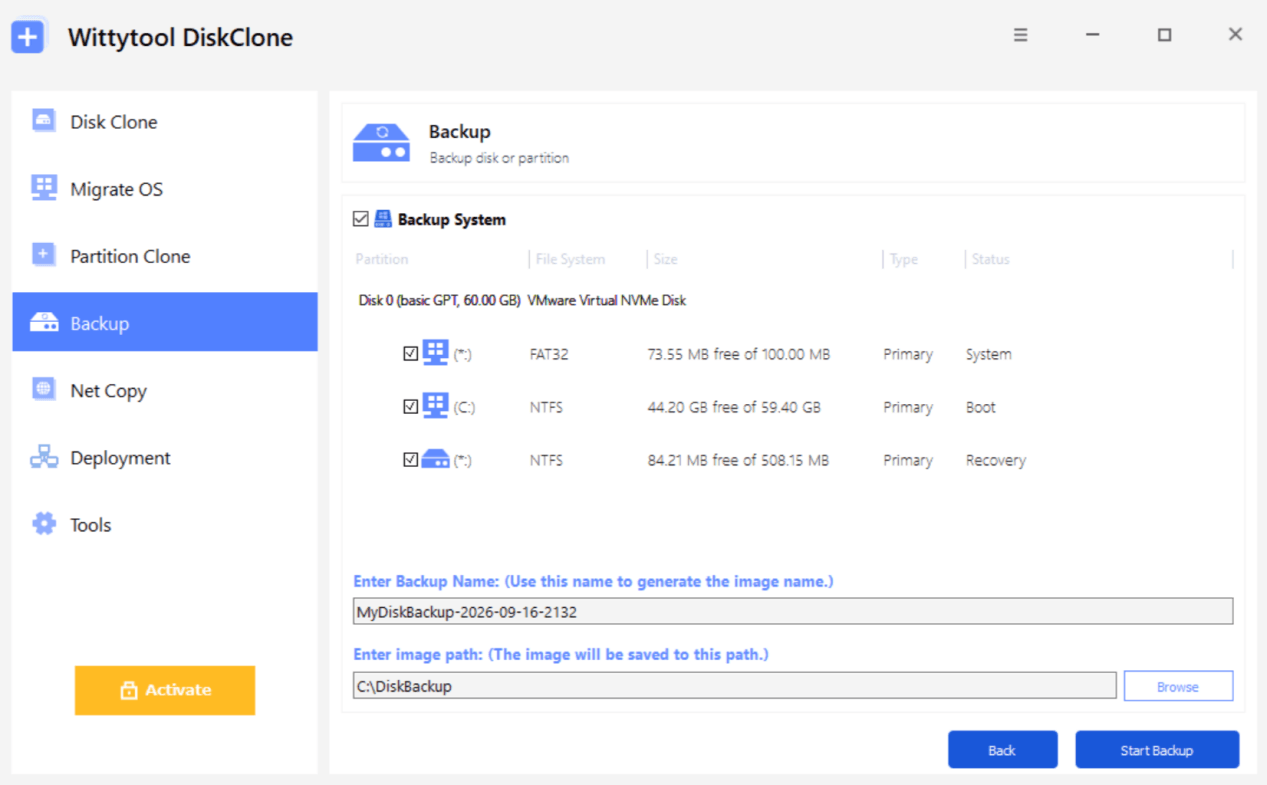
Step 1: Back Up the Source PC
First, create a backup image of the source PC.
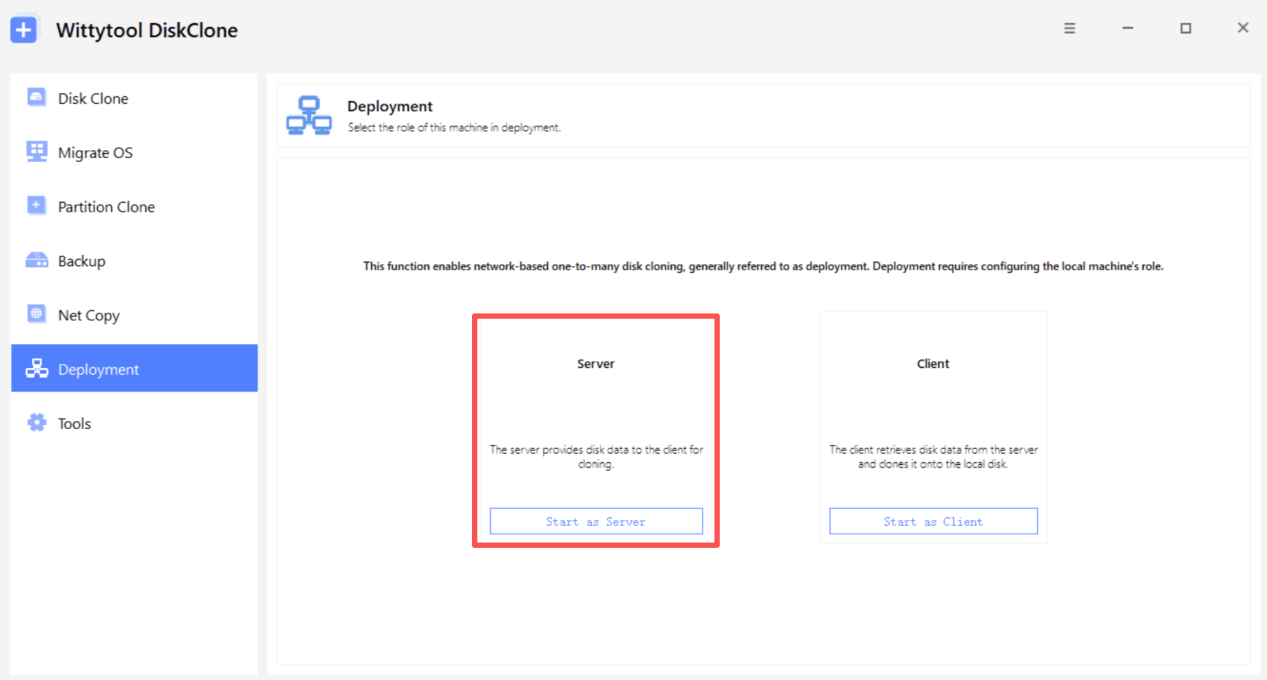
Step 2: Configure the Server
After the backup is complete, configure the server:
Open Deployment. Select Start as Server.
Step 3: Select the Backup Image
Click Browse and select the backup image you created in Step 1.
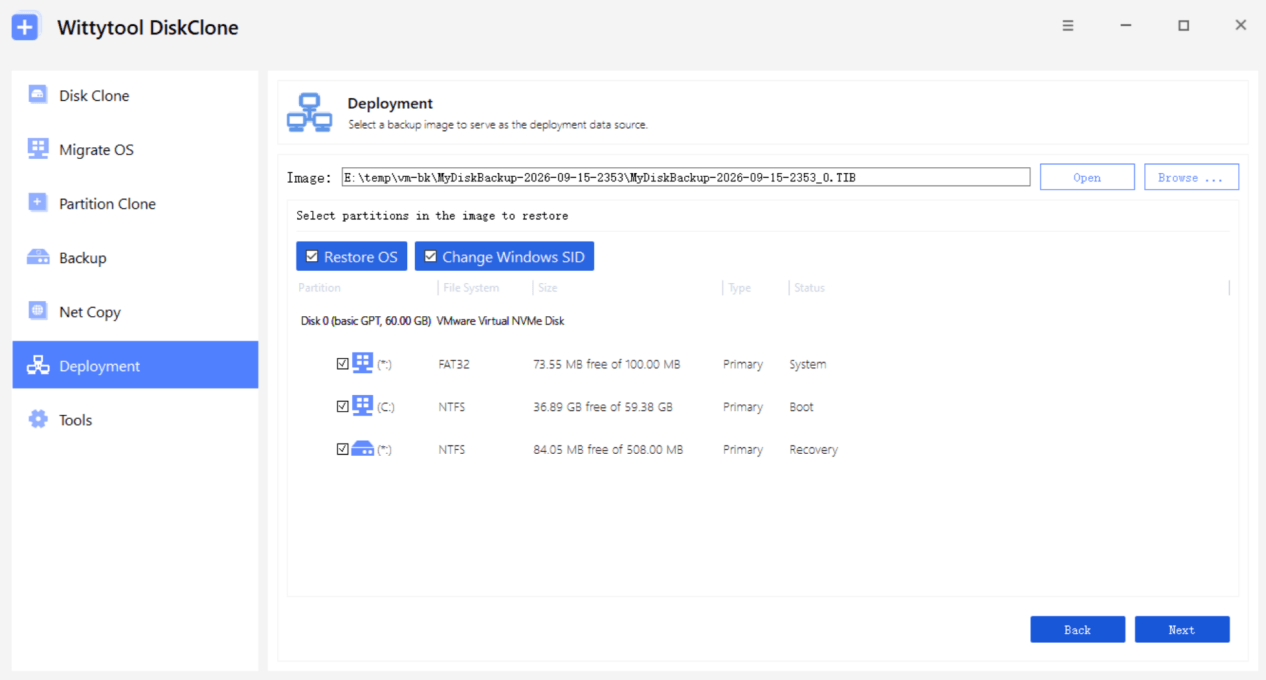
If the selected image is a system image, the Restore OS and Change Windows SID options will appear.
Select these options according to your requirements:
- Restore OS: Automatically selects the partitions related to the operating system.
- Change Windows SID: Changes the SID in the current image.
Step 4: Configure Target PC Settings
Configure the target PC settings according to your deployment requirements.
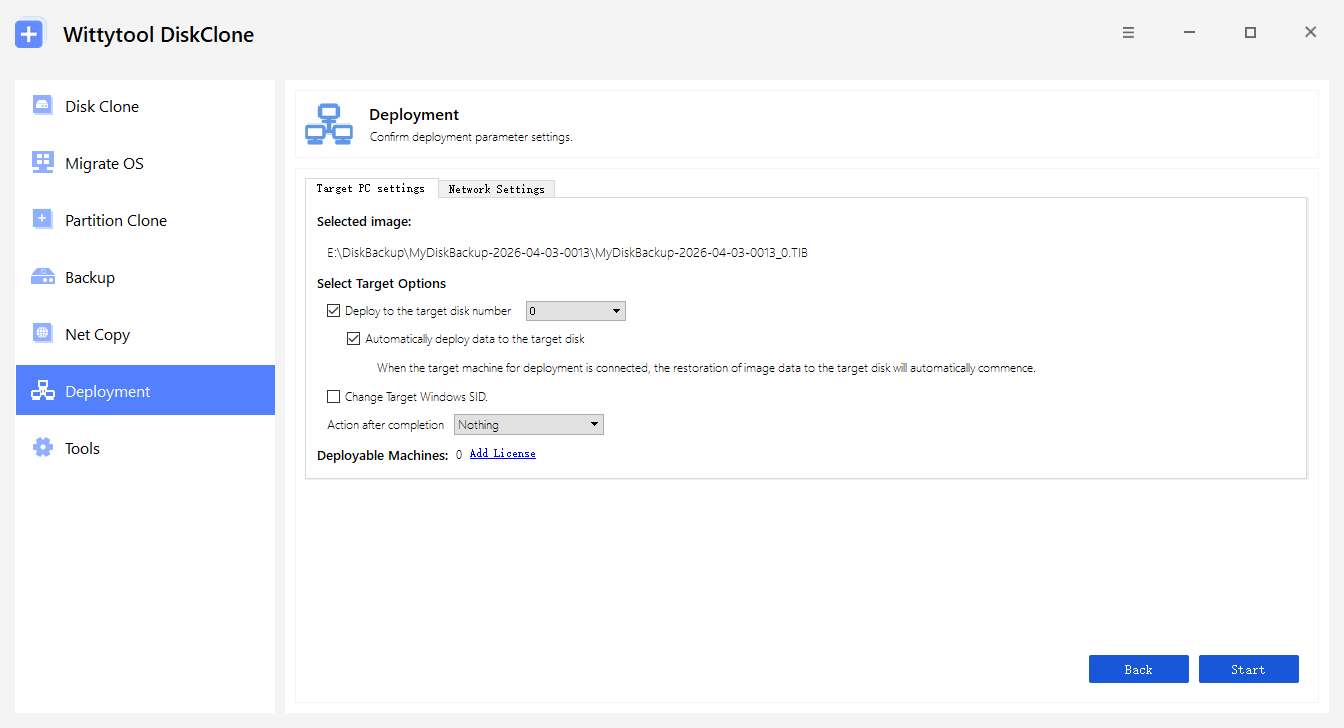
Under Target Options:
- Set Target Disk Number to specify the target disk for deployment.
- Select Automatically Deploy Data to the Target Disk to enable automatic deployment when Wittytool Disk Clone starts on the target PC.
- If Change Windows SID is selected, the SID on the target PC will be changed automatically to help prevent duplicate SIDs.
The server-side configuration is now complete.
Step 5: Connect the Target PC to the Server
On the target PC, connect to the server to start the deployment. There are two deployment methods: automatic and manual.
——Automatic Deployment——
Use automatic deployment when Target Disk Number and Automatically Deploy Data to the Target Disk have been configured on the server.
Method 1: Start Wittytool Disk Clone in WinPE
- Start Wittytool Disk Clone in WinPE mode on the target PC.
- The program will automatically detect the server and obtain its information.
- Wittytool Disk Clone will automatically connect to the server.
- After connecting, the deployment will be performed automatically according to the server-side settings until it is complete.
Method 2: Start from the Command Prompt
You can start the deployment directly from the command prompt using:
DiskClone.exe deployment [server IP] [port]Example: DiskClone.exe deployment 192.168.1.1 3002
The target PC will connect directly to the server and perform the deployment according to the server-side settings.
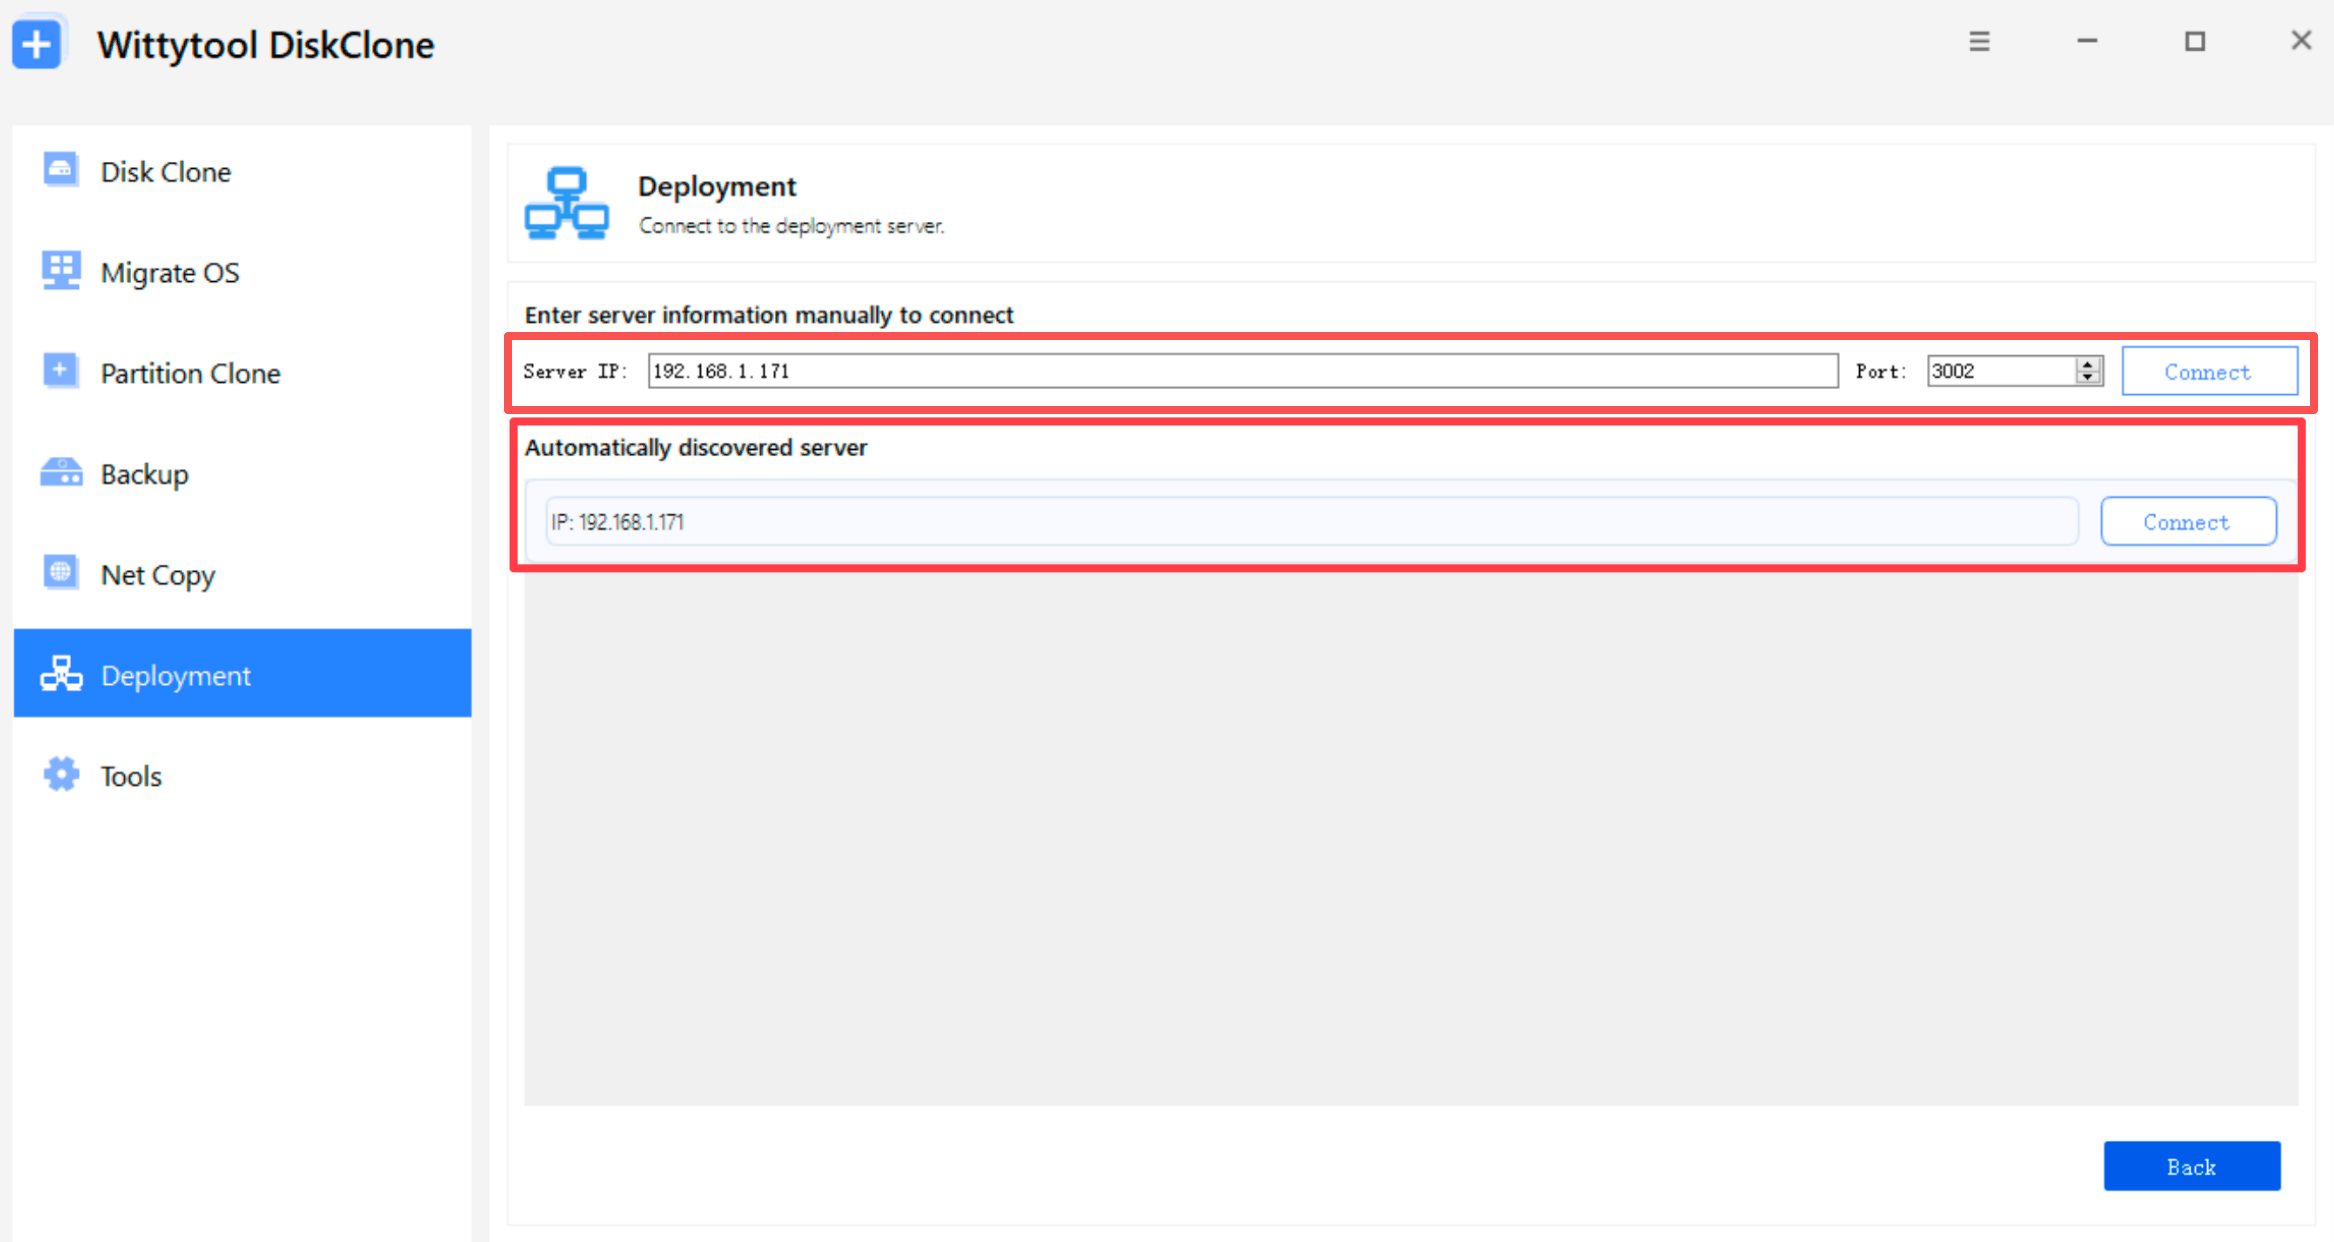
Method 3: Connect Through Deployment
- Open Deployment on the target PC.
- The program will automatically search for the server IP information.
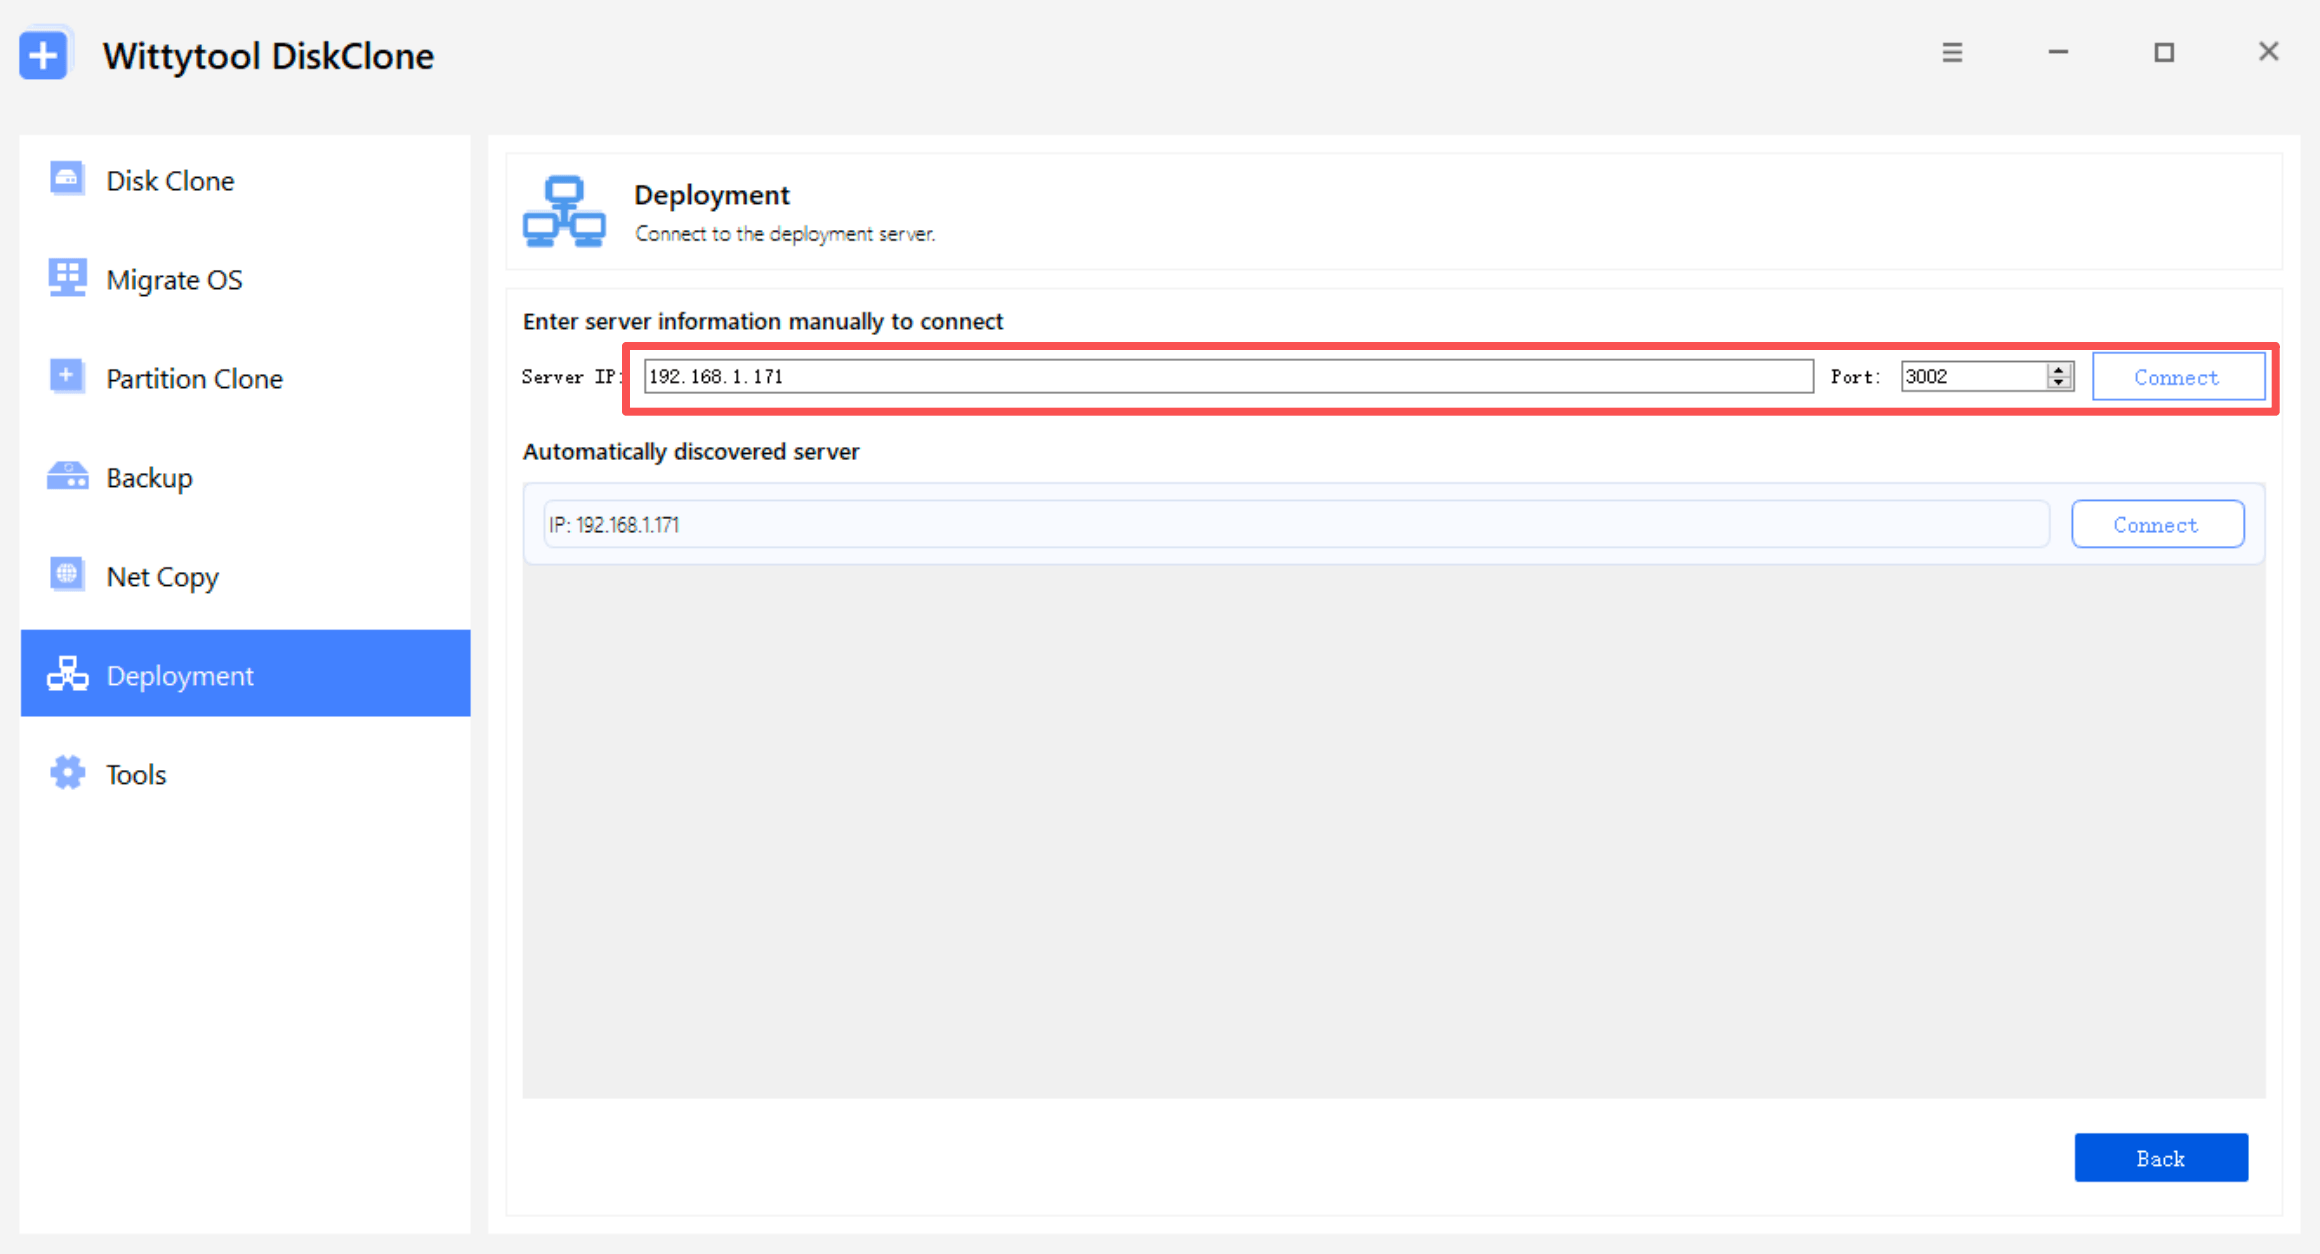
- You can also enter the server IP information manually.
- Click Connect after the server information is displayed.
- The target PC will connect to the server and perform the deployment according to the server-side settings.
——Manual Deployment——
Use manual deployment when Target Disk Number and Automatically Deploy Data to the Target Disk have not been configured on the server.
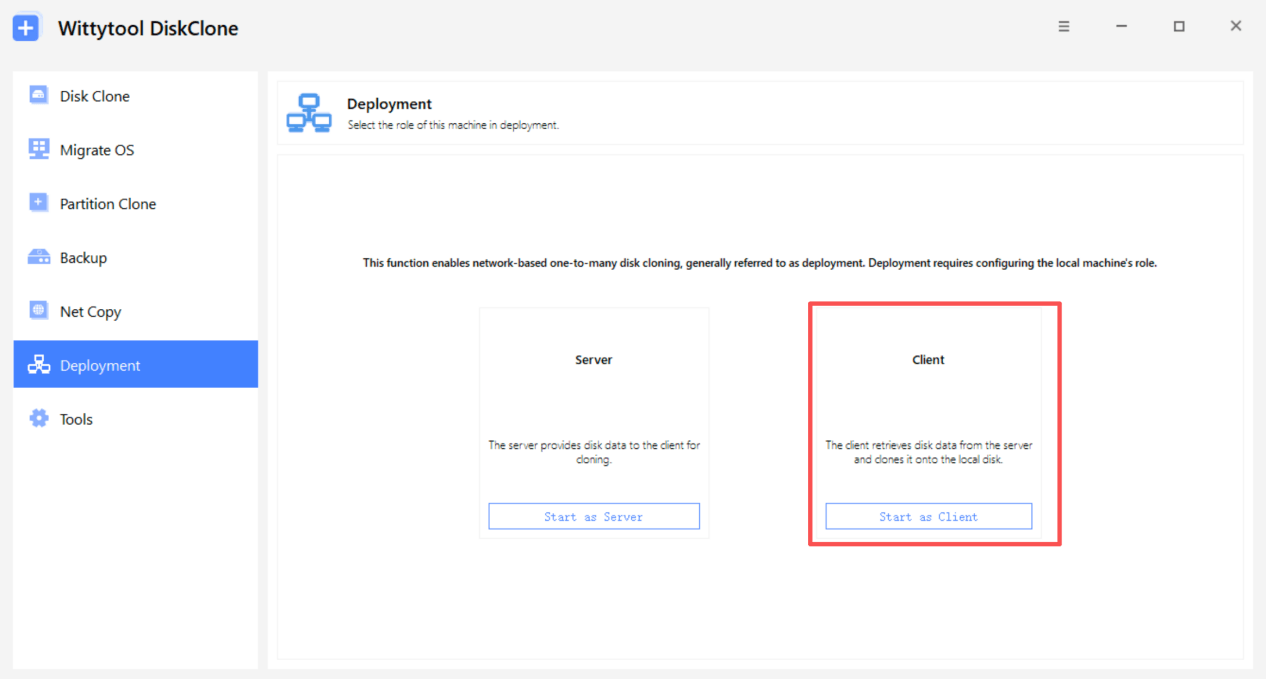
1. On the target PC, open Deployment and select Start as Client.
2. Enter the server IP address and Port, then click Connect.
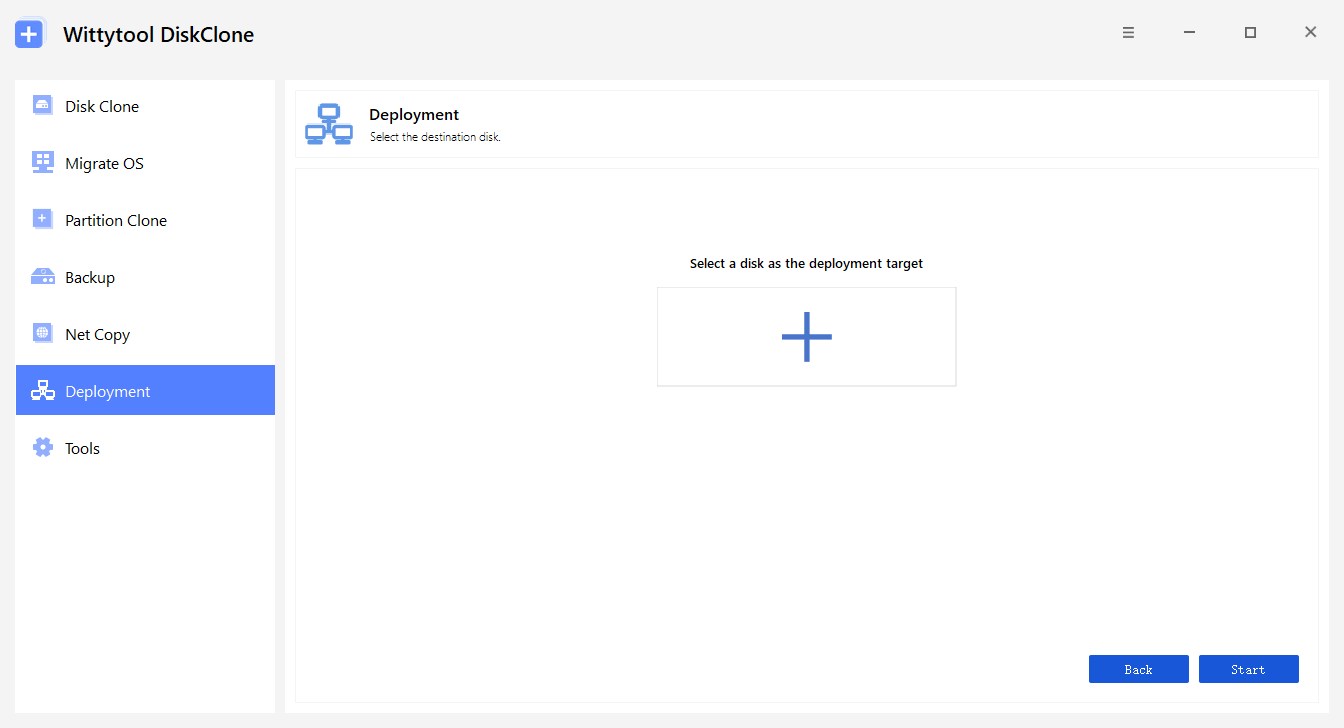
3. Select the disk where you want to deploy the image.
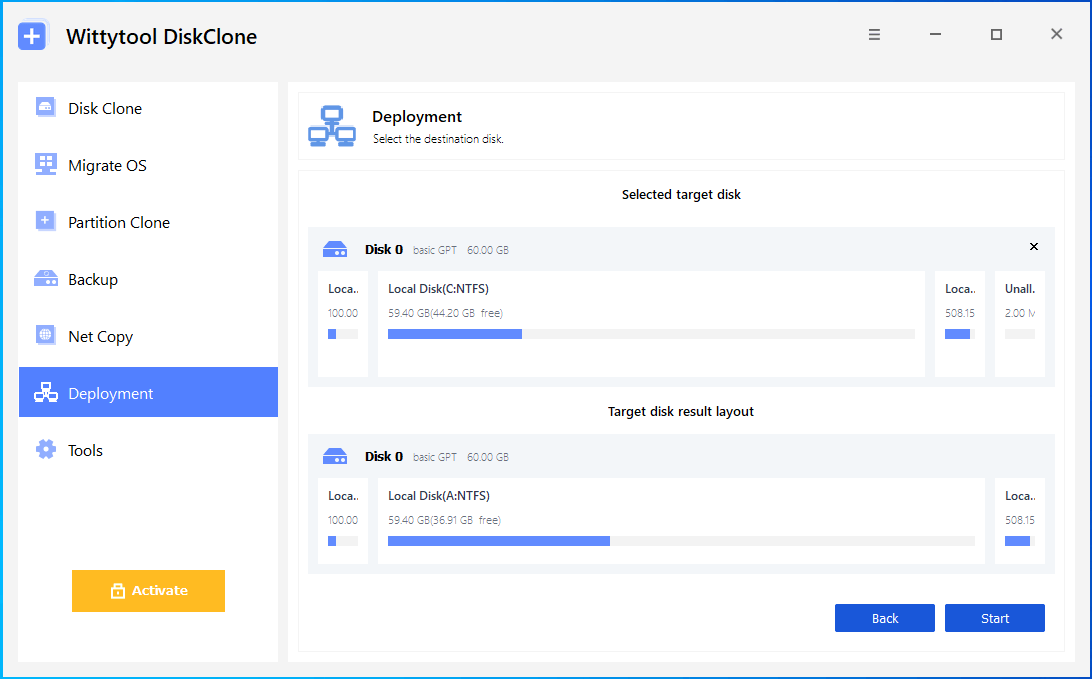
4. Click Start to begin the deployment.
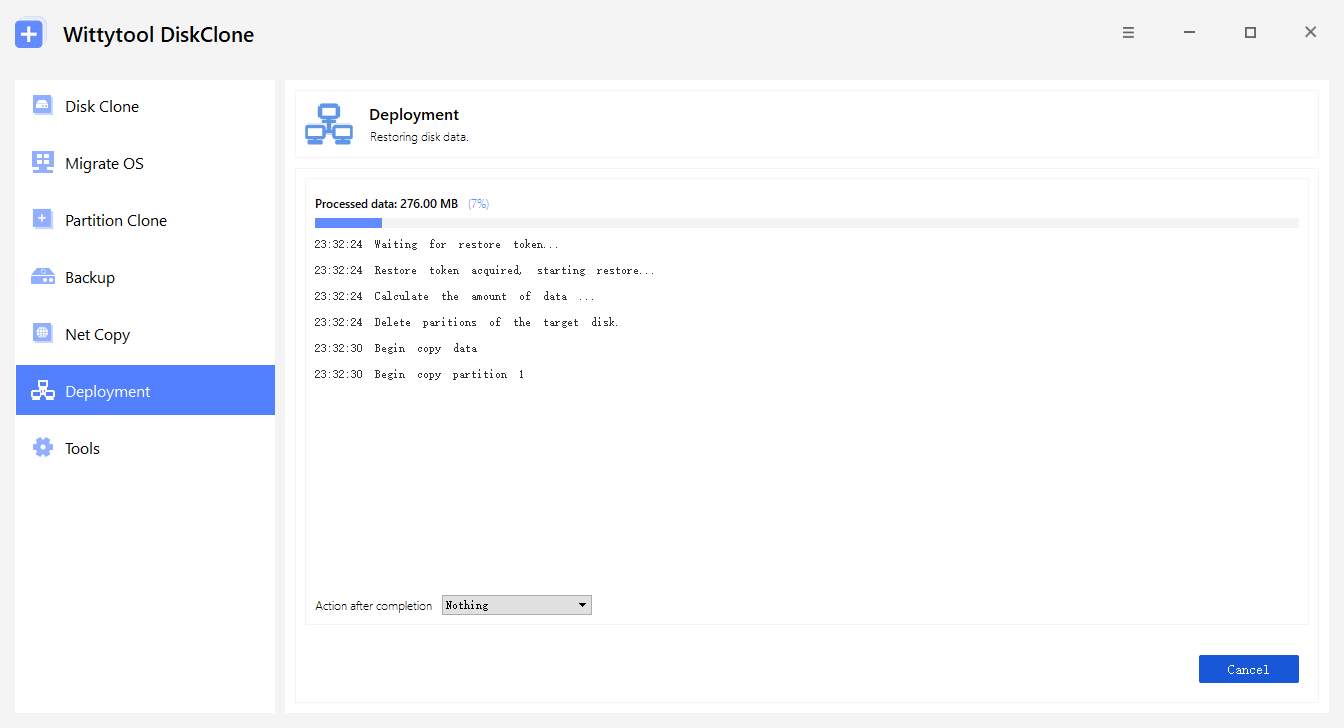
Step 6: Monitor the Deployment Progress
You can monitor the deployment progress in real time from the server side.
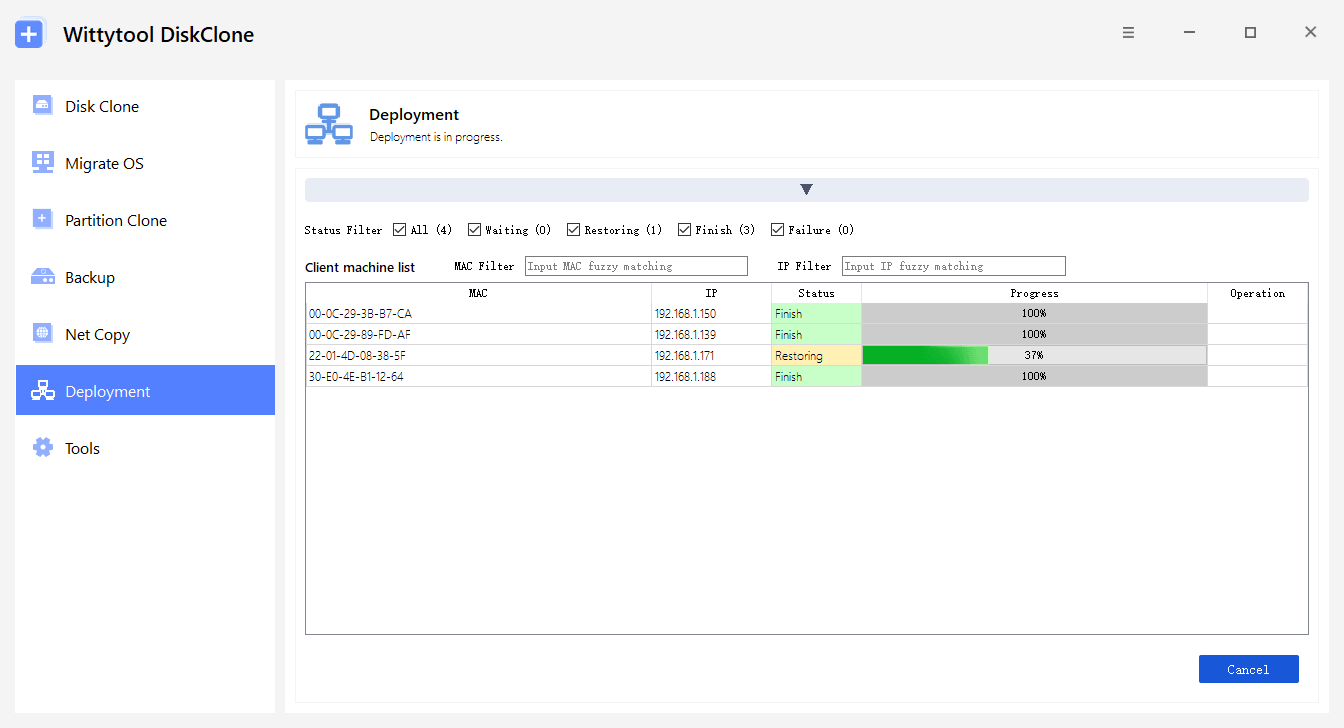
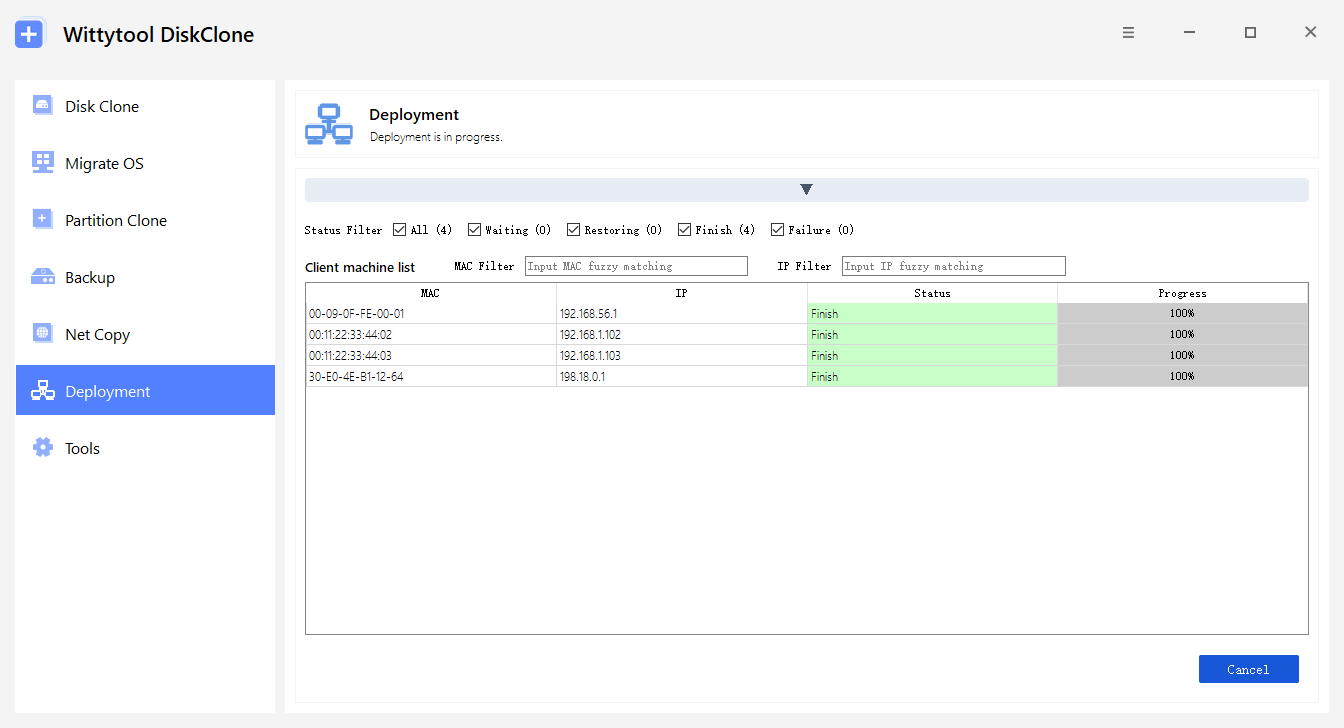
When the deployment is complete, the entire deployment process is finished.
Verify Each Computer Before Handover
A completed restore is the start of validation. A progress bar at 100% does not confirm that Windows boots, applications work, or the computer is ready for its user.
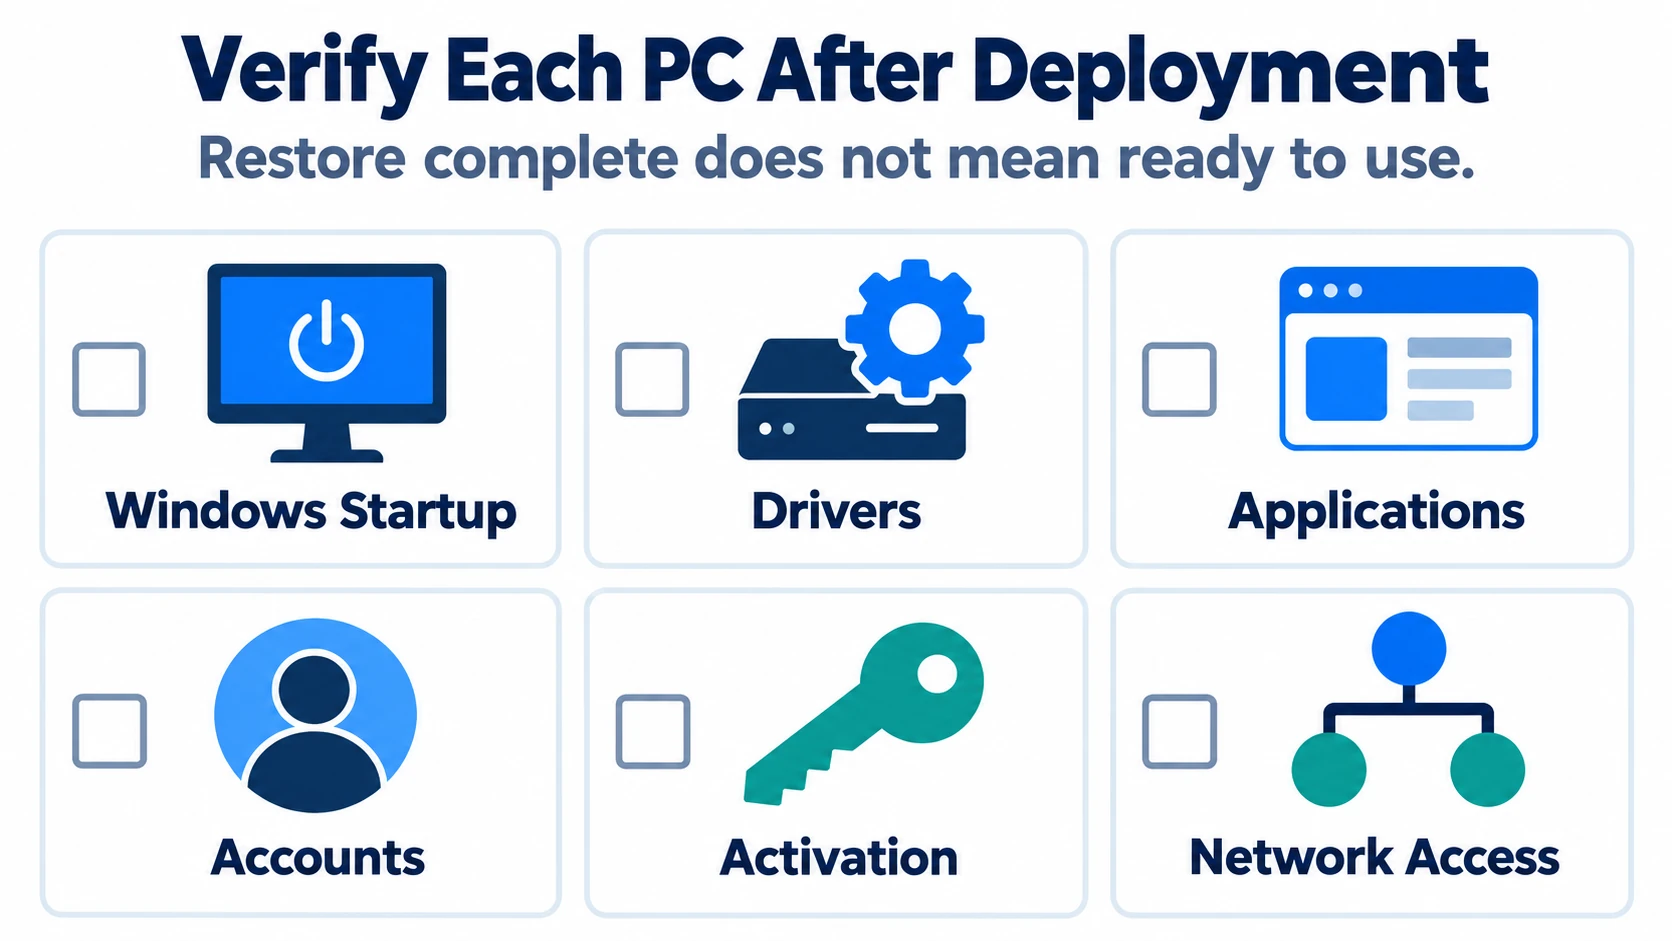
Validate the pilot before deploying the same image to the remaining PCs. Then use the same checklist for each target:
| Check | What to confirm |
|---|---|
| Windows startup | The PC boots from the intended internal drive and starts the expected Windows edition and build |
| Hardware | Storage, network, display, and required peripherals work without unresolved driver problems |
| Applications | Required programs launch, and a representative work task completes successfully |
| Accounts and settings | Local accounts, permissions, and configuration match your deployment plan |
| Device identity | The computer name fits your naming plan, and target SID handling follows your chosen workflow |
| Activation | Windows and licensed applications show the expected activation status |
| Managed access | Where required, domain access, device management, and business resources work for the intended user |
Treat local SID handling, computer naming, domain membership, and device management registration as separate checks. Changing a local machine SID does not change domain account SIDs or automatically join a device to a domain.
For a source PC that is already joined to a domain, review the domain-joined Windows PC cloning guide when planning source preparation and the target computers’ domain access.
Keep a simple deployment record with the target identifier, image version, restore result, validation result, and any follow-up work. Use the server’s MAC/IP information to match status entries to physical devices. Resolve failed targets individually rather than count every connected client as a successful deployment.
Troubleshoot Common Deployment Problems
The Client Cannot Connect to the Server
Check that the deployment service is running and that the client is using the correct server IP address and configured port. Use the values from your deployment environment, not the sample values in a screenshot.
Confirm that WinPE detects the network adapter and obtains a usable network configuration. If Windows networking works but WinPE networking does not, investigate the WinPE driver and initialization process. The Microsoft WinPE networking guidance linked above documents those checks.
Also check the cable, switch connection, network segmentation, and the access rules needed for your configured service. Make a specific approved rule adjustment if necessary rather than disable the firewall generally. Continue with a single client until the connection is reliable.
The Target Disk Is Missing or Windows Does Not Boot
If the destination disk is missing from the client environment, first check whether WinPE has the necessary storage driver. If the disk appears but Windows does not boot after restoration, review the selected destination, the restored system partitions, firmware boot settings, and hardware compatibility.
Do not assume that restoring only the Windows partition creates a complete bootable installation. The image and destination layout need the system components required for startup.
Stop the batch while you investigate the pilot failure. Universal Restore supports dissimilar hardware, but you still need to validate the actual hardware and drivers. Avoid making unrelated firmware changes or bypassing Windows 11 hardware requirements to force the deployment through.
Windows Boots, but Apps or Network Authentication Fail
Separate an application configuration or activation problem from a network authentication problem. Test the affected application or resource, record the exact error, and check the relevant account, device name, network settings, and management state.
Duplicate SIDs are one possible cause of authentication failures in specific updated Windows environments. Microsoft documents this issue for Windows 11 24H2 and 25H2, and Windows Server 2025, after relevant updates released from August 29, 2025 onward. Symptoms can include inaccessible network shares and failed Remote Desktop connections. See the Microsoft duplicate SID support article for the affected conditions.
An authentication error alone does not prove a SID conflict. Use the duplicate machine SID checking guide to compare the affected PCs before deciding whether a SID change is appropriate. Confirm the cause before changing identities or repeating the deployment. If you revise the source image or deployment settings, validate the change on a pilot again before continuing the rollout.
FAQs
Can You Use the Same Windows 11 Image on Multiple Computers?
Yes, if the image is compatible with the target hardware and your deployment tool. Validate it on a pilot PC first, check each destination disk, and confirm the required licensing, activation, and device identity settings for each target.
Do You Need Sysprep Before Deploying a Windows 11 Image?
Microsoft’s documented image deployment process requires generalizing Windows with Sysprep before copying it to other PCs, even with similar hardware. Wittytool Disk Clone supports its own deployment workflow without running Sysprep first. Its SID change feature is not equivalent to all Sysprep generalization tasks or a guarantee of Microsoft support.
Can You Deploy the Image to Computers with Different Hardware?
Wittytool Disk Clone supports dissimilar hardware deployment through Universal Restore. Test a representative PC from each hardware group and verify startup and drivers before deploying the image more widely. Do not assume every hardware combination will work without further preparation.
Do You Need Windows Server or PXE for This Workflow?
You do not need Windows Server solely to use the deployment server role: a compatible PC with Wittytool Disk Clone installed can act as the server. PXE is a supported network boot option. You can also prepare WinPE bootable media for target clients instead of relying on PXE.
Can Wittytool Disk Clone Deploy a WIM File?
No. The documented deployment feature supports system and disk image files generated by Wittytool Disk Clone. Use a WIM-compatible deployment workflow for a WIM image rather than treat it as a Wittytool Disk Clone backup.
Will Image Deployment Keep the Existing Files on Target Computers?
No. This workflow deletes partitions on the selected target disk and writes the image to it. Back up the target files you need before connecting an automatically configured client or starting a manual deployment. Preserved applications and accounts come from the source image.