Last updated on May 8, 2026
Upgrading your M.2 SSD to a larger drive is essential for expanding storage or replacing aging hardware. Whether you’re moving OS to new M.2 in laptop or upgrading a desktop, cloning ensures seamless data migration without reinstalling Windows. This guide also addresses advanced scenarios like clone NVMe SSD to NVMe SSD and install Windows 7 on NVMe SSD for legacy systems.
Part 1: Prepare M.2 SSD
Cloning a hard drive to an SSD enhances your computer’s performance without requiring a Windows reinstallation or risking data loss. This process applies equally when upgrading to a larger M.2 SSD. To ensure a smooth transition, follow these preparatory steps for your new M.2 SSD:
Step 1. Verify SSD Slot Availability
- Open your laptop or desktop case using a screwdriver.
- Inspect the number of available M.2 SSD slots.
Note: If your device lacks sufficient slots, refer to specialized methods for cloning with a single slot.
Step 2. Select the Correct M.2 SSD
When purchasing a new M.2 SSD, prioritize these factors:
- Ensure the SSD matches the length of your PC’s slot.
- For single-slot systems: Acquire an M.2 SSD USB adapter alongside the new drive.
- Opt for a capacity 2–3 times larger than the original SSD (e.g., 500GB or 1TB models).
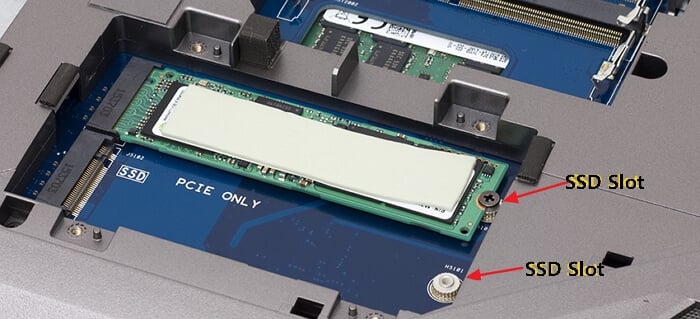
Step 3. Install the New M.2 SSD
- For single-slot PCs: Connect the SSD via the USB adapter.
- For multi-slot systems:
- Laptops: Open the M.2 slot → Insert the SSD → Secure with screws → Reattach the cover.
- Desktops: Locate the PCIe-labeled M.2 connector → Insert the SSD → Fasten with the mounting screw.
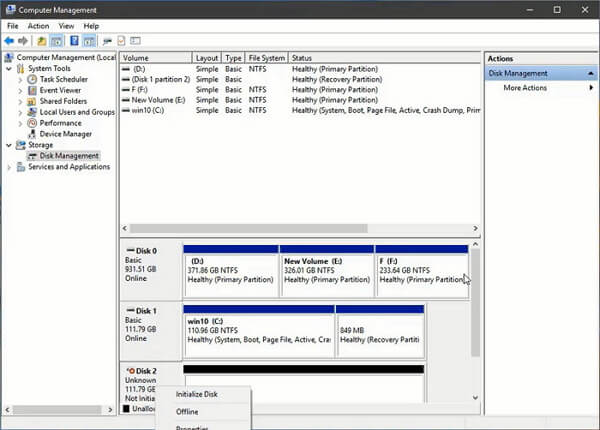
Step 4. Initialize the New SSD
To prepare for cloning:
- Open Disk Management and right-click the original SSD → Check its partition style (MBR/GPT).
- Right-click the new SSD → Select “Initialize Disk” → Match the partition style to the source drive.
With these steps completed, you’re ready to proceed with cloning your M.2 SSD or transferring data between drives efficiently.
Learn More: Clone HDD to M2 SSD
Part 2: How to Clone M.2 SSD to a Larger M.2 SSD
WittyTool DiskClone is a top-rated M.2 cloning tool offering:
- Sector-by-sector cloning for exact replication.
- 4K alignment to boost SSD speed.
- Support for NVMe, SATA, and PCIe interfaces.
Following the steps below to upgrade & clone M.2 SSD by this SSD cloning software:
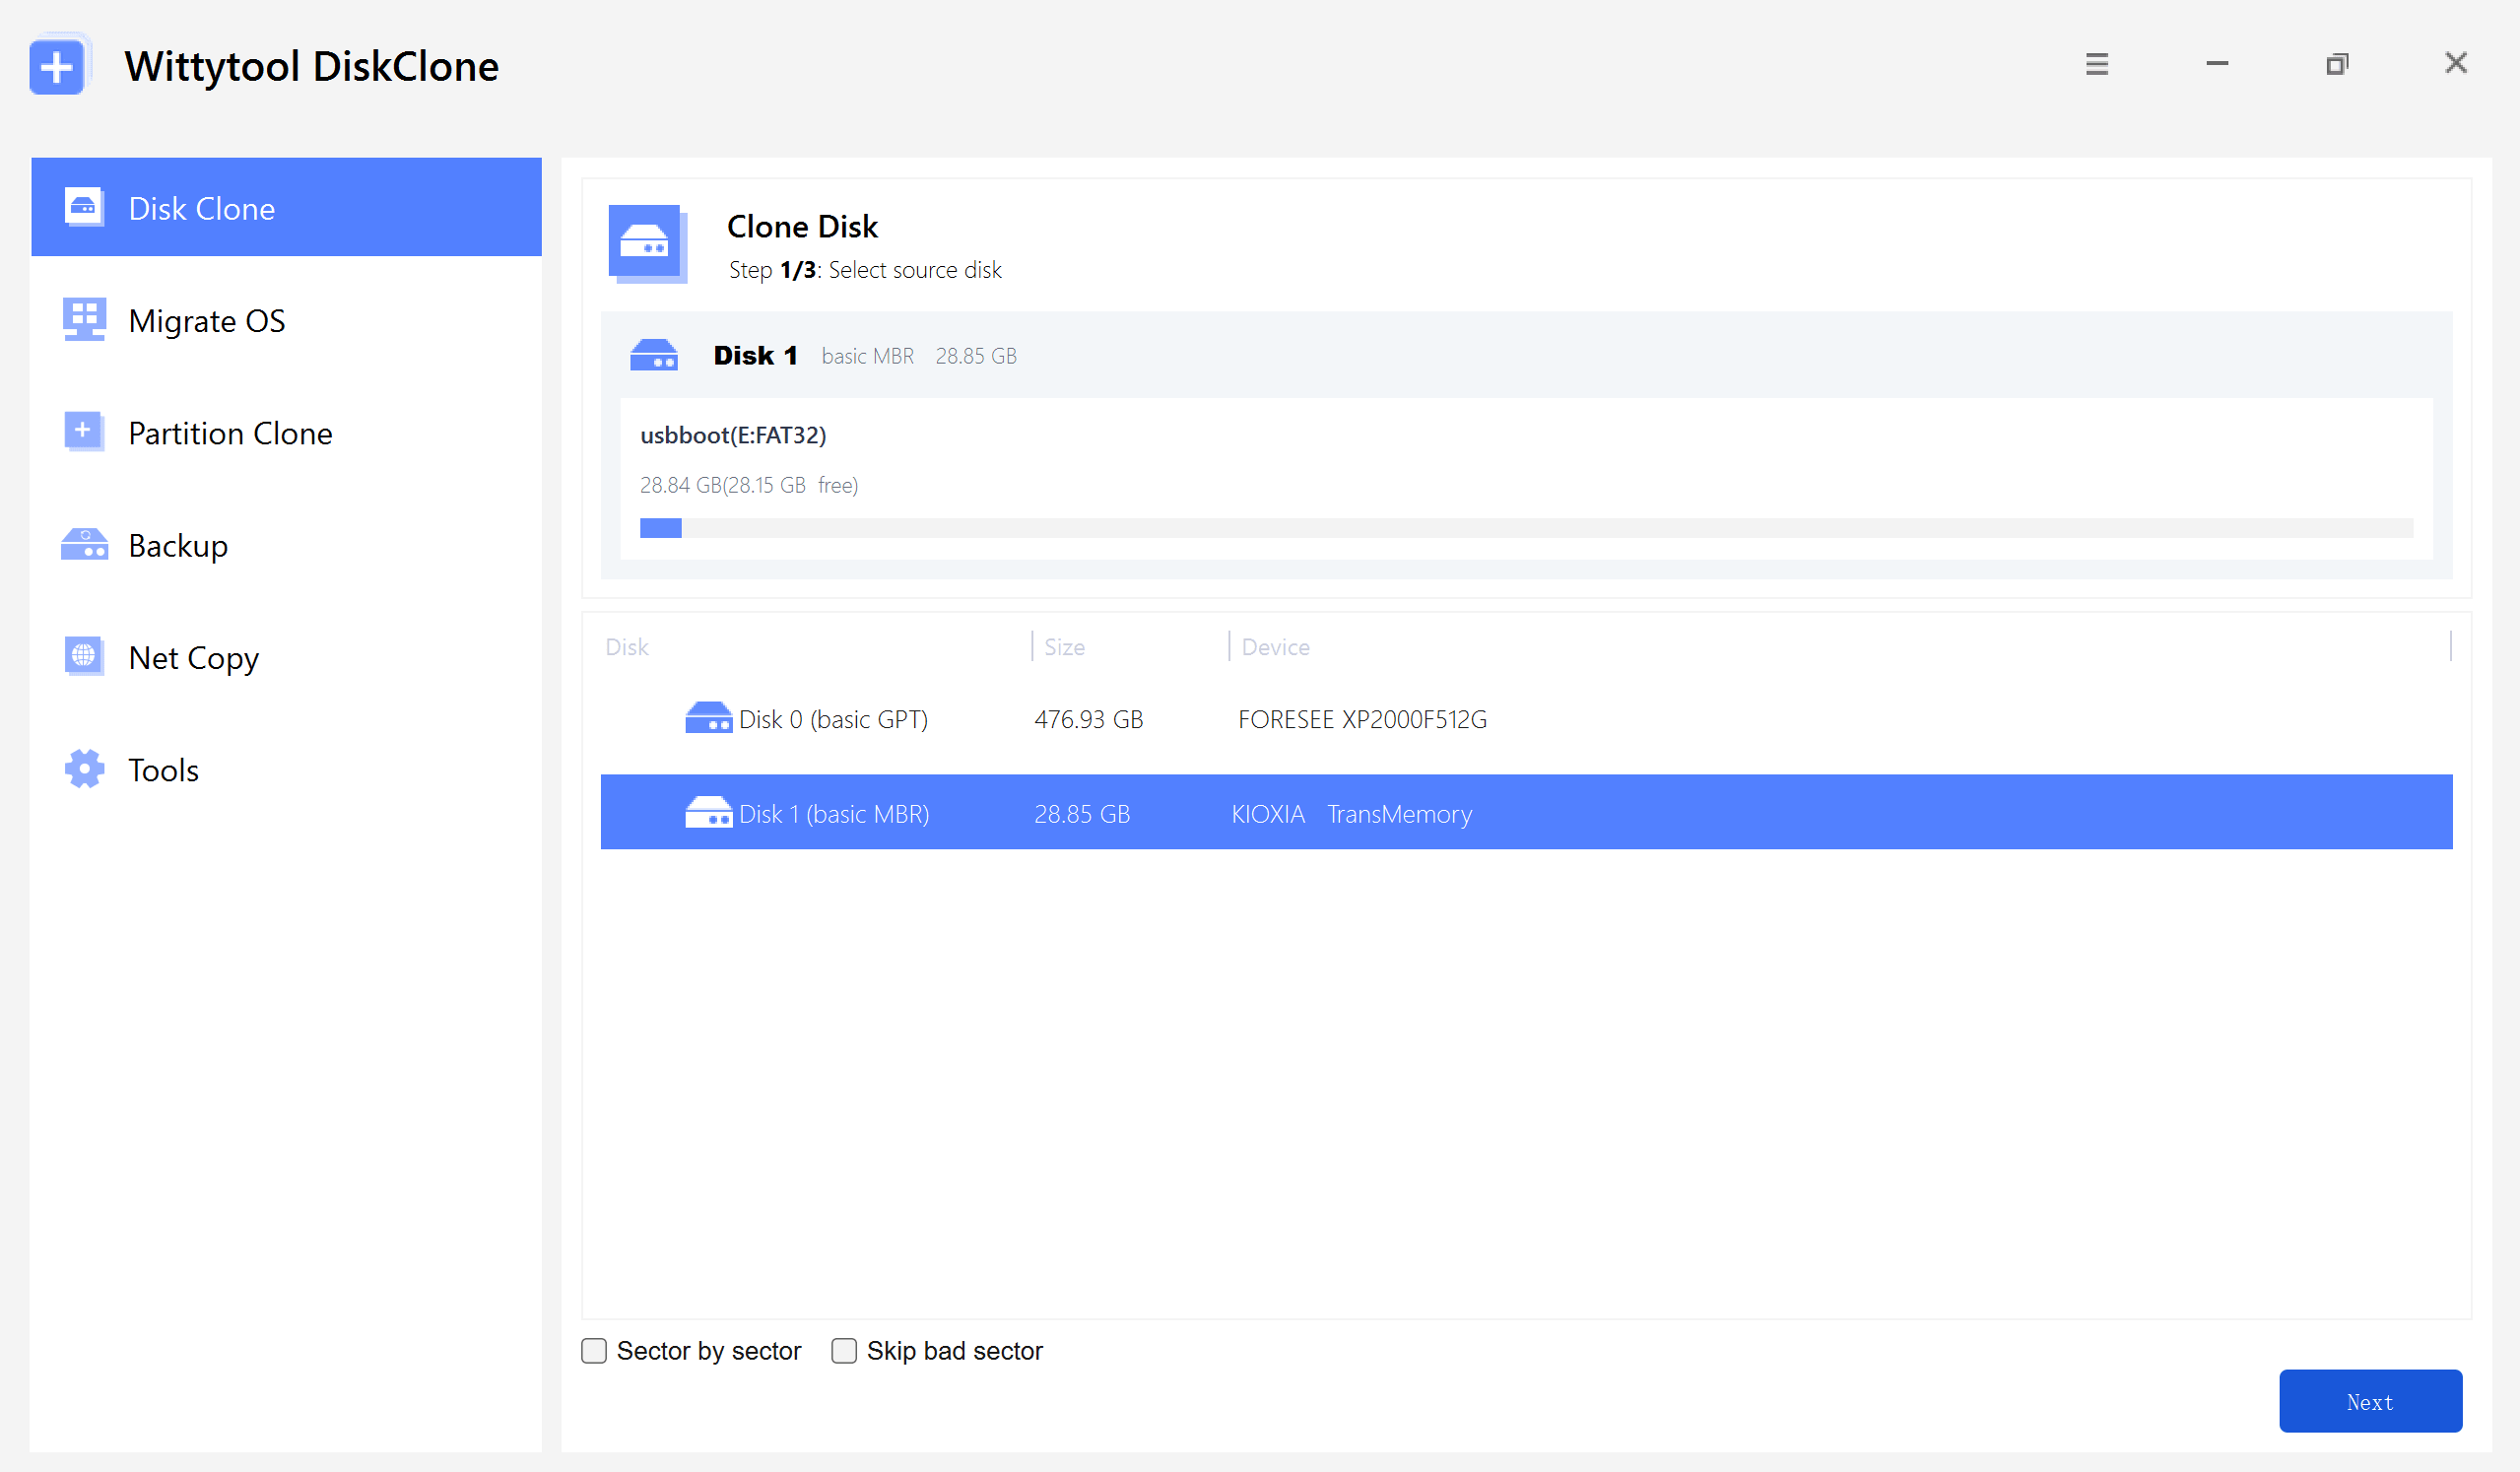
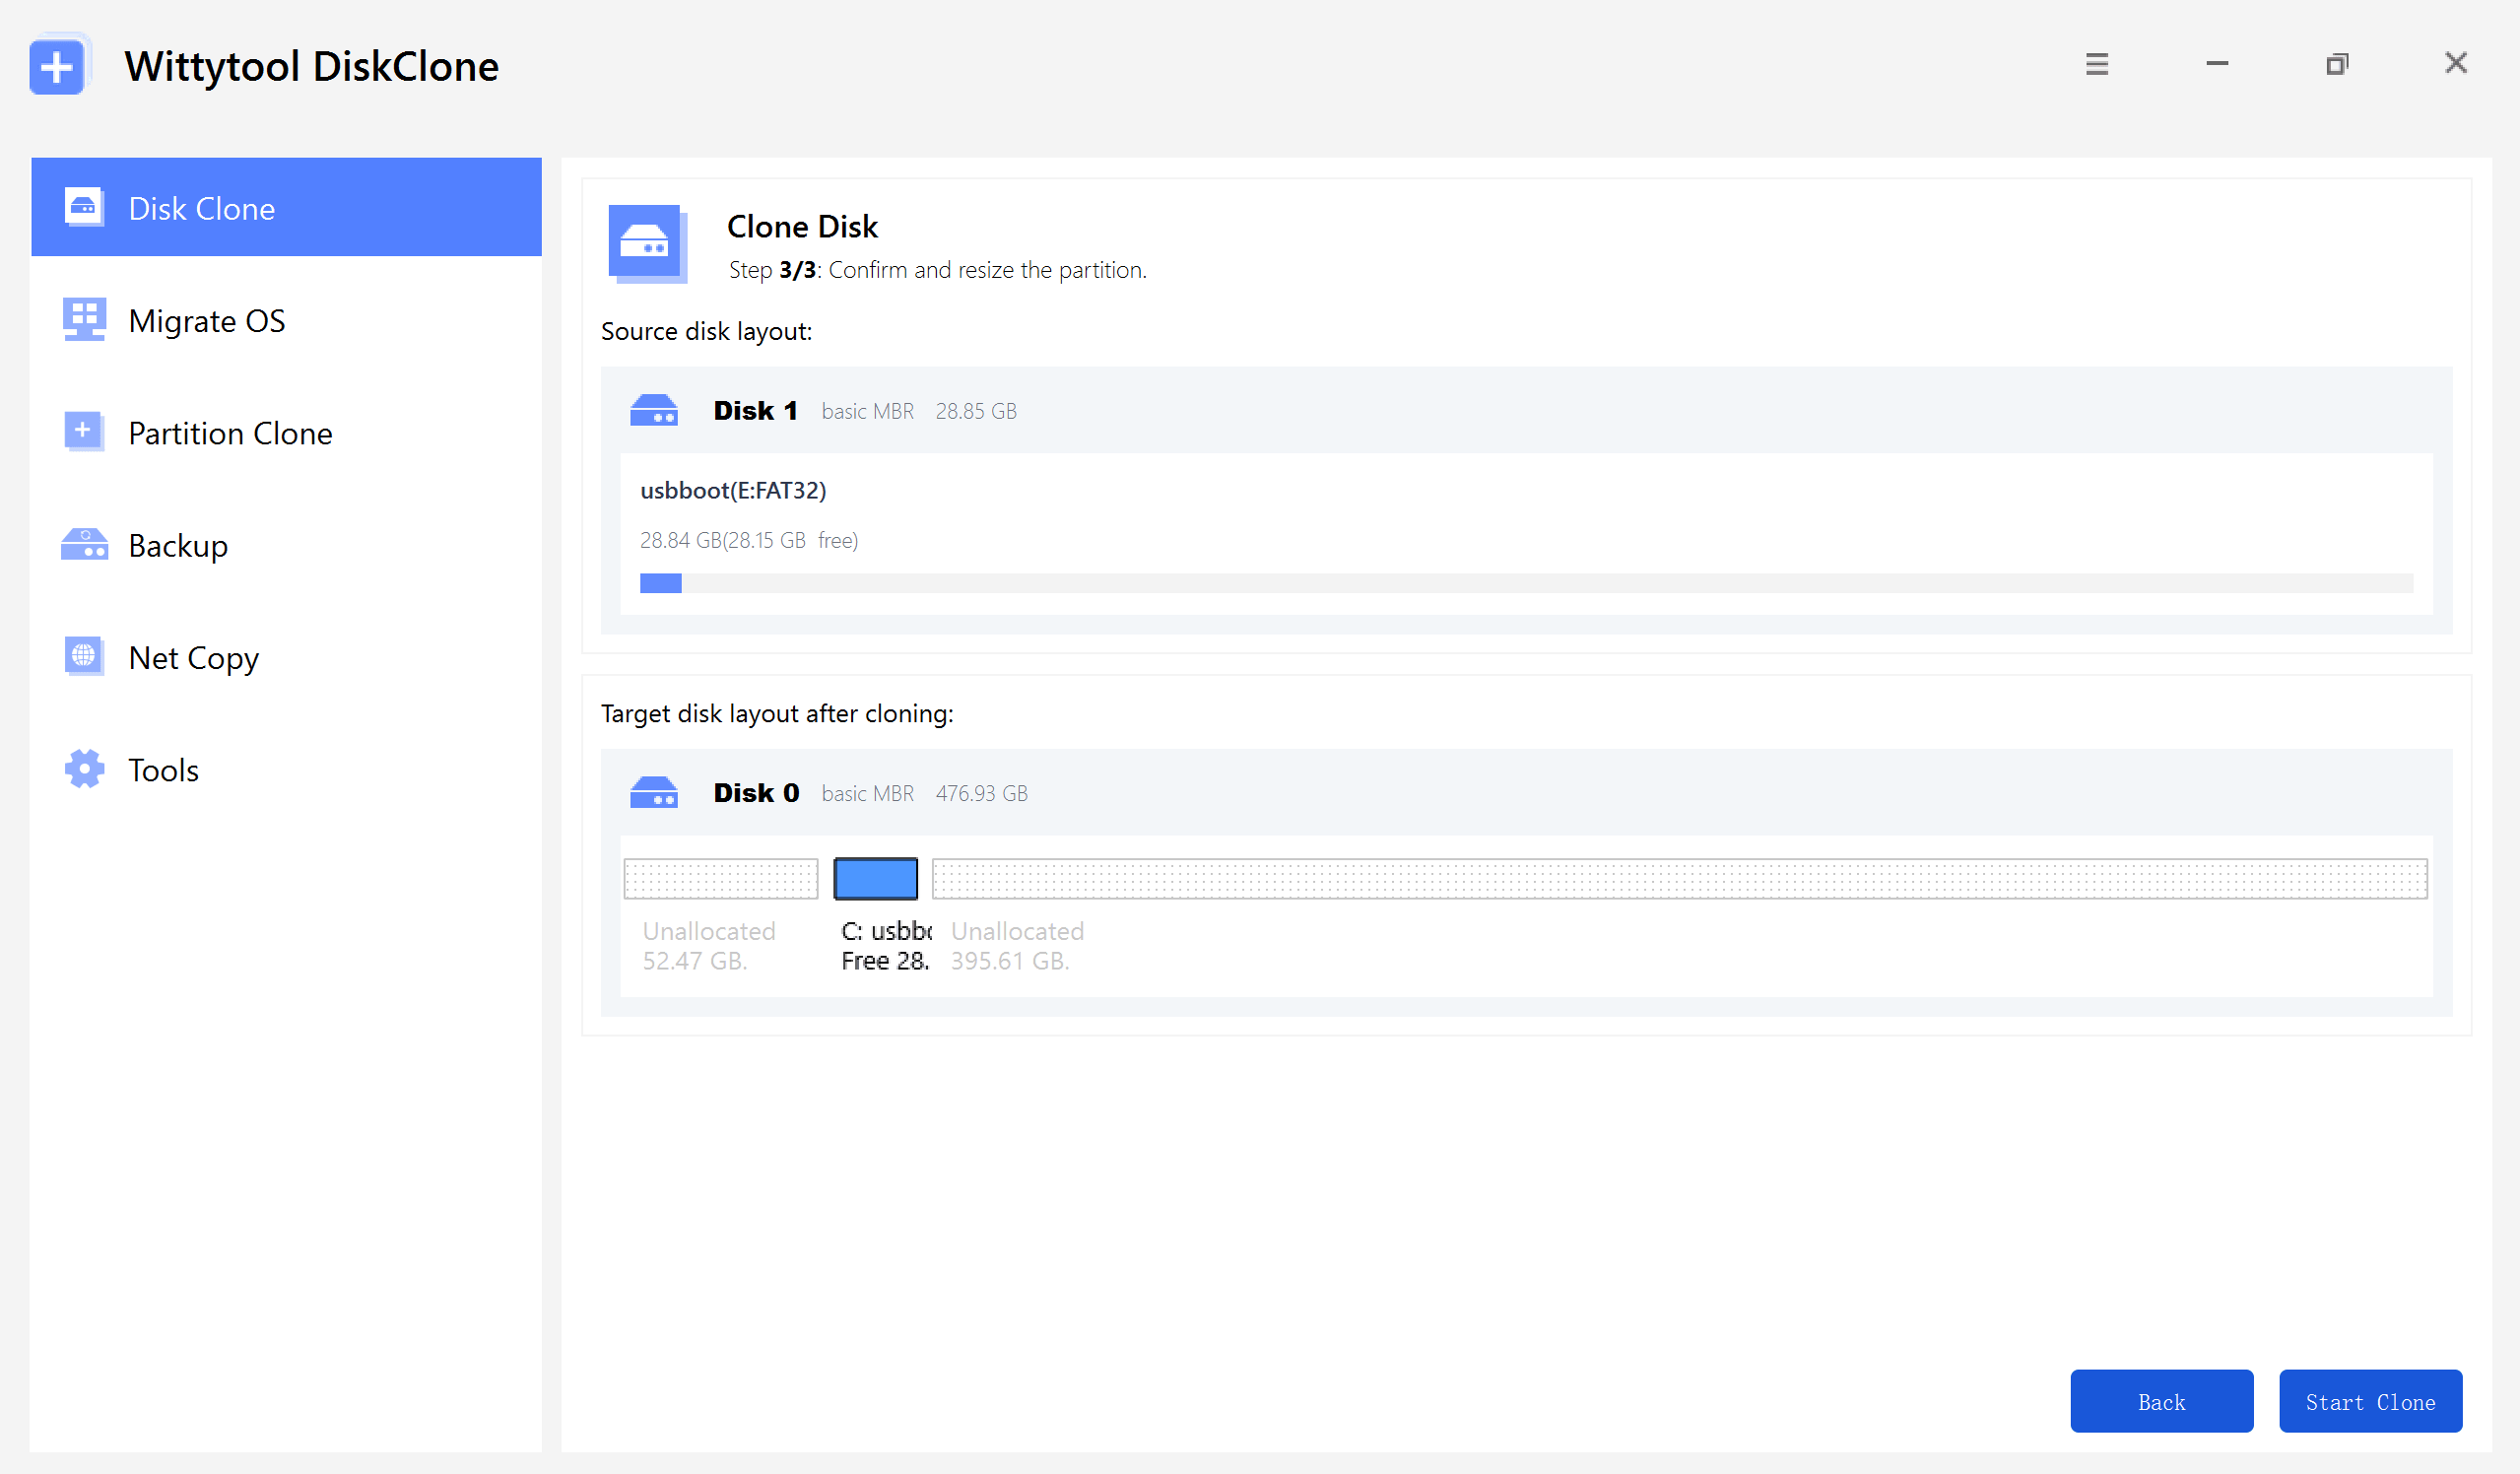
Step 1: Select Disk Clone (or Partition Clone for a nearly identical workflow), then choose your source disk and click Next.
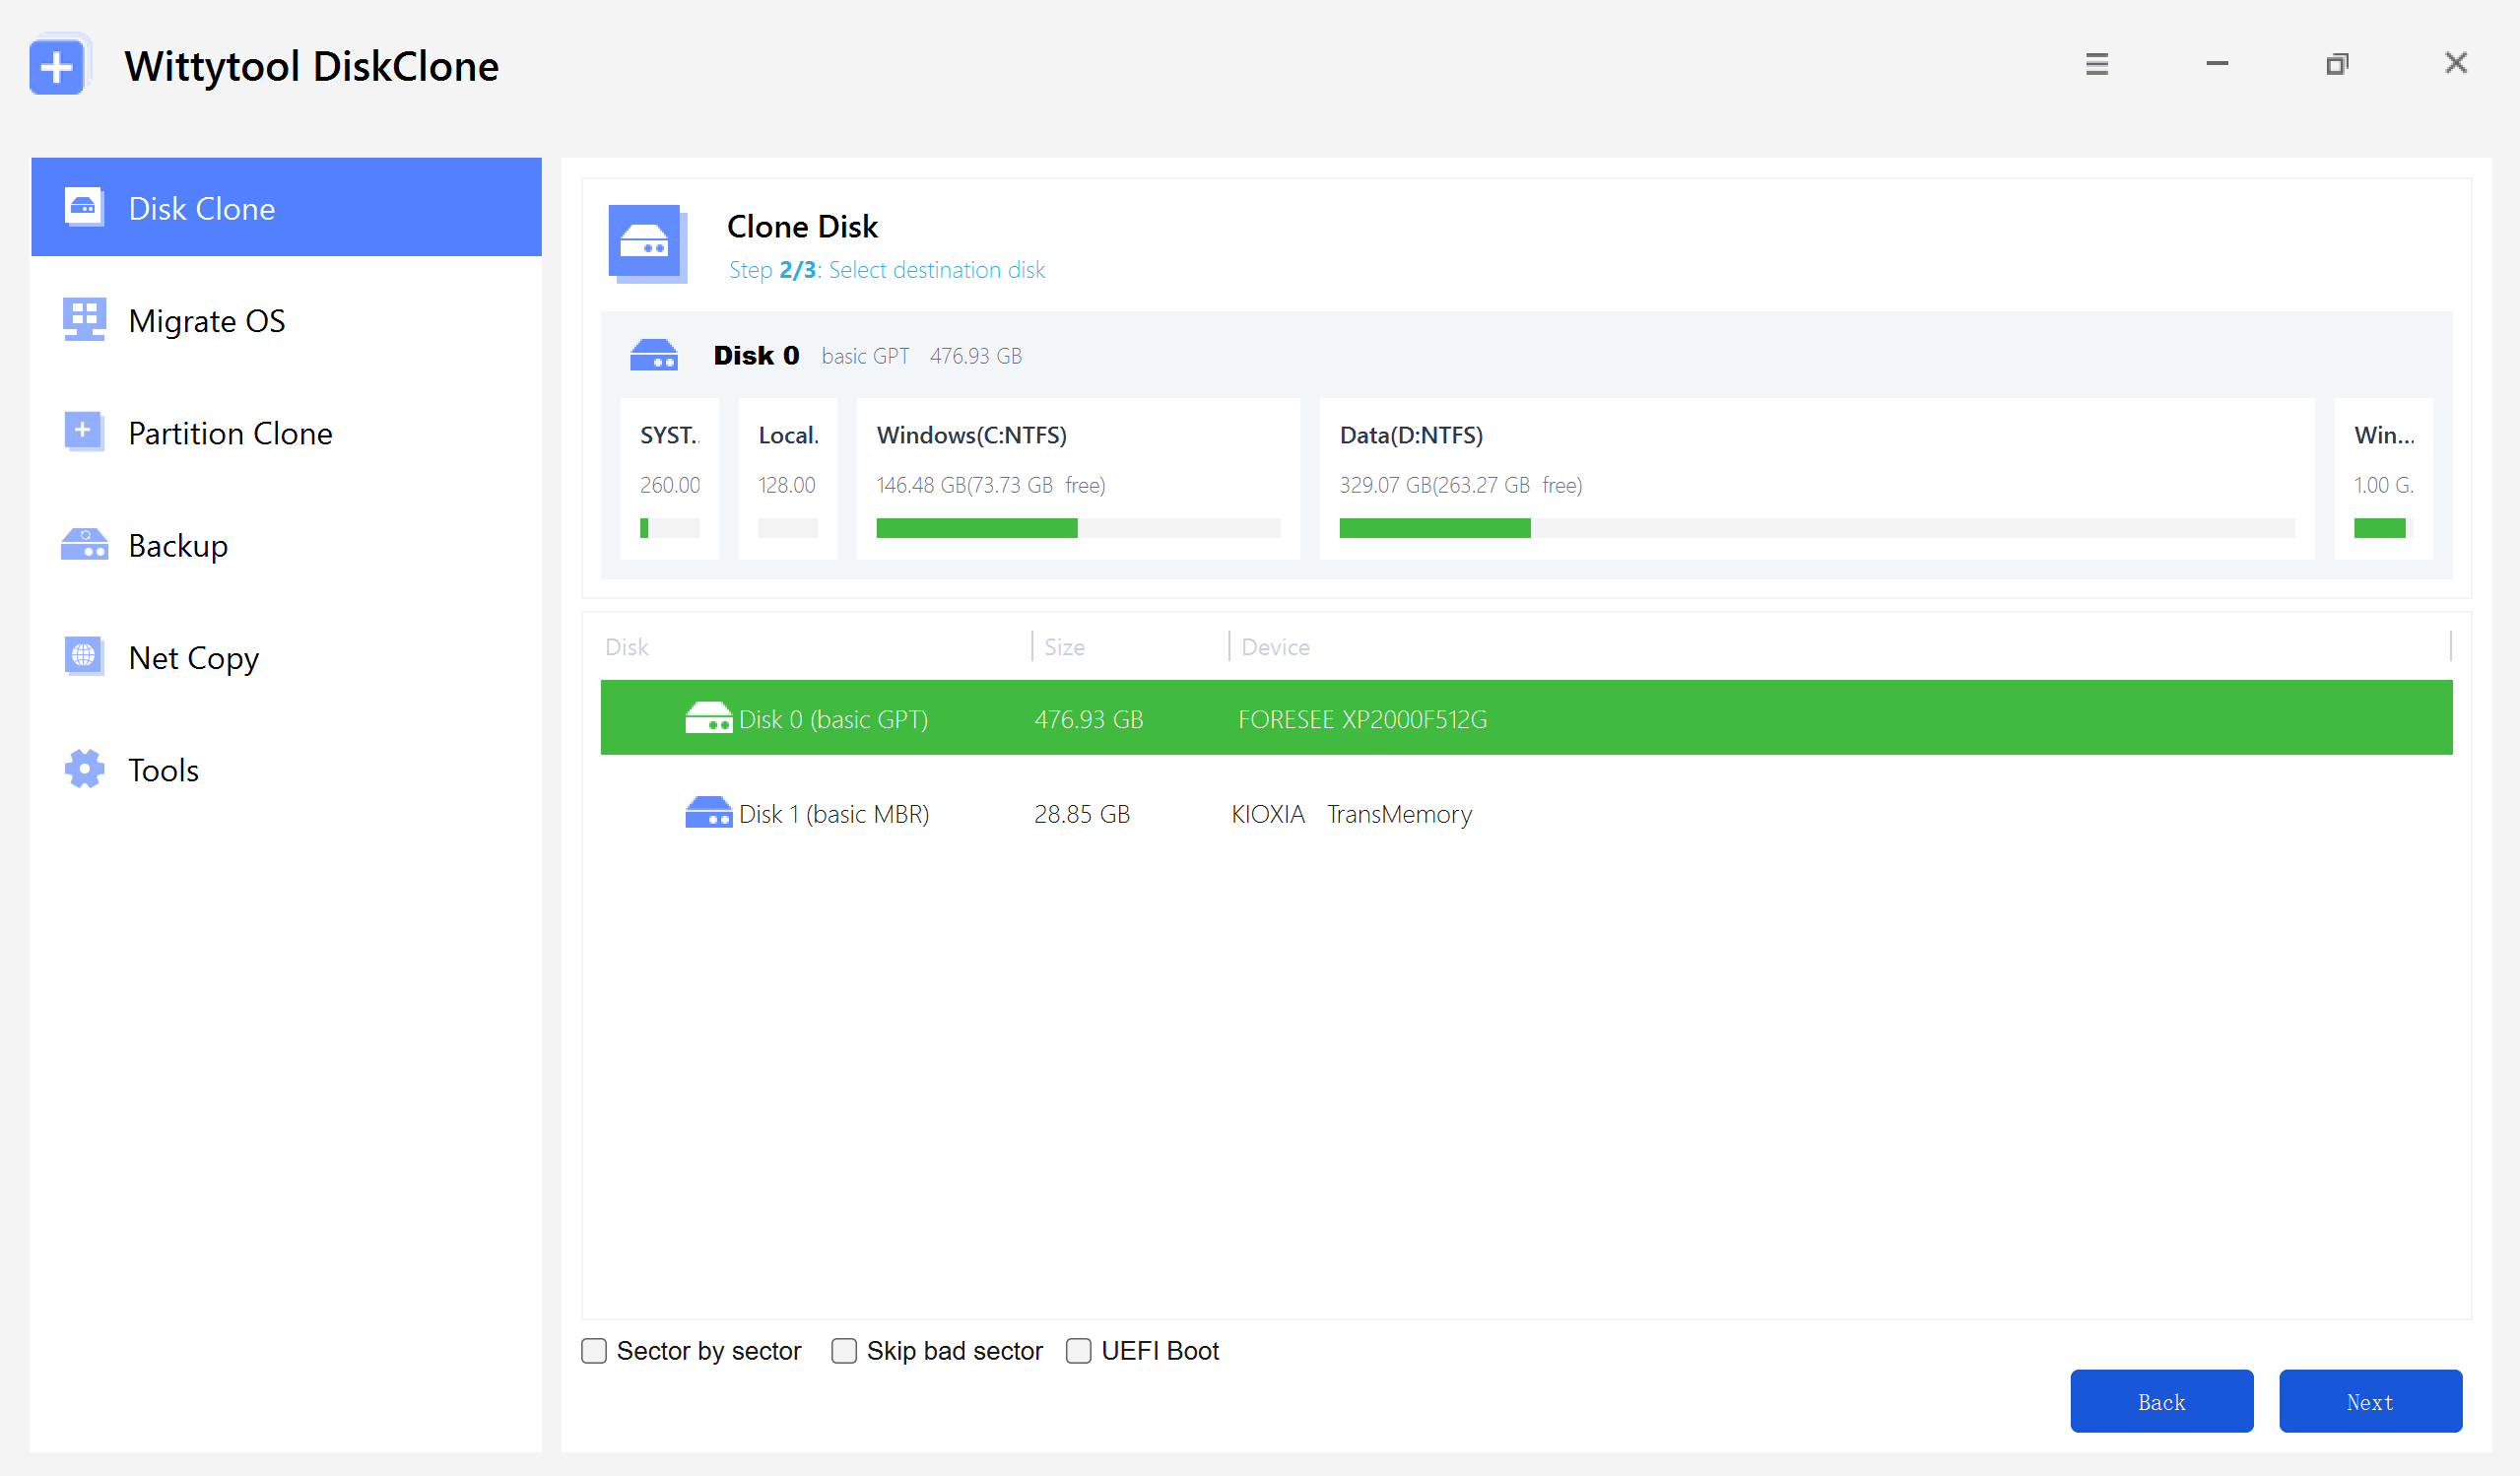
Step 2: Choose your destination disk and click Next to access the configuration settings.
Here, you can enable sector-level cloning, skip bad sectors, or check the UEFI BOOT option to convert the boot mode, ensuring the drive is fully compatible with the UEFI firmware of modern motherboards.
Step 3: Resize the partitions on the target disk layout as needed to fit your requirements, then click the “Start Clone” button to begin the cloning process.
Watch the Disk Cloning Video Guide with Wittytool Disk Clone:
Part 3: What to Do After Cloning M.2 to M.2 SSD
#1. Make Cloned M.2 SSD Bootable
- Restart your PC and enter BIOS (press F2/DEL).
- Set the cloned SSD as the primary boot device.
- Disable Secure Boot temporarily if Windows fails to start.
#2. Manage Old M.2 SSD
- Repurpose it: Use the old SSD as external storage via an M.2 enclosure.
- Secure erase: Use tools like DiskPart to wipe sensitive data before disposal.
FAQ About M.2 SSD Clone
1. Can I clone an M.2 SSD with only one slot?
Yes! Use a USB-to-M.2 adapter to connect the new SSD externally, then clone with WittyTool.
2. Will cloning affect Secure Boot?
Temporarily disable Secure Boot in BIOS during cloning, then re-enable it afterward.
3. Do I need to format a new SSD before cloning?
Yes. Formatting ensures compatibility and prepares the drive for data transfer.
Conclusion
Cloning your M.2 SSD to a larger drive is straightforward with the right M.2 cloning tool. Follow this guide to avoid data loss, optimize performance with 4K alignment, and seamlessly boot from your upgraded drive.
Ready to upgrade? Download WittyTool DiskClone today and breathe new life into your storage!