


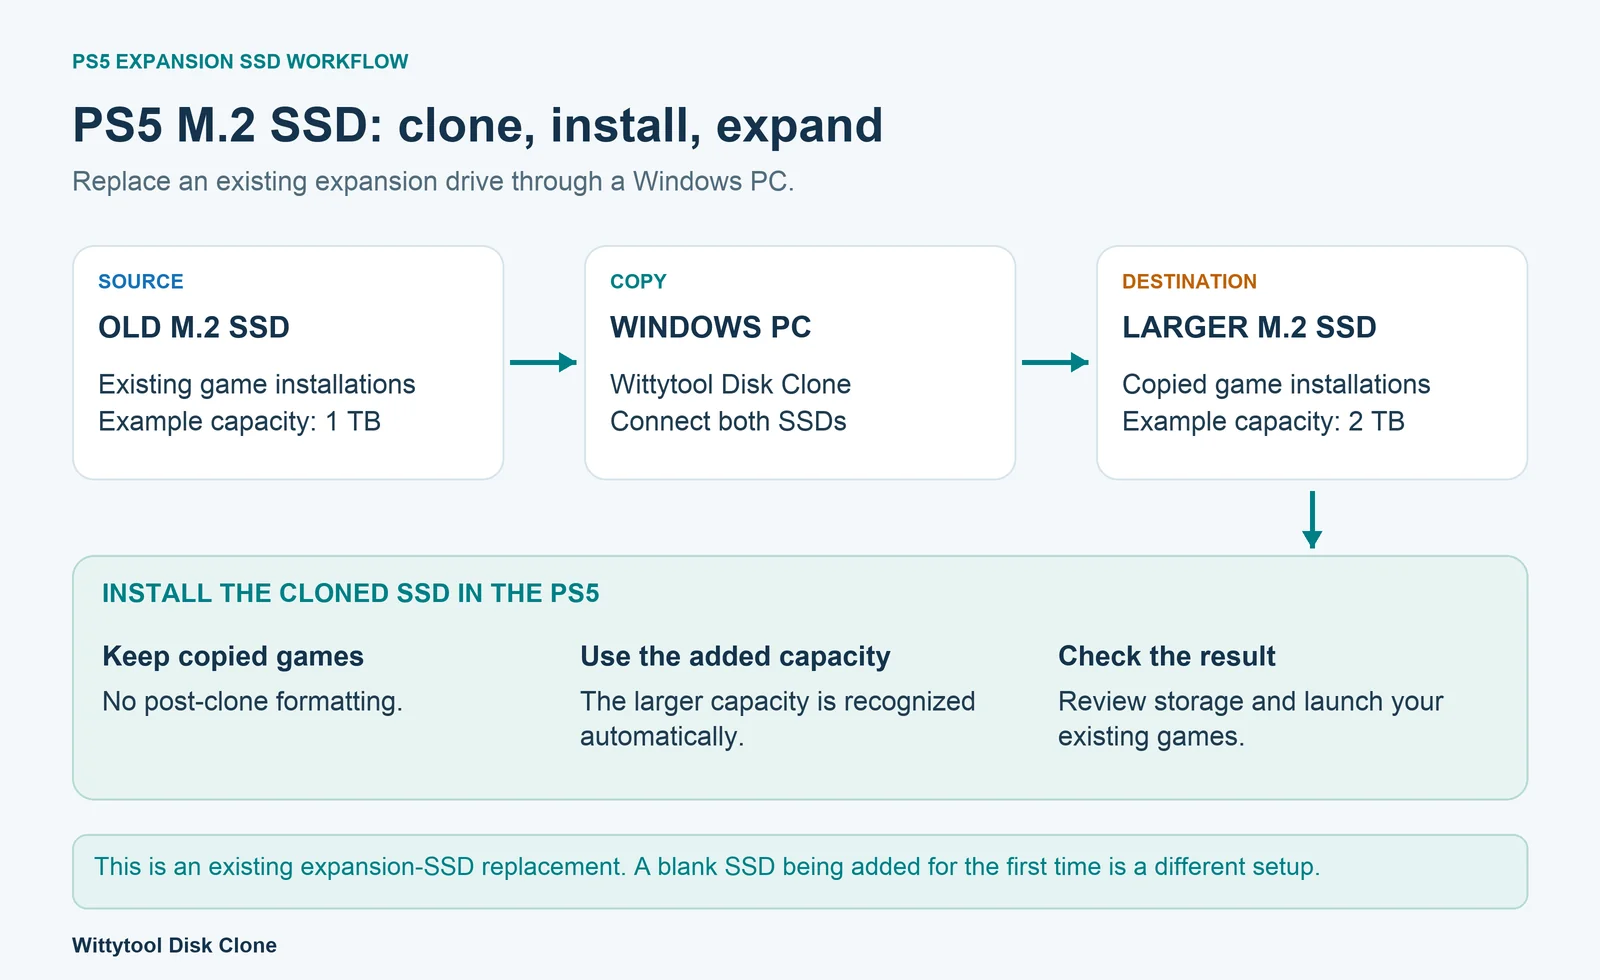
When an M.2 expansion SSD fills up, replacing it with a larger drive gives your PS5 more room for installed games. You can transfer the existing drive’s contents through a Windows computer using Wittytool Disk Clone: connect both SSDs, identify the source and destination, and complete the clone before installing the replacement.
After this clone, the replacement SSD does not need formatting. The additional capacity of the larger SSD is recognized automatically. Formatting the cloned drive would erase the games you just copied.
This guide concerns the removable M.2 expansion SSD already installed in your PS5. It is useful when a growing library, or a large release such as GTA 6, makes that drive too small.
Which PS5 SSD Are You Replacing?
There are two different storage-upgrade situations:
- You have never added an M.2 SSD. You are adding a new expansion drive. There is no old expansion SSD to clone.
- You already use an M.2 SSD. You can remove that expansion drive and replace it with a larger compatible SSD, transferring or cloning its contents.
The PS5’s onboard storage is a separate component. Do not treat it as the removable drive described here. Sony’s M.2 installation guide shows the expansion location and instructions for the different PS5 model groups.
PC Cloning or Console Transfer: Choose Your Route
Cloning is one way to carry an existing expansion drive’s contents to its replacement. You can also move games through the console’s own storage controls.
| Route | What you do | When it fits |
|---|---|---|
| PC-based cloning | Connect the old and new SSDs to a computer and copy the old drive with Wittytool Disk Clone | You want to replace the existing expansion drive and have suitable PC connections |
| Console-managed transfer | Temporarily move the games elsewhere, install and set up the replacement, then move them back | You have enough temporary console or USB extended-storage capacity |
USB extended storage can hold PS5 game installations temporarily. Those games need to be moved to console storage or M.2 storage to run. Sony storage options.
The rest of this guide follows the PC clone route.
What You Need Before Cloning
A larger PS5-compatible M.2 NVMe SSD
Choose a replacement that meets the current PS5 requirements for the interface, capacity, dimensions, and cooling. Sony specifies compatible PCIe Gen4 x4 M.2 NVMe storage, with supported capacities from 250 GB to 8 TB. Check the complete requirements for the drive and its heatsink before you buy or install it.
Choose capacity around the games you want to keep installed. For example, replacing an existing 1 TB expansion SSD with a compatible 2 TB SSD gives the library more room without changing the role of the expansion slot.
A Windows PC with connections for both SSDs
You can use two compatible NVMe USB enclosures, or connect one drive to a suitable internal M.2 slot and the other through an enclosure or adapter. An accessory must support the SSD’s protocol and physical size. Check whether an attached heatsink will fit too.
For this task, select accessories that support NVMe. Check the interface and accessory fit using our SSD connection guidance; an enclosure limited to M.2 SATA drives serves a different interface.
Backup and software preparation
Back up anything you need from the replacement SSD before cloning: the destination will be overwritten. Keep the original expansion SSD intact until the replacement has passed your checks.
Step 1: Remove the Existing Expansion SSD
Fully shut down the PS5 and unplug it. Let the console cool, then follow the removal instructions for your specific model.
Open the appropriate outer cover and expansion-slot cover, release the screw securing the M.2 SSD, and remove the drive as directed. Keep the screw and spacer organized. Use Sony’s model-specific instructions for the cover and slot arrangement rather than assuming every PS5 opens in the same way.
Record the old SSD’s model and capacity. Label it as the source if the two drives look similar.
Step 2: Connect Both SSDs to the Computer
Install the old and replacement SSDs in the chosen PC slots or accessories. Turn the computer off before installing a drive internally; follow the enclosure manufacturer’s instructions for an external connection.
Identify both physical devices in Wittytool Disk Clone. Match the model, capacity, and any available device information to the drives you connected. A Windows drive letter is not a substitute for checking the physical disk.
If Windows offers to initialize or format the old PS5 SSD, cancel that prompt. You are preserving its existing contents for the clone, not preparing it as a blank Windows data drive.
Step 3: Clone the Expansion SSD with Wittytool Disk Clone
Our Wittytool Disk Clone workflow copies the old expansion SSD to its replacement through a graphical source-and-destination selection. It lets you keep the game installations together during the drive upgrade, without first finding a third storage device large enough to hold the library.
Download Wittytool Disk Clone to copy your existing PS5 expansion SSD to the larger replacement.
Use the whole-disk cloning workflow for the old expansion SSD:
Open Disk Clone and choose the old PS5 expansion SSD as the source.
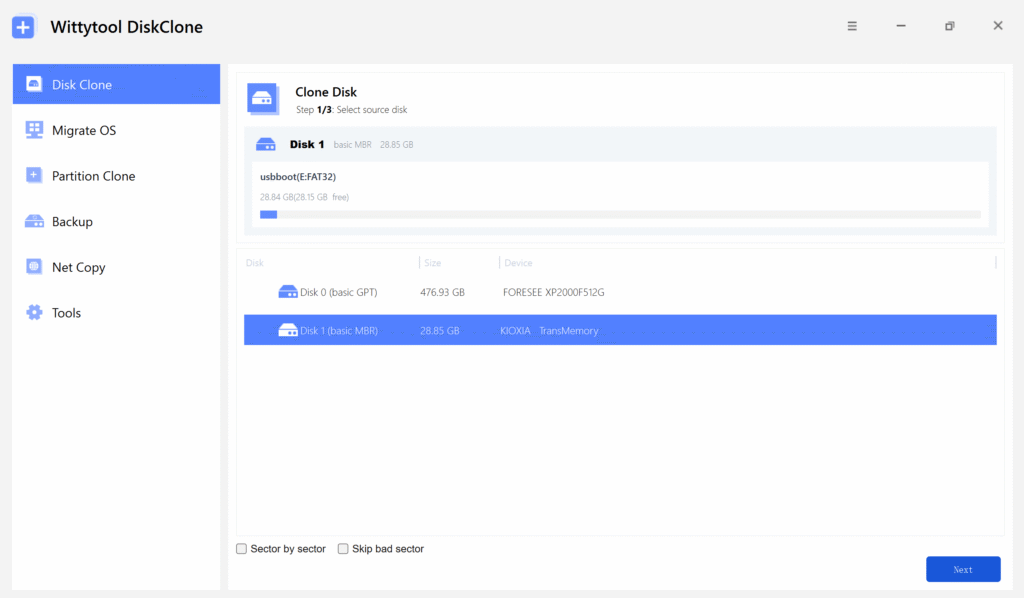
Select the larger replacement SSD as the destination.
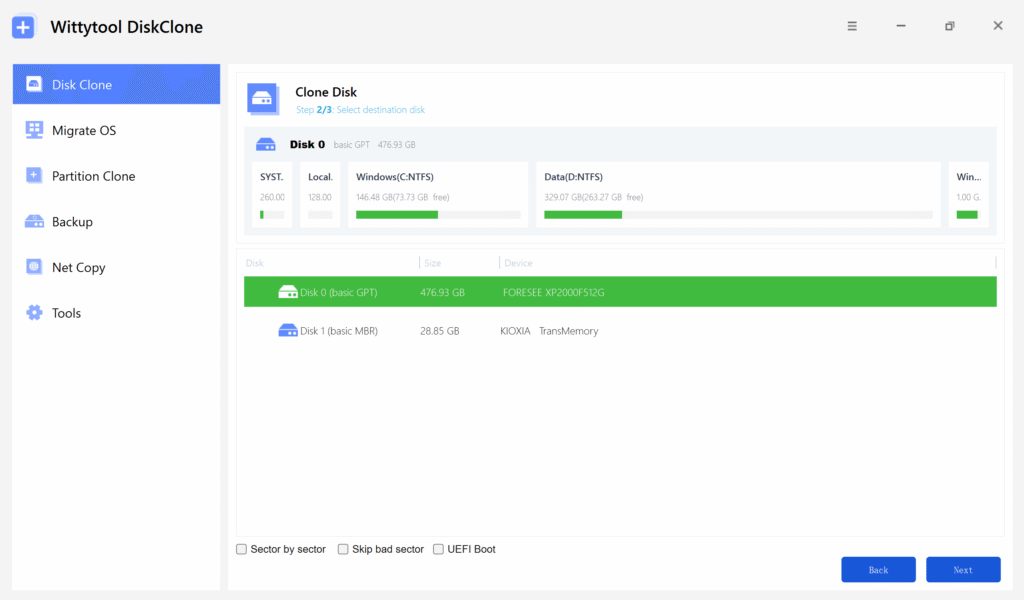
Review the source, target, copy settings, and destination layout shown by the software.
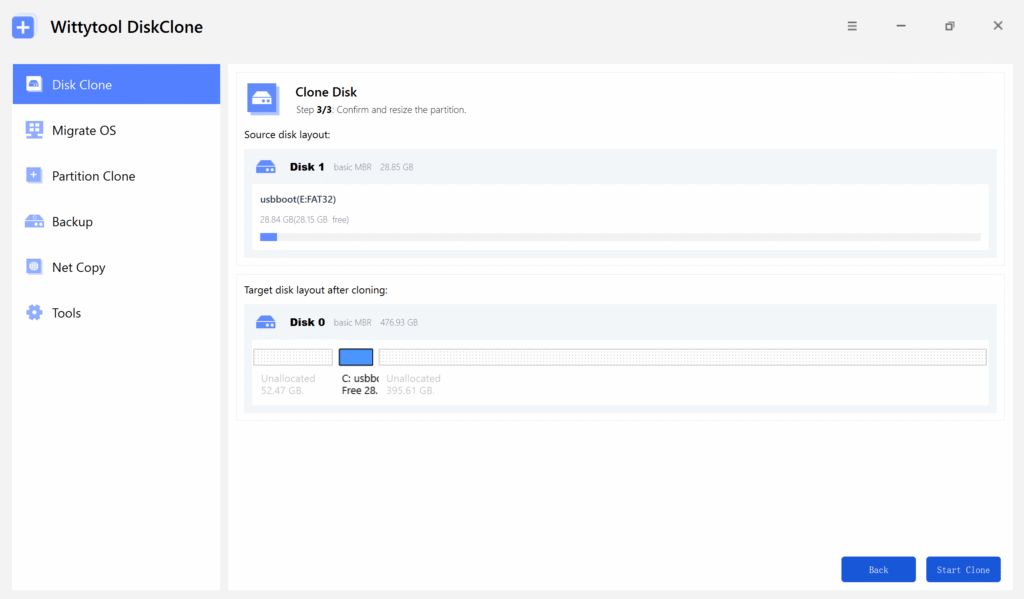
Confirm that the destination is the SSD you intend to overwrite and that any necessary destination data has been backed up.
Select Start Clone and wait for the operation to finish.
Our disk-cloning workflow covers source selection, destination selection, and final review. Keep both drives connected and the computer powered throughout the operation.
A PS5 expansion drive is a different task from moving Windows. Use Disk Clone for the drive copy; do not switch to Migrate OS or add a Windows partition-expansion procedure to this job.
If a drive is missing from the software or the copy reports an error, preserve the original SSD and check the connection and device identity before proceeding. Record the exact error for Wittytool Disk Clone support rather than initializing the source to make it appear as an ordinary Windows volume.
Step 4: Install the Cloned Replacement Without Formatting It
After the clone finishes, disconnect the SSDs using the appropriate procedure for their connections. Follow Sony’s installation instructions to fit the replacement into the PS5 expansion slot, secure it correctly, and replace the covers.
Do not format the cloned replacement as a normal next step. Unlike a blank SSD being set up for first use, this SSD already contains the copied games. Formatting would clear those contents.
Start the PS5 and open Settings → Storage. The larger SSD’s additional capacity is recognized automatically in this Wittytool Disk Clone workflow; you do not need to perform a separate post-clone manual expansion.
Step 5: Check Capacity and Existing Games
Before repurposing the original SSD, check the result:
- Confirm that the PS5 detects the replacement as M.2 storage.
- Review its reported capacity and available space.
- Check that your expected game installations appear.
- Launch games that matter to you and check their normal operation.
- Confirm the intended installation location for future downloads.
An expansion-drive clone transfers the contents of that drive. It is not a complete backup of all PS5 saved data and console settings. Check saved progress separately using the relevant console or cloud controls. Sony’s PS5 data-location guide.
If the Replacement Does Not Behave as Expected
PS5 requests formatting
Formatting is not part of the expected post-clone workflow described here. Do not accept it simply to get past the message: it would erase the copied games. Keep the original SSD intact, record the prompt, and review the clone result, selected disks, connection history, and replacement compatibility with Wittytool Disk Clone support.
The larger SSD still shows the old capacity
Automatic recognition of the additional capacity is the expected result. Check that you installed the intended replacement and are viewing its M.2 storage information. If the result still differs, retain the original drive and provide the SSD models, capacities, software version, and clone result to support. Do not apply a generic Windows resize tool to the PS5 layout as an improvised fix.
Games are missing or do not start
First check the displayed storage device and the result of the clone operation. Distinguish a missing installation from a saved-data, account-access, or game-update issue. Avoid overwriting the original while you investigate.
Use the Extra Space for GTA 6 and Future Games
Select the M.2 SSD as the destination for new games once you have checked the replacement and existing installations. Before a large download such as GTA 6, confirm that the selected device has enough available space.
Frequently Asked Questions
Can I connect a PS5 M.2 SSD to a computer?
Yes. Use a compatible NVMe connection, such as a supported internal M.2 slot or NVMe USB enclosure. Check the SSD’s dimensions and any attached heatsink against the accessory.
Can I use two USB NVMe enclosures?
Yes, provided the enclosures and computer can connect both drives correctly. Identify the old and new disks carefully before starting the copy.
Do I need to format the replacement after cloning?
No. In this workflow, the copied games remain on the cloned SSD. Formatting would erase them.
Will the additional capacity be recognized automatically?
Yes. The larger SSD’s added capacity is recognized automatically after the clone and installation. Check the storage screen to confirm the result.
Does cloning the expansion SSD copy all my PS5 saved progress too?
No. The clone copies that SSD’s contents. Console-resident saved data and other data categories need separate treatment.
What if the old SSD already has a heatsink?
Check whether your PC connection accessory can accommodate it. Choose a suitable enclosure or adapter and follow the SSD manufacturer’s instructions if any hardware needs to be removed or refitted.