


If your games live on a separate physical drive from Windows, you can replace that game drive without migrating the operating system. A full-disk clone copies the source drive’s partitions and contents to the new SSD. Afterward, check drive letters and launcher library paths so your installed games can be found.
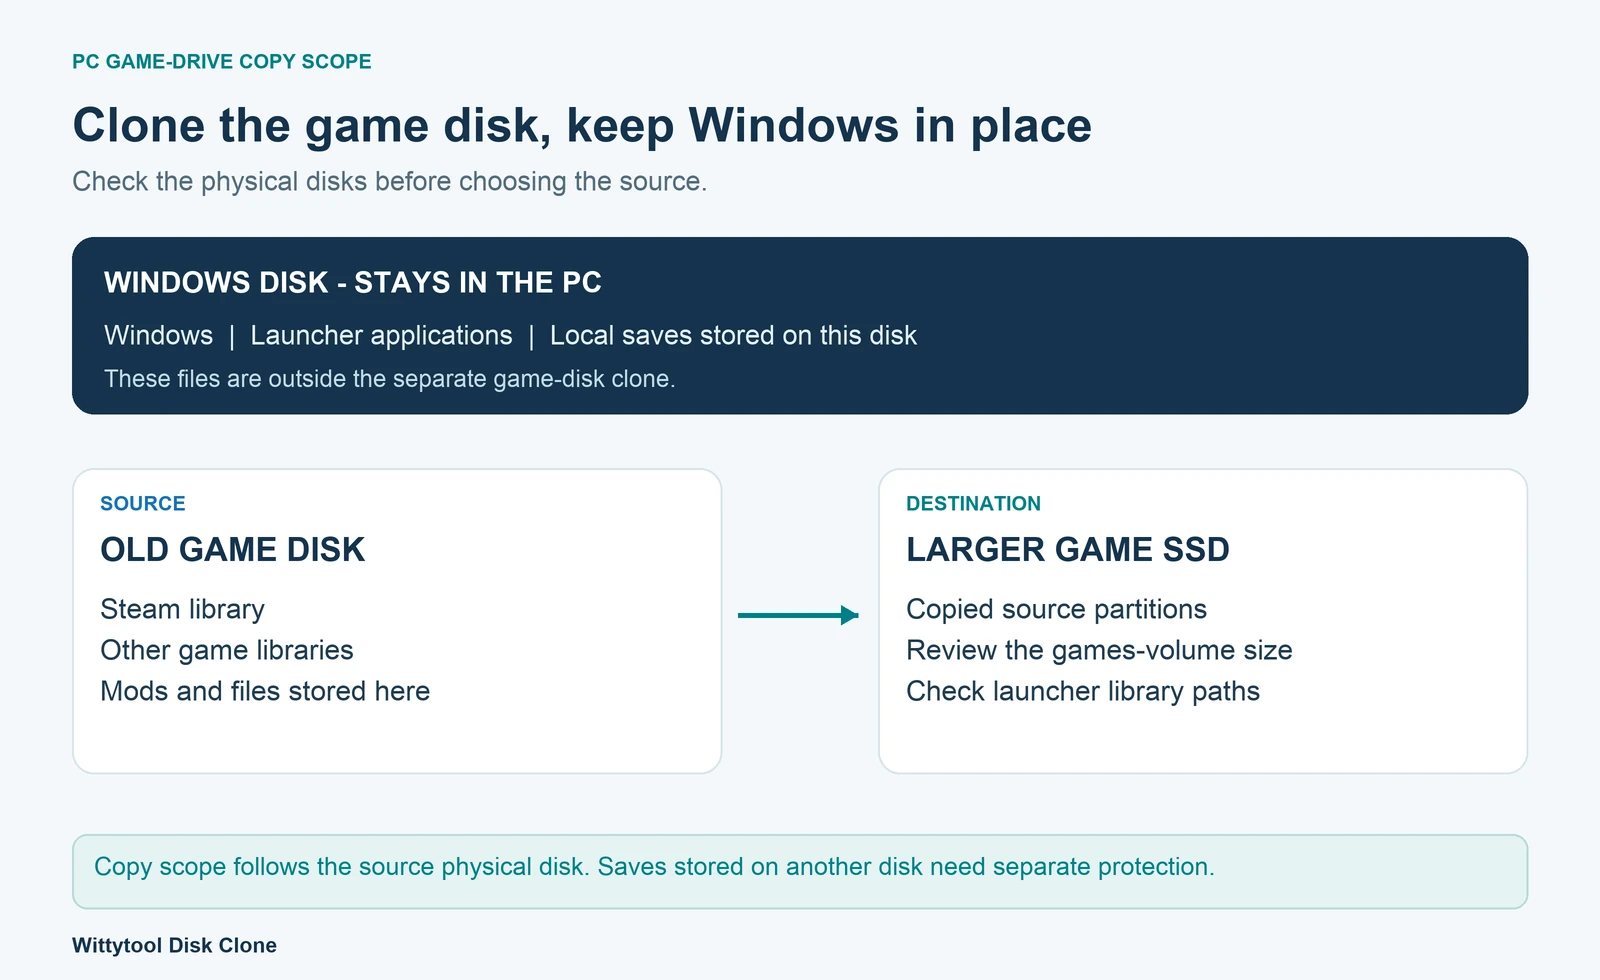
First check whether the games are on a separate physical disk or on a partition of the Windows disk. That determines what you need to copy and which files will remain elsewhere.
Should You Clone the Drive or Move the Games?
Start with the size of the job, not the name of the folder you want to move.
| What you want to change | Suitable approach |
|---|---|
| Move a few Steam games while retaining both drives | Steam’s built-in game-move feature |
| Copy one games partition while leaving other source partitions behind | A supported partition-clone workflow |
| Replace an entire physical game-storage drive | Full-disk cloning |
| Replace the disk that contains Windows | A system-disk cloning or OS-migration workflow |
For example, if an old 2 TB data drive contains libraries from several launchers and you are replacing it with a larger SSD, a full-disk clone keeps the work at the disk level. You can then check each launcher after the replacement.
If you only want to move one title to an SSD you already use, the launcher’s own move feature may be the simpler job. Steam’s official move instructions cover that situation.
Check What Is Actually on Your Game Drive
Match drive letters to physical disks
Open Disk Management in Windows and examine the disk layout. Match the capacity and model information to the drive you intend to replace.
Do not assume that C: and D: are separate devices. They might be partitions on the same physical disk. If the source disk also contains Windows, this guide’s dedicated-game-drive scope no longer matches your setup.
Similarly, selecting a physical disk for a full-disk clone includes more than one partition when that disk contains several. Use the Disk Clone versus OS Migration comparison if you need to choose a different transfer scope.
List your libraries and related files
Record the game libraries on the old drive and the launchers that use them. Also check for mod-manager downloads, custom content, screenshots, and configuration files you want to retain.
Installed games and saved progress do not always share a location. Some local data may be in your Windows user profile or another game-specific folder. Check the developer’s save-location guidance for games whose progress matters to you, and keep a separate copy of those saves before changing storage.
A clone of the game disk includes data on that disk. It cannot include a save folder stored on another physical device merely because the save belongs to one of those games.
Prepare the New SSD
Choose an SSD and connection method supported by your PC and the drive. An M.2 NVMe drive needs an appropriate NVMe connection; a SATA adapter is a different accessory. If you are using an enclosure temporarily, check its supported protocol, dimensions, and power/connection requirements.
The destination must accommodate the data and intended partition layout. For a larger-drive upgrade, decide how you want the additional space allocated before starting the copy.
Back up and identify the drives
Before proceeding:
- Back up important source files and separately located saves.
- Save anything you need from the destination somewhere else.
- Record the old and new drive models, capacities, and disk identities.
- Close games, launchers, and other programs using the source libraries.
- Keep the original drive available until the replacement has been checked.
Cloning overwrites the selected destination. Confirm that the destination is the new SSD before starting.
Clone the Game Drive with Wittytool Disk Clone
Our Wittytool Disk Clone workflow copies the complete game disk, including libraries from different launchers when they are stored on that source. The graphical destination preview lets you review the copied partitions and their sizes before writing, which is useful when replacing a full game drive with a larger SSD.
Download Wittytool Disk Clone to transfer the whole game drive to its replacement.
1. Connect the replacement SSD
Connect the new SSD using the PC, motherboard, or accessory manufacturer’s instructions. Turn the PC off before fitting a drive internally. If connecting through USB, use a secure connection that will remain available throughout the copy.
2. Select the physical game disk as the source
Open Disk Clone in Wittytool Disk Clone. Select the physical disk containing the game libraries you want to transfer.
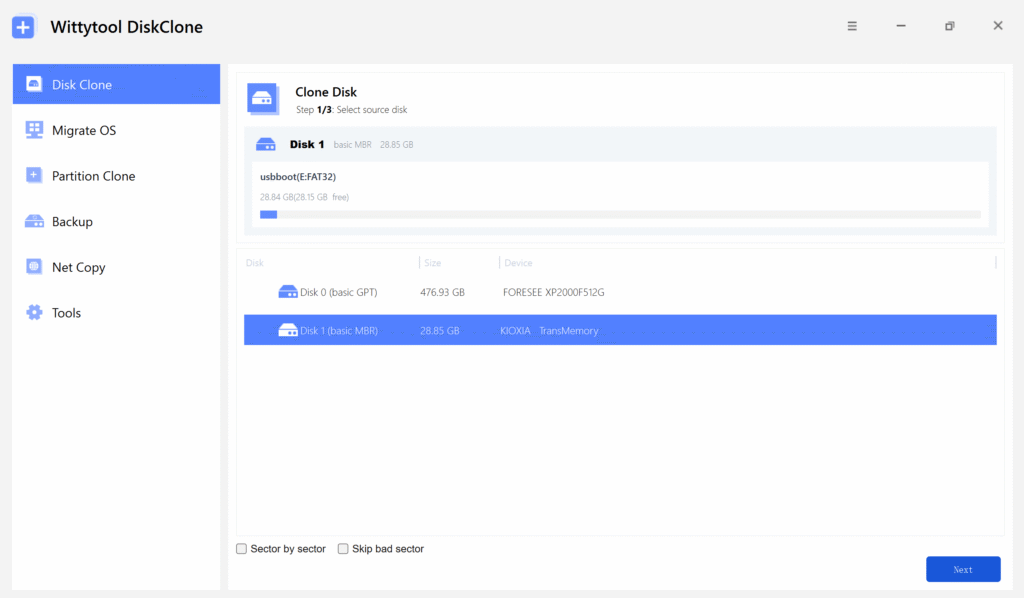
Compare the selected device with the information you recorded. Avoid selecting the Windows disk simply because a launcher application is installed there; the source for this task is the separate game-storage disk.
3. Select the new SSD as the destination
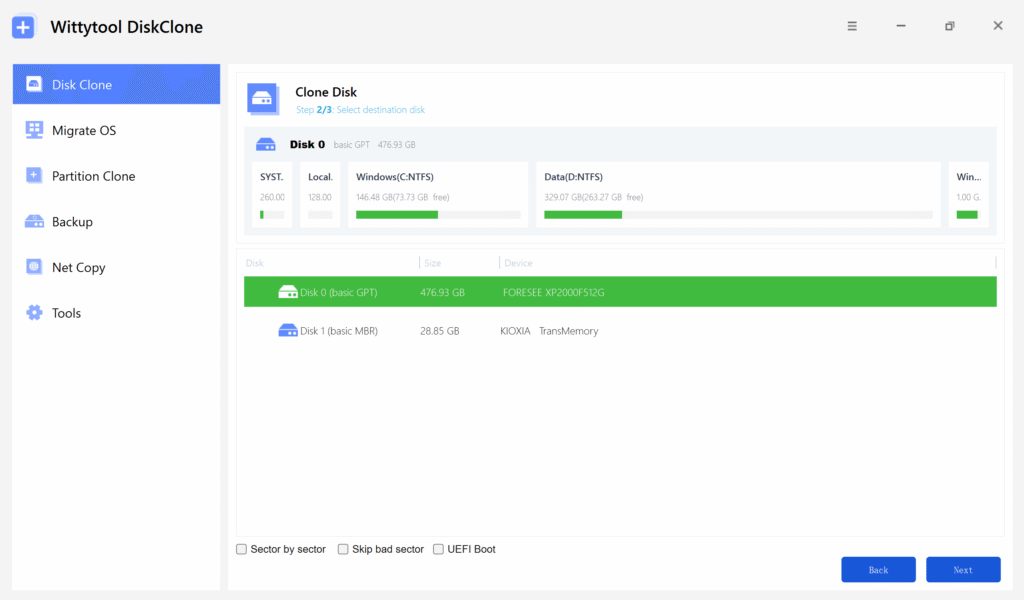
Choose the replacement SSD and verify its identity again. Check the model and capacity, not just its position in the list.
4. Review the target layout
Inspect the partitions the software proposes to create. If you want a supported Windows data partition to use more of the replacement SSD, review its size in the destination layout before starting. Wittytool Disk Clone also enables 4K alignment by default for SSD cloning.
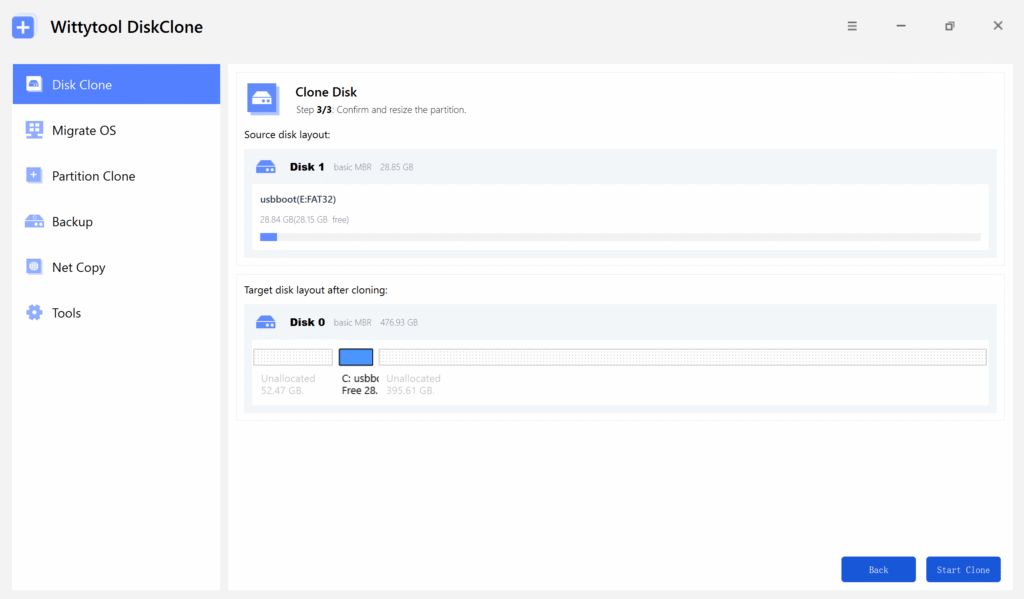
The layout preview matters: a larger physical SSD and a larger games volume are related, but they are not the same item on the screen.
5. Confirm and start the clone
Recheck the source, destination, and destination backup. Read the overwrite warning and select Start Clone when those choices are correct. Wait for the operation to finish before changing connections.
The product also includes AI Disk Assistant, which executes software tasks after you enter a natural-language instruction. If you use it, specify the intended operation and correct drive details. Source and destination identification remain just as important. The current product guide describes the available workflows.
Replace the Old Drive and Check Its Paths
Shut down the PC and install the replacement according to the hardware instructions. Initially leave the old game disk disconnected where practical, so you can clearly identify the replacement and avoid mixing up the two copies.
Windows should continue to start from its existing system disk in this dedicated-game-drive scenario. Check the new game drive’s capacity, partitions, and letter.
Review the drive letter
If a launcher still expects a path on the old drive letter, a new letter can break that reference even though the files are present. Microsoft explains how to change a volume’s letter in Disk Management and notes that application paths can be affected by letter changes. Microsoft drive-letter guidance.
For a replacement data volume, you can consider restoring its previous letter when that letter is available and you have identified the correct volume. Do not change the Windows system volume’s letter or reassign another active application’s drive casually to make room.
Reconnect launcher libraries
Open each launcher and check the location it uses. In Steam, an existing library may need to be added through Settings → Storage if it is not already recognized. Other launchers have their own documented file-detection or migration procedures; use the instructions for the particular launcher rather than applying Steam’s menus to all of them.
Keep these changes focused on the library paths. A copied drive does not transfer game ownership or replace account authentication.
Verify Games Before Reusing the Original Disk
Check more than the total number of files. Open the launchers you use, launch representative games, and check recent saved progress. For a modified game, check the relevant mod manager, custom files, and configuration too.
Where needed, run a launcher’s file-verification feature. Verification may download missing or changed files, so a small download afterward does not by itself show that the whole migration failed.
Keep the original drive intact until the new storage layout and the games that matter to you work as expected. Your separate save backup should remain accessible too.
Troubleshoot Missing Libraries or Capacity
The launcher shows Install instead of Play
Check the drive letter, library path, and whether the new drive is available. If the files are present, use the launcher’s existing-library recognition procedure before deleting them or starting over. Steam documents this situation in its installed-games recognition FAQ.
A game still points to the old location
Review shortcuts, launcher library entries, and mod-manager paths. Updating one library entry does not necessarily update a separate utility that stores its own location.
The SSD does not show the expected usable space
Compare the physical disk capacity with the partition layout in Disk Management. If space was left outside the intended data volume, review the layout with Wittytool Disk Clone support before making further changes. Keep the original disk; do not delete unfamiliar partitions just to make an extension option available.
Frequently Asked Questions
Do I need to clone Windows when only the game drive changes?
No. If Windows is on a different physical disk, a full clone of the dedicated game drive does not require an OS migration. Confirm the physical layout first.
Is cloning different from copying a games folder?
Yes. A full-disk clone copies the source disk’s partition contents and layout through a disk-copying workflow. A folder copy transfers selected files and does not, by itself, update launcher registrations or copy other partitions.
Will saves stored on C: be included?
Only if C: is on the source disk being copied. In this guide’s separate-game-drive setup, saves on the Windows disk remain outside the game-drive clone.
Can one clone contain several launchers’ libraries?
A whole-disk clone can copy the libraries located on that source disk. Check each launcher afterward, including its paths and account access.
When can I erase the old game drive?
After you have verified the replacement’s files, capacity, library paths, and important games, and you still have the backups you need. Identify the old physical disk again immediately before any erasure.