Upgrading your computer’s hardware or operating system often brings a hidden challenge: dealing with old disk styles. If you’ve encountered errors like “Windows cannot be installed on this disk” or warnings about your disk being too small for a modern OS, you’ve likely run into the MBR vs. GPT problem. Converting your disk is the solution, but the fear of losing precious data (and the need to potentially recover delete files) can be paralyzing. This guide will walk you through five safe methods to convert MBR to GPT without data loss, ensuring a smooth transition to a more modern and capable system.
What Is the Difference Between MBR and GPT?
Before we dive into the “how,” it’s important to understand the “why.” MBR (Master Boot Record) and GPT (GUID Partition Table) are two different ways your computer stores information about your disk’s partitions. Think of them as two different librarians with different methods for cataloging books.
MBR is the older, more traditional librarian. It’s been around since the 1980s and has some limitations. For instance, it only works with disks up to 2TB in size and can only have a maximum of four primary partitions. GPT is the new, modern librarian. It’s part of the UEFI standard and doesn’t have these limitations. It supports disks larger than 2TB and allows for virtually unlimited partitions. More importantly, GPT stores multiple copies of its data across the disk, making it more robust and reliable for recovering data if something goes wrong.
Here’s a quick chart to compare them:
| Feature | MBR (Master Boot Record) | GPT (GUID Partition Table) |
|---|---|---|
| Maximum Disk Size | 2TB | 9.4 ZB (Zettabytes, practically unlimited) |
| Maximum Partitions | 4 Primary | 128 Primary (in Windows) |
| Boot Compatibility | BIOS (Legacy) | UEFI (Modern) |
| Data Security | Single boot record location | Multiple redundant copies for recovery |
| Supported OS | All Windows versions | Windows 10/11 64-bit, modern OSes |
Why need to convert MBR to GPT without data loss
There are several compelling reasons to make the switch from the old MBR style to GPT. A recent industry report suggests that over 70% of new PCs shipped now use UEFI with GPT as the default, highlighting the industry-wide shift. You might need to change MBR to GPT without data loss if you want to:
- Use a Large Hard Drive: If you’ve purchased a new hard drive or SSD larger than 2TB, you must use GPT to access all the storage space.
- Upgrade to Windows 11: Microsoft officially states that Windows 11 requires a UEFI boot mode and a GPT disk style for clean installations. Converting is essential for compatibility.
- Enjoy Better Security: GPT works with UEFI, which supports security features like Secure Boot, helping to protect your system from malware at startup.
- Have More Partitions: Need more than four primary partitions? GPT makes it easy.
Is it possible to convert MBR to GPT without data loss?
Absolutely, yes! The possibility of a safe conversion depends entirely on the method you choose. Built-in Windows tools like Diskpart or the MBR2GPT utility are designed to perform this conversion directly on the disk. However, these methods carry an inherent risk; a sudden power loss or system crash during the process could corrupt the disk and lead to data loss. Now there is a safest way, please continue reading.
The newest way to convert MBR to GPT without data loss in Windows 11/10/8/7
When data safety is your top priority, the undisputed best method is to use professional disk cloning software. This approach doesn’t directly modify your original disk. Instead, it creates a perfect, bootable copy of your entire system on a new GPT-formatted disk. This eliminates any risk of data loss on your original drive.
For this, we highly recommend free disk cloning software fastest – Wittytool Disk Clone from WittyTool. This software is specifically designed to make complex tasks like this simple and safe for all users. It’s not just another partition manager; it’s a dedicated tool that ensures a smooth and error-free transition from MBR to GPT.
The process is incredibly straightforward. You simply connect a new drive to your computer, launch WittyTool Disk Clone, a reliable usb clone tool free, and select the “Clone Disk” function. The software does all the heavy lifting: it copies your operating system, all your installed programs, personal files, and settings bit-for-bit. Most importantly, during the cloning and migrating procedure, the software can automatically convert the hard drive to GPT format. Once the clone is complete, you simply swap the old drive for the new one and boot up—your system will run exactly as before, but now on a modern GPT disk. It’s the most secure method, far superior to using system tools that require manual intervention and carry inherent risks.
Method 1: Convert System Disk from MBR to GPT via Cloning
Step 1. Go to the “Clone” tab, select the system drive, and click Next.
Step 2. Choose the target disk (MBR or GPT). Enable “UEFI BOOT” and proceed.
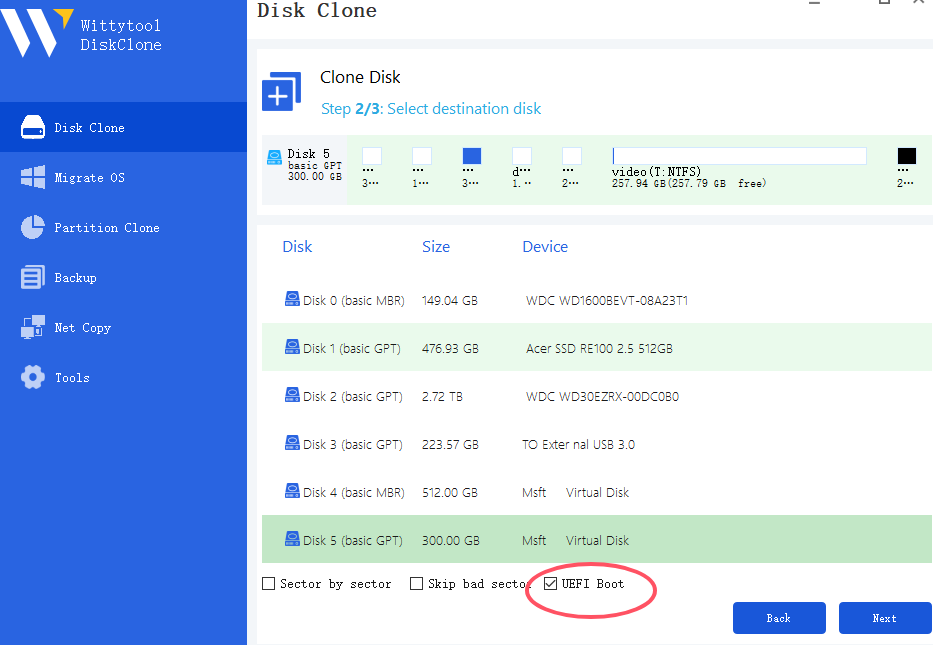
Step 3. Cloning will start and automatically convert the disk to GPT.
Step 4. After cloning, set the new disk as the boot drive in BIOS.
Step 5. Restart and press Del, F2, F12, or Esc to enter BIOS.
Step 6. Under the Boot tab, set the desired drive as 1st Boot Device.
Step 7. Save and exit (usually F10) to reboot.
Method 2: Convert System Disk from MBR to GPT via OS Migration
Step 1. Click the “Migrate OS” tab.
Step 2. Select the target disk (MBR or GPT), check “UEFI BOOT”, and click Next.
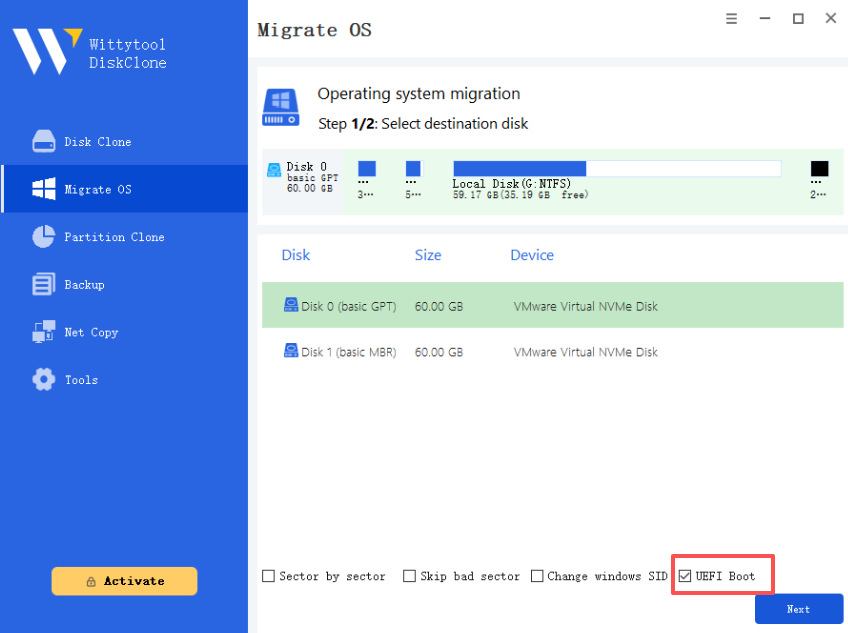
Step 3. Migration will automatically convert the disk to GPT.
Step 4. After migration, choose the boot drive in BIOS.
Step 5. During restart, press F2 (or other designated key) to enter BIOS.
Step 6. Adjust boot order to set the desired drive as boot device.
Step 7. Save changes and exit—the system will boot from the new drive.
Another 4 methods to convert MBR disk to GPT on Windows 11/10/8/7
For those who prefer to use built-in tools or convert their current disk directly, here are four other common methods. Remember to back up your data before proceeding.
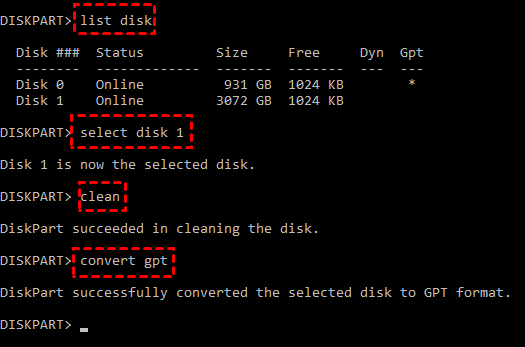
Method 1. Using Command Prompt (Diskpart) to convert MBR disk to GPT
The Diskpart utility in Windows is very powerful but also very dangerous if used incorrectly. This method will erase everything on the disk.
❗ Warning: This method will delete all partitions and data on the selected disk. Only proceed if you have a full backup, here Wittytool Disk Clone also can backup your data quickly.
💡 Steps:
- Back up all data from the disk you want to convert.
- Open Command Prompt as an Administrator.
- Type
diskpartand press Enter. - Type
list diskand note the disk number you want to convert. - Type
select disk X(replace X with your disk number). - Type
clean. This command will delete all partitions and data on the disk. - Finally, type
convert gpt. - Exit Diskpart. You can now create new partitions on your now-GPT disk.
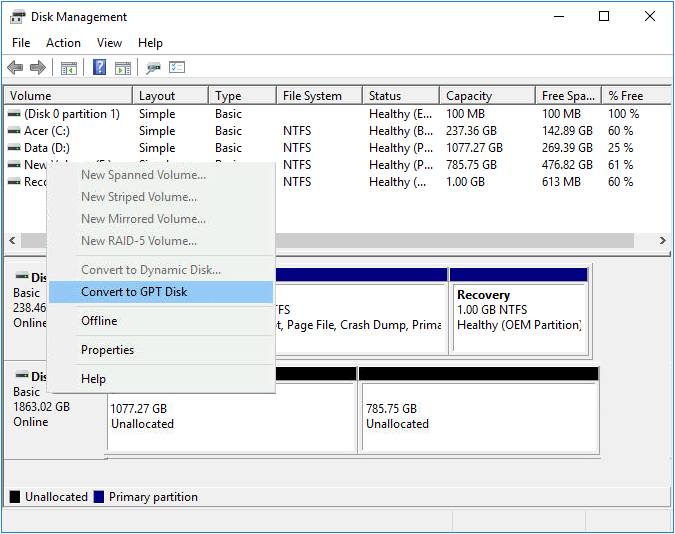
Method 2. Use Disk Management to Convert MBR to GPT
Disk Management offers a graphical interface, but the requirement is the same: the disk must be empty.
⚠ Note: You must delete all volumes on the disk first, which erases all data.
💡 Steps:
- Back up your data.
- Press
Win + Xand select “Disk Management.” - Locate the MBR disk you want to convert.
- Right-click each volume on that disk and select “Delete Volume.” Do this until the entire disk is unallocated space.
- Right-click the disk label (where it says “Disk X”) and you will see the option “Convert to GPT Disk.” If it’s greyed out, ensure every single volume is deleted.
Method 3. Use MBR2GPT.exe to Convert MBR to GPT
This is a dedicated Windows tool designed for this specific conversion. It can sometimes work without data loss, but strict requirements must be met.
💡 Prerequisites: Your disk must have the necessary free space and must be booting in Legacy BIOS mode. It is recommended to run the tool in validation mode first.
Steps:
- Boot into Windows and open Command Prompt as Admin.
- To validate the disk for conversion, run:
mbr2gpt /validate /disk:0(replace 0 with your disk number if needed). - If validation passes, run the conversion command:
mbr2gpt /convert /disk:0. - You must then go into your computer’s BIOS/UEFI settings and change the boot mode from Legacy to UEFI.
Method 4. Use third party disk partition tool to Convert MBR to GPT
Many third-party partition managers offer a one-click “MBR to GPT” conversion function without data loss. These tools can be a good middle ground. They work by directly modifying the partition table on the disk while it’s in use. While generally effective, any operation that directly alters a live disk carries a small risk of failure, which is why a backup is always recommended before proceeding, even with these tools.
To Sum Up
Choosing the right method to convert MBR to GPT Windows 10 and other versions depends on your comfort level and whether you are converting a system disk or a data disk. The following chart summarizes the advantages and disadvantages of all five methods discussed.
| Method | Best For | Data Loss Risk | Difficulty |
|---|---|---|---|
| WittyTool Disk Clone | Safest overall method; System & Data disks | None (works on a clone) | Low |
| Diskpart / CMD | Empty disks or advanced users | High (Erases all data) | High |
| Disk Management | Empty data disks | High (Erases all data) | Medium |
| MBR2GPT | Converting the system disk in-place | Low (but advanced computer skills required) | Medium |
| Other Partition Tools | Converting non-system data disks | Low (but unstable) | Low |
As the table shows, using WittyTool Disk Clone is undoubtedly the best choice for most users. Its unparalleled safety, by isolating the conversion process to a cloned disk, makes it more secure than all other options, including system tools and other third-party partition managers.
FAQs on converting MBR to GPT
Does converting to MBR delete data?
It depends on the method. Using Windows built-in tools like Diskpart or Disk Management to convert a disk to MBR will delete all data on that disk. Converting from MBR to GPT can be done without data loss using tools like MBR2GPT or third-party software, but a backup is always recommended.
How to switch from MBR to GPT?
The process to switch from MBR to GPT involves choosing a conversion method. The safest way is to clone your MBR disk to a new disk using software like WittyTool Disk Clone, which handles the conversion during cloning. For the current system disk, you can use the MBR2GPT tool, or for non-system disks, you can use a third-party partition manager.
How to convert MBR to GPT during Windows installation?
This is common during a clean OS install. Boot your computer from the Windows installation USB. When you get to the “Where do you want to install Windows?” screen, you might see an error if the disk is MBR. Select each partition on the target drive and delete them all, leaving a single “Unallocated Space.” Select the unallocated space and click “Next.” Windows will automatically initialize the disk as GPT and begin installation.