


Replacing a gaming PC’s system SSD does not have to mean rebuilding Windows and downloading your library again. You can transfer the existing installation with a full-disk clone or an OS-migration workflow, then start the PC from the replacement and check your games.
The key is knowing which partitions and disks contain your setup. Windows, the launcher, a game’s installation files, and its saved progress can be in different places. A successful plan accounts for those locations before the old SSD is removed.
This guide covers a new system SSD in the same Windows PC. Moving Windows to a different computer adds hardware, driver, and activation considerations.
Do You Need to Replace the System SSD?
Replace the system SSD when you need more space on that drive or have chosen to upgrade the drive itself. If Windows can remain where it is and you only need more room for games, you may be able to add another SSD and move selected installations instead.
| Your goal | Starting point |
|---|---|
| Replace the complete Windows disk and keep its data partitions | Disk Clone |
| Move the installed Windows environment while retaining separate data storage | Migrate OS, after reviewing the included partitions |
| Keep the system SSD and relocate selected Steam games | Steam’s built-in move feature |
| Start with a newly installed Windows environment | Clean installation and a separate application/data setup |
We provide both Disk Clone and Migrate OS in Wittytool Disk Clone. Choose the transfer scope around the Windows environment and game partitions you want on the replacement.
Map Windows, Libraries, and Saved Progress
Open Disk Management and identify the physical disk you are replacing. Then check where the launchers and games store their files.
Games installed on C:
If a game is installed on the Windows partition, its installation files are part of that partition’s contents. Transferring the installed Windows environment can carry those files with it. You should still test the launcher and game afterward, including any sign-in or update it requests.
Games on another partition of the same SSD
Suppose C: contains Windows and D: contains games, but both partitions are on the old system SSD. A full-disk clone is the straightforward scope when you intend to replace that whole SSD and retain both partitions.
An OS-focused transfer may exclude D:. If you then remove the original disk, the D: game installations will not be available unless you have also transferred them. Review the actual partition preview rather than assuming that “move Windows” means every partition will move.
Games on a different physical disk
If the library is on another drive that will stay in the PC, you may not need to copy that library at all. Keep the device and its paths available after the system-SSD upgrade. The launcher on the replacement Windows installation must still be able to find it.
Saves, mods, and settings outside the game folders
Check the local save locations for your important games. Also account for mod-manager profiles, downloaded mods, screenshots, custom configuration, and other files you would miss.
These may be in the Windows user profile or another game-specific location. Keep separate copies where appropriate, even if the source partition is included in the migration. Cloud synchronization is useful for games that support it, but should not be assumed to cover every local file. Steam Cloud guidance.
Choose Disk Clone or Migrate OS
Choose Disk Clone for a complete source-disk replacement, or Migrate OS for a Windows-focused move. Review the included partitions so games on other storage remain accounted for.
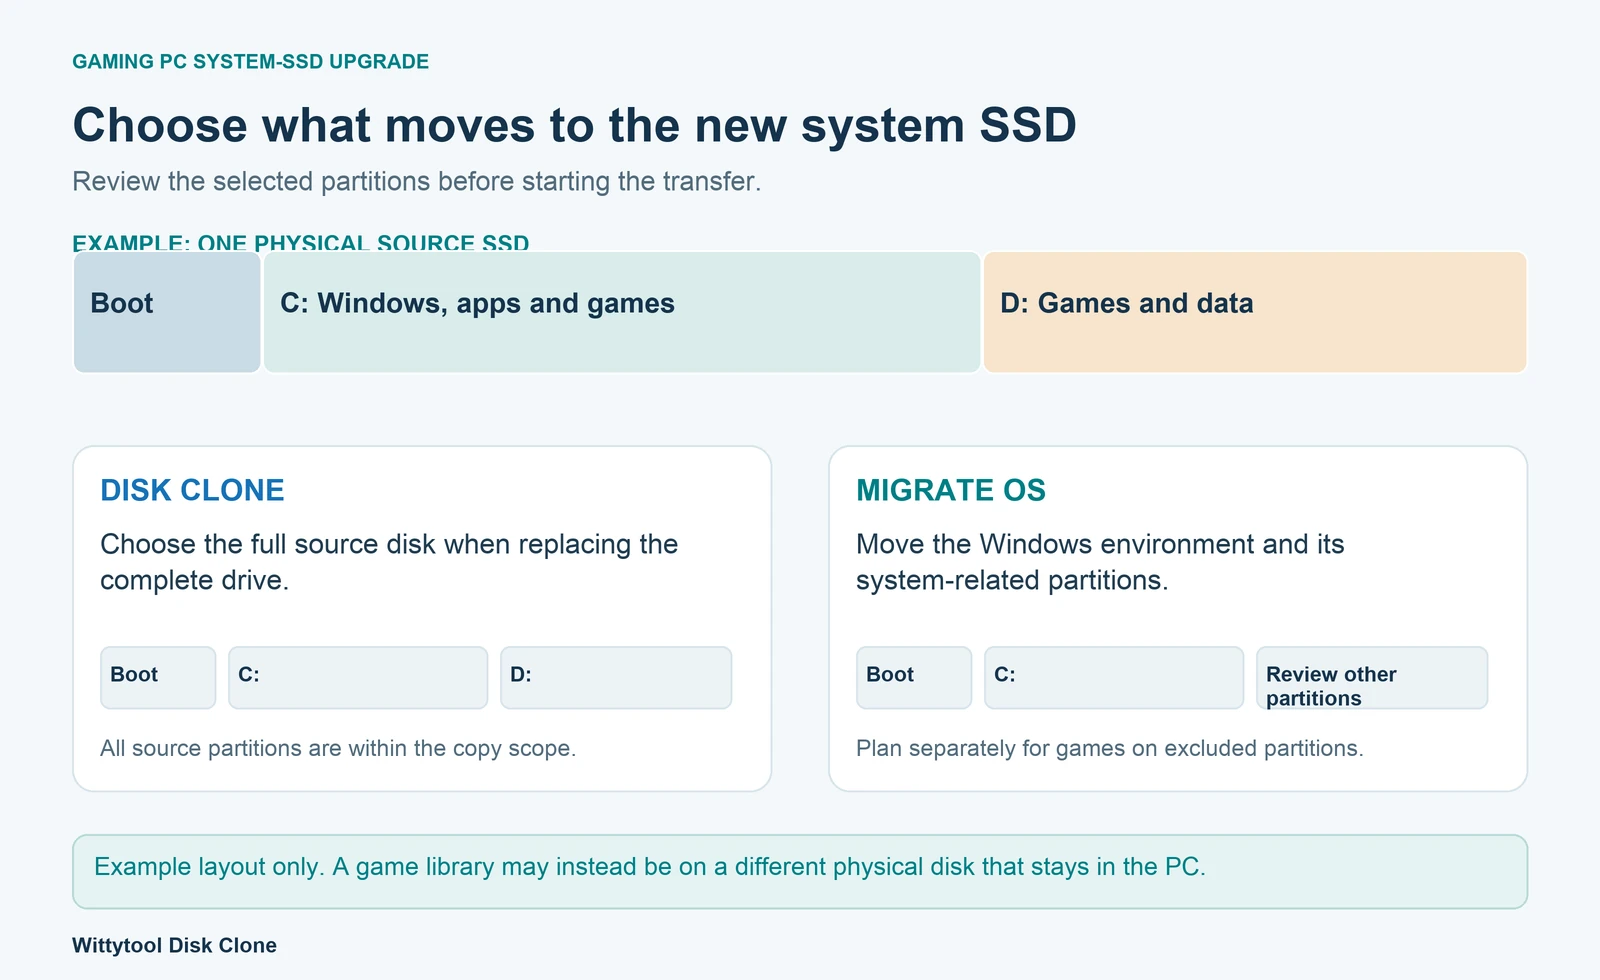
Use Disk Clone to replace the entire source disk
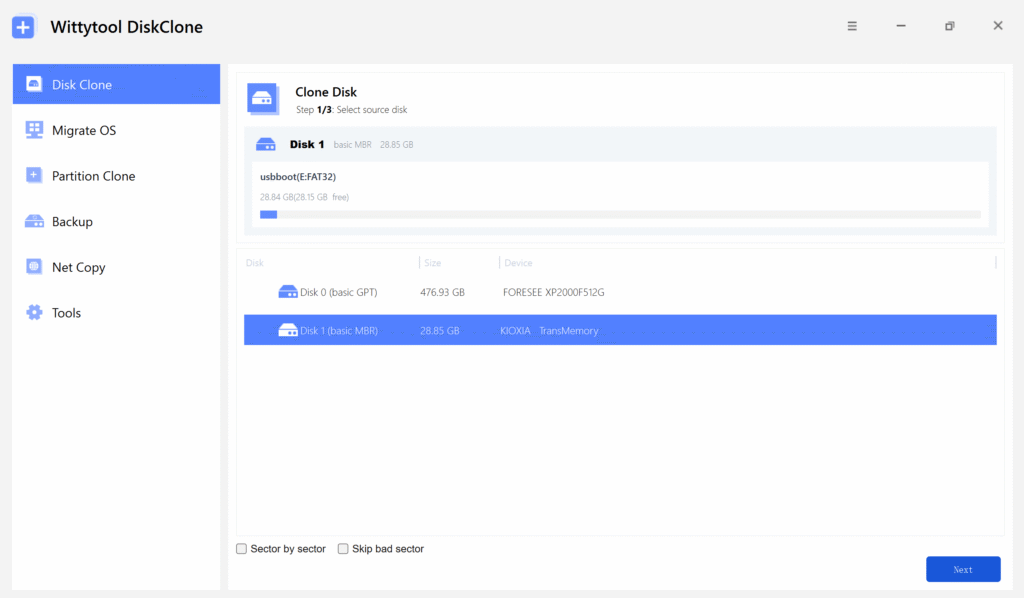
A full-disk copy is appropriate when you want the source SSD’s Windows and data partitions on the replacement. This is especially useful when the old physical disk will be removed and its games partition needs to come with it.
Use Migrate OS for a Windows-focused transfer
Migrate OS transfers the installed Windows environment and its relevant system partitions. Applications and personal content on the selected Windows partition are part of that environment; the workflow does not extract Windows from C: while automatically leaving every installed application behind.
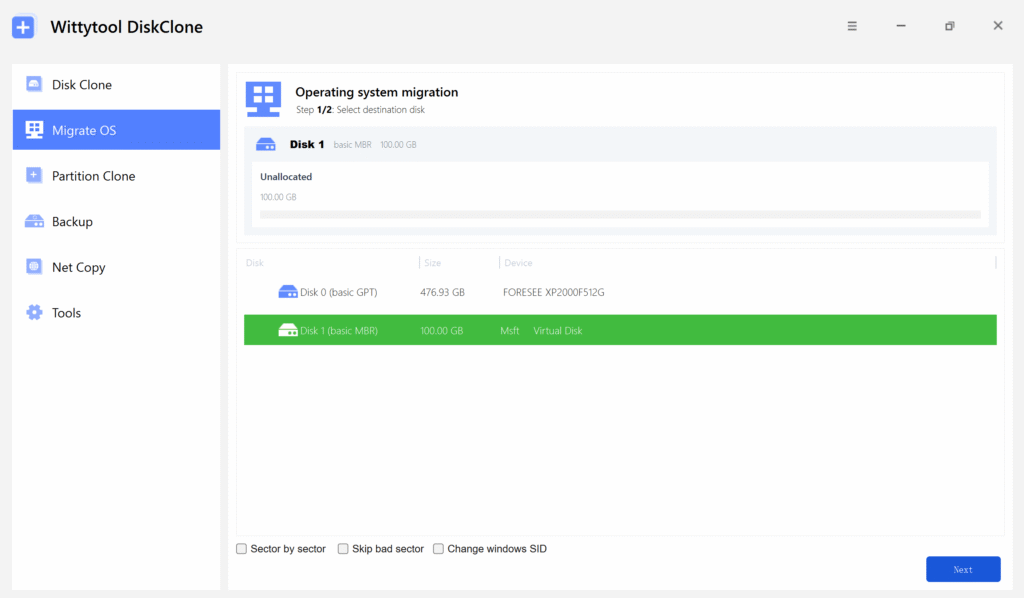
The important limit is partition selection. Games and files on an excluded partition remain outside the transfer. The existing Disk Clone versus OS Migration guide explains that distinction in more detail.
Choose a clean install when you want a fresh setup
A clean install is an alternative when you deliberately want to rebuild Windows. It involves installing applications and restoring or reconnecting the data you need afterward. For that route, follow the Windows-on-NVMe installation guide.
Prepare the Replacement SSD and Your Backups
Confirm that the SSD fits your PC and that the interface and connection are supported. If there is only one suitable internal slot, a compatible external enclosure can connect the replacement during the transfer, followed by a physical swap.
Check the source’s encryption status before starting. The current Wittytool Disk Clone guidance states that BitLocker-encrypted source disks are not recognized. Do not proceed with an unsupported source simply because its files are accessible in your current Windows session. Current SSD cloning guidance.
Before writing to the destination:
- Back up important source data, including the local saves and configuration you identified.
- Copy any needed destination data to another device; cloning or migration can overwrite it.
- Record the source and destination models, capacities, and disk identities.
- Save your work and close games, launchers, and other applications.
- Plan to keep the original SSD until the replacement has been verified.
Transfer the Installation with Wittytool Disk Clone
Our graphical transfer workflow lets you review the Windows-related partitions and destination sizes before copying. That helps you plan room for C:, account for a separate games partition, and retain the installed environment you want to use after the swap.
Download Wittytool Disk Clone to move your Windows setup and the selected game partitions to the new SSD.
Free supports destination disks up to 150 GB in total capacity. Use an appropriate paid plan for a larger destination; Pro has no edition-level disk-capacity limit.
1. Select the workflow and destination
For a full-disk transfer, open Disk Clone, select the old physical system disk, and choose the replacement SSD as the destination.
For a Windows-focused transfer, open Migrate OS and choose the destination SSD. Review the system-related partitions and identify any source data partition that is not included.
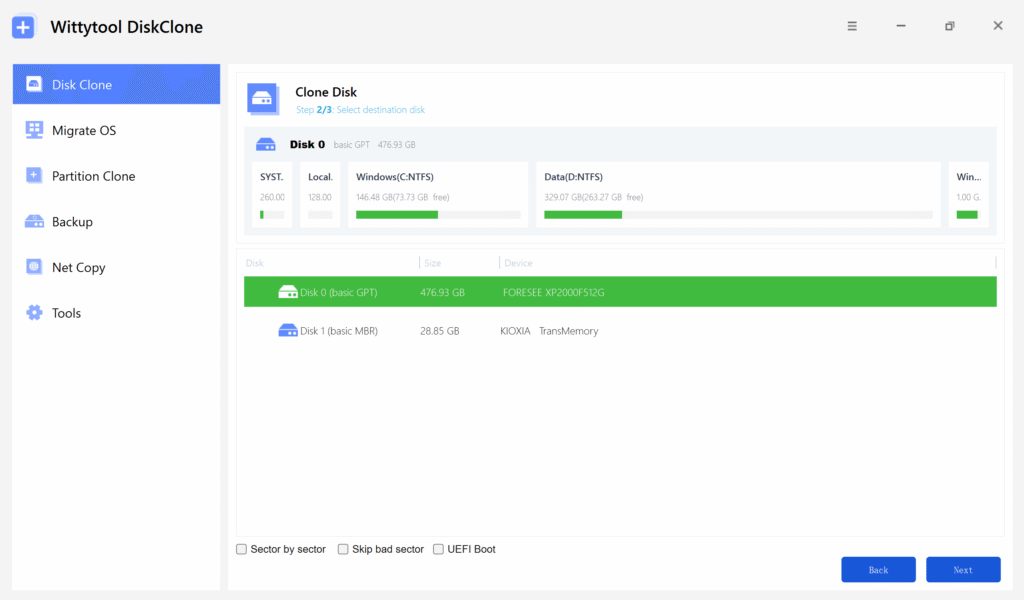
2. Review partitions and the destination layout
Check that the resulting layout matches your plan for Windows and games. If you want more room on C: or a copied games partition, review the proposed target sizes before starting. Wittytool Disk Clone supports layout adjustment and enables 4K alignment by default.
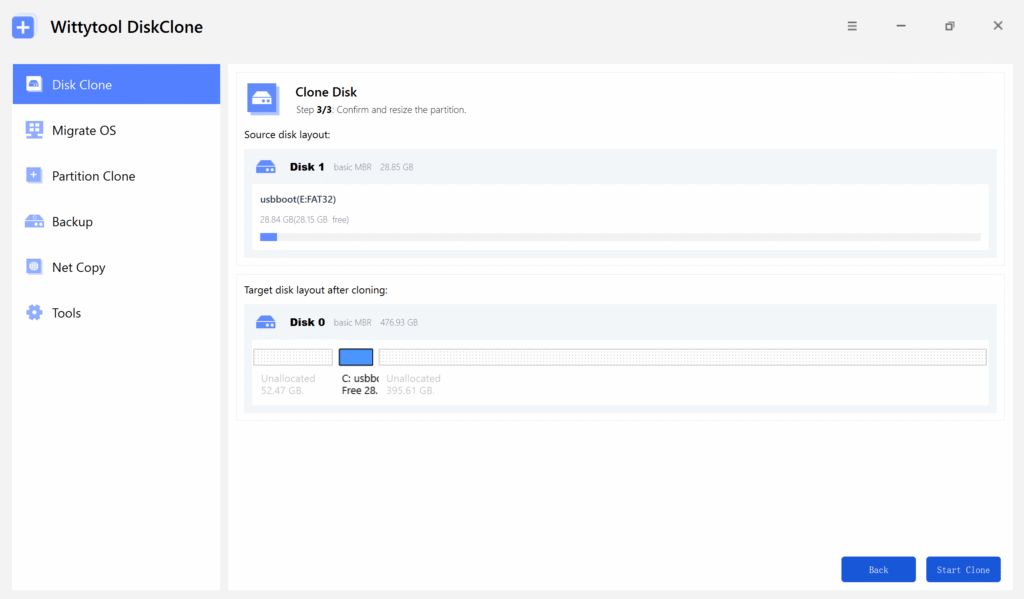
Windows startup can depend on partitions that do not have normal drive letters. Microsoft’s documentation describes the EFI system, Windows, and related partitions in a UEFI/GPT installation. Copying the visible files on C: is not a replacement for transferring the necessary system layout. Microsoft Windows partition documentation.
If the existing installation relies on boot components on another physical drive, account for that dependency before removing devices. A preview of one disk is not proof that every startup dependency resides on it.
3. Confirm the overwrite and complete the transfer
Check both disk identities and confirm that the destination data you need has been backed up. Read the overwrite warning, then select Start Clone. Keep the connections and power stable until the operation finishes.
Our Windows migration and cloning guide provides the corresponding source, destination, and layout-review workflows.
Start the PC from the Replacement SSD
Shut the computer down and follow its manufacturer’s drive-installation instructions. Select the replacement’s Windows startup entry through the PC’s documented boot controls. On applicable UEFI systems, this may appear as a Windows Boot Manager entry.
Keep the firmware mode consistent with the Windows installation. A normal storage upgrade is not a reason to disable Secure Boot or change unrelated controller settings.
Confirm which physical SSD is running Windows
Seeing C: in File Explorer does not identify the physical drive. Check the disk layout and device information after startup so you know that Windows is using the replacement.
Where practical and consistent with the PC’s hardware instructions, test startup with the old system SSD temporarily disconnected. This helps reveal a remaining dependency on the old disk. Confirm the new drive’s capacity and restart once before treating the transfer as finished.
Check Your Game Setup After Windows Starts
Open your launchers and review their library locations. Pay particular attention to installations on a separate data partition or disk.
Launch representative games and check your recent progress. For modified games, test the relevant mod manager, profiles, and custom content too. Sign in again or complete application activation when a program requires it; a disk transfer should not be treated as a guarantee that every account session or license state remains unchanged.
Keep the original SSD and your separate backups until the setup you actually use has passed these checks.
If Windows Starts but Games Are Missing
First look for a storage-selection problem:
- Was the games partition excluded from an OS-focused migration?
- Is a separate game-storage drive still connected?
- Did a data volume receive a different drive letter?
- Is the launcher looking at the correct existing library?
For Steam, register an existing library through Settings → Storage if needed. If its files are present but not recognized, follow Steam’s installed-games recognition guidance. Use the corresponding instructions for other launchers.
File verification can address missing or changed installation files. Saved progress is a separate check: recognizing the installation does not prove that the intended save folder is present.
If the Replacement SSD Does Not Boot
Preserve the original SSD and the last working setup. Check the copy result, physical connection, selected startup device, and included system partitions before making further changes.
Use the cloned-SSD startup guide for more diagnosis, matching the advice to your actual configuration. Record any error message. Do not format the original or make broad security-setting changes simply because the first startup failed.
Frequently Asked Questions
Do I have to reinstall Windows after replacing its SSD?
No. A supported clone or OS migration can transfer the existing installation. The replacement still needs the correct system partitions and a compatible startup configuration.
Does Migrate OS include games installed on C:?
Game files on the migrated Windows partition are included with that partition’s contents. Review installations, saves, and configuration stored on other partitions separately.
What happens to a game library on D:?
It depends on the physical layout and selected transfer scope. A D: partition on an excluded or removed disk will not become available on the new SSD automatically. A separate disk retained in the PC can continue to provide the library when its paths are correctly configured.
Does upgrading the SSD automatically improve game FPS?
A larger drive provides more installation space. It does not guarantee a frame-rate improvement; gaming performance depends on the game and the rest of the system as well.
When can I reuse the original system SSD?
After Windows starts from the replacement independently, important applications and games work, and your backups remain available. Confirm the old drive’s identity again before erasing or repurposing it.