Last updated on June 25, 2026
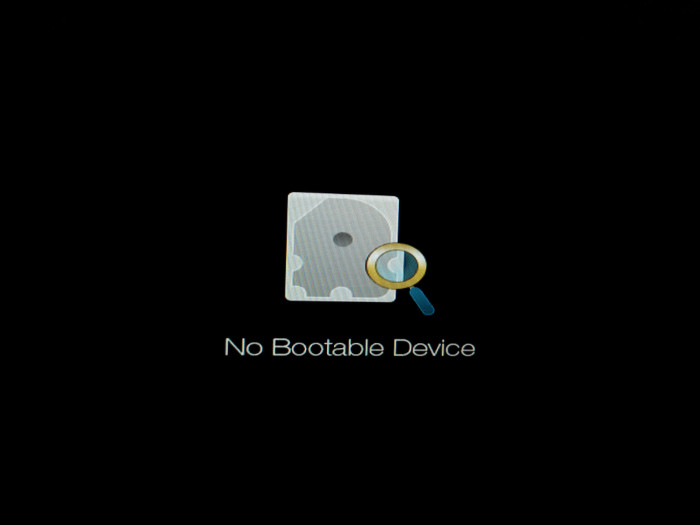
Last month, I upgraded my aging laptop with a new 1TB NVMe SSD. I cloned my Windows 11 installation, swapped the drives, hit the power button – and got nothing but a black screen with a blinking cursor. Sound familiar?
If your cloned SSD won’t boot, I’ve been exactly where you are. After spending the better part of a weekend troubleshooting (and helping a few colleagues with the same issue since), I’ve put together this guide based on what actually worked. Below are the 9 fixes I personally tested, ordered from easiest to most advanced – so you can start with the simplest solution and only dive deeper if needed.
Why Won’t My Cloned SSD Boot? (Common Causes)
Before I started randomly toggling settings, I wanted to understand why my clone failed in the first place. Knowing the cause makes the fix obvious – so here’s what I learned from my own troubleshooting and a fair bit of research:
| Cause | What’s Happening |
|---|---|
| Wrong boot order | BIOS is still pointing to the old drive |
| UEFI/Legacy mismatch | Source disk uses one mode, BIOS expects another |
| MBR vs GPT mismatch | Partition style doesn’t match firmware mode |
| Corrupted BCD | Boot Configuration Data didn’t migrate cleanly |
| Inactive system partition | System partition not marked active (MBR disks) |
| Missing EFI/system reserved partition | Cloning tool skipped hidden boot partitions |
| Secure Boot conflict | Secure Boot rejects the cloned bootloader |
| Faulty clone | Bad sectors or interrupted cloning produced an incomplete image |
In my case, it turned out to be a combination of issues #2 and #6 – but I didn’t know that at the start. With these causes in mind, let’s work through the pre-flight checks before touching any advanced settings.
Before You Begin: Quick Pre-Check Checklist
Whenever I help someone with this issue, I always start here. Skipping these basics is how I once wasted an hour on what turned out to be a loose SATA cable:
- ✅ SSD is properly seated in the SATA/M.2 slot
- ✅ SATA/power cables are firmly connected
- ✅ SSD appears in BIOS/UEFI under storage devices
- ✅ I have a Windows installation USB ready
- ✅ Critical files are backed up
If your SSD doesn’t show up in BIOS at all, that’s a different rabbit hole – I’d recommend reading this guide on SSD not showing up in Windows before continuing here. Once your hardware is confirmed, you can move into the actual fixes with confidence.
9 Proven Fixes When a Cloned SSD Won’t Boot
Fix 1: Set the Cloned SSD as the First Boot Device
This is embarrassingly simple, but it’s the first thing I now check – because in most cases, the PC is still trying to boot from the old drive that’s still connected.
- Restart your PC and press
F2,F10,Del, orEscto enter BIOS/UEFI. - Navigate to the Boot tab.
- Move the cloned SSD to the top of the boot priority list.
- Press
F10to save and exit.
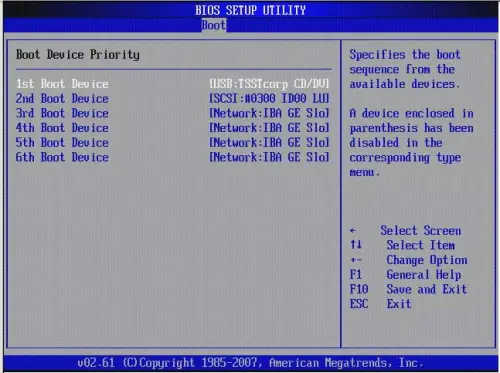
💡 My tip: If the SSD doesn’t appear in BIOS at all, try a different SATA port or check whether NVMe support is enabled in advanced settings.
If reordering the boot devices didn’t get you into Windows, the next likely culprit is a firmware mode mismatch.
Fix 2: Switch Between UEFI and Legacy BIOS Mode
This was actually one of my issues. My source drive was GPT/UEFI, but my BIOS had defaulted back to Legacy after a firmware update – so even with the right boot device selected, Windows wouldn’t load.
The rule of thumb:
- GPT disk → BIOS must be in
UEFImode - MBR disk → BIOS must be in
LegacyorCSM Enabledmode
To check your partition style in Windows: open Disk Management → right-click the disk → Properties → Volumes tab → look at Partition style.
If your firmware mode and partition style still don’t line up, you have two options: change BIOS mode (Fix 2) or convert the partition style itself, which I’ll cover next.
Fix 3: Match Partition Style (MBR vs GPT)
When changing BIOS mode isn’t possible (some prebuilt systems lock this), the cleaner fix is converting the disk. I used Microsoft’s built-in MBR2GPT tool because it doesn’t require wiping the drive:
mbr2gpt /validate /disk:0 /allowFullOSmbr2gpt /convert /disk:0 /allowFullOS⚠️ Only convert if your motherboard supports UEFI. After conversion, switch BIOS to UEFI mode.
If MBR2GPT throws validation errors, there’s a safer step-by-step walkthrough in this guide on how to convert MBR to GPT without data loss. With partition style sorted, there’s still one BIOS-level setting that often gets in the way – Secure Boot.
Fix 4: Disable Secure Boot Temporarily
Secure Boot rejected my cloned bootloader on first try. Disabling it just long enough to confirm the boot works is a quick diagnostic:
- Enter BIOS/UEFI.
- Go to the Security or Boot tab.
- Set Secure Boot to
Disabled. - Save and reboot.
Once Windows booted successfully, I re-enabled Secure Boot and it stayed working. If you run into the odd “Secure Boot enabled but not active” status afterward, please refer the that guide to walk through the platform-key reset that fixed it for me. If your SSD still won’t boot after that, the bootloader itself is probably damaged – which leads us into the most impactful fix in this guide.
Fix 5: Rebuild the BCD (Boot Configuration Data)
A corrupted BCD is, in my experience, the single most common reason a cloned SSD won’t boot. Here’s the fix that’s worked for me every time:
- Boot from a Windows installation USB.
- Choose Repair your computer → Troubleshoot → Command Prompt.
- Run these commands one at a time:
bootrec /fixmbrbootrec /fixbootbootrec /scanosbootrec /rebuildbcdWhen I got Access is denied on bootrec /fixboot (which happens often on UEFI systems), I used:
bcdboot C:\Windows /s C: /f ALLReplace C: with the actual Windows drive letter shown by diskpart → list volume.
If the command-line approach feels intimidating, Windows has an automated alternative that does much of the same work behind the scenes.
Fix 6: Run Startup Repair from Windows Installation Media
For readers less comfortable with the command line, Startup Repair is the friendliest option. It’s automated and surprisingly thorough:
- Boot from the Windows USB.
- Click Repair your computer → Troubleshoot → Startup Repair.
- Select your Windows installation and let it run.
I’ve found that running it 2–3 times in a row sometimes fixes issues a single pass misses. If even Startup Repair can’t load Windows, the issue may not be the bootloader—it may be that the system partition isn’t marked as bootable at all.
Fix 7: Mark the System Partition as Active (MBR Disks Only)
On a friend’s older system running an MBR clone, the system partition wasn’t flagged as active. Here’s how I fixed it via Command Prompt from the Windows USB:
diskpartlist diskselect disk 0list partitionselect partition 1activeexitPick the partition with the boot files – usually the small System Reserved partition (about 100–500 MB).
Sometimes, however, the partition is fine and the real problem is that Windows is silently using the wrong drive’s bootloader. That’s where the next fix comes in.
Fix 8: Disconnect the Original Drive
This is what finally solved my own issue. Windows was reading the bootloader from my old HDD while loading the OS from the new SSD – a fragile setup that broke as soon as I tried to remove the old drive.
- Power off the PC.
- Physically disconnect the original drive.
- Boot with only the cloned SSD connected.
If it boots fine, you can later reconnect the old drive as secondary storage (after wiping its boot partition). If, after all eight fixes, your SSD still won’t boot, the issue is almost certainly with the clone itself – not your system.
Fix 9: Re-Clone with Reliable Software
If you’ve tried everything above and your SSD still won’t boot, the clone itself is probably the problem. Common causes I’ve run into:
- The cloning tool skipped hidden partitions (EFI, Recovery, MSR)
- The clone was interrupted mid-process
- The source had bad sectors that weren’t handled gracefully
For my second attempt, I used Wittytool Disk Clone, which I’d seen recommended in a few Reddit threads.
- It cloned all hidden partitions (EFI, MSR, Recovery) without me having to manually select them
- 4K alignment for SSDs was on by default
- It supports both standard system clone and sector-by-sector clone modes, which is useful when a standard clone fails on a drive with minor errors
- The interface is straightforward – no learning curve
If you only need to migrate Windows itself rather than the whole disk, the dedicated workflow in how to move OS to another drive without data loss is a lighter-weight option. For full-disk replacements like mine, the standard clone hard drive walkthrough is the right pick.
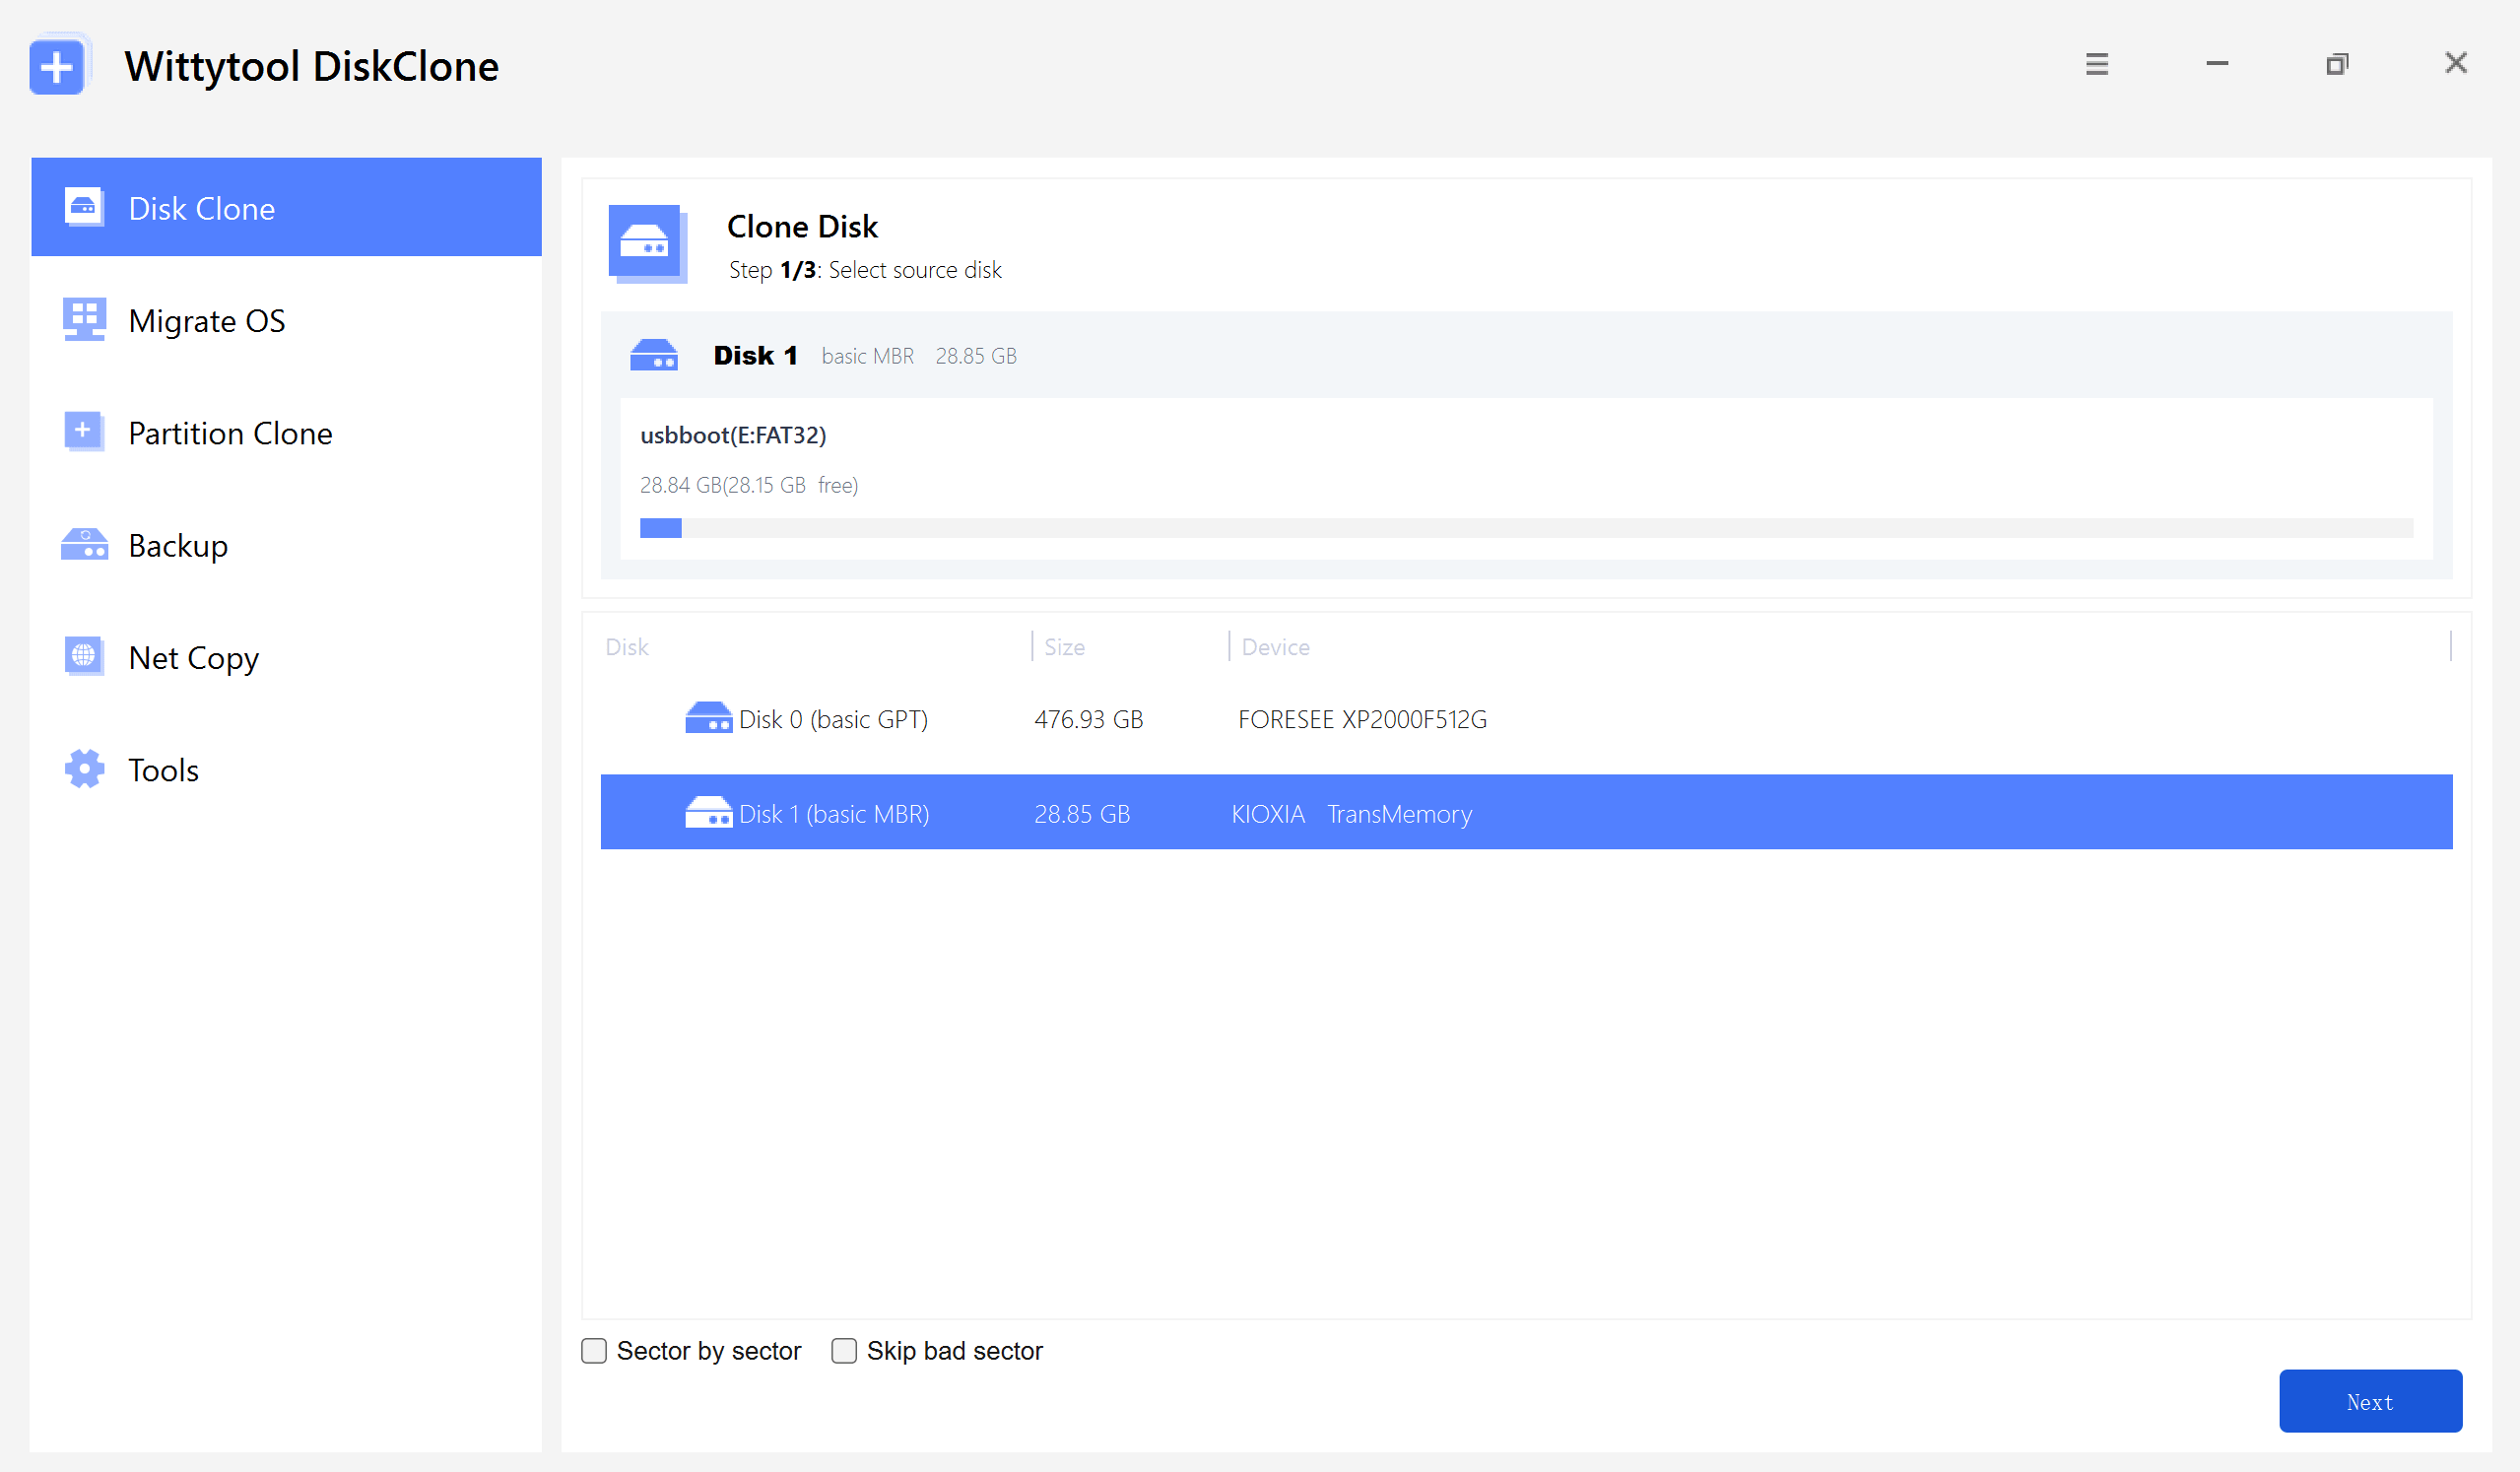
Now download Wittytool Disk Clone and follow my re-cloning workflow:
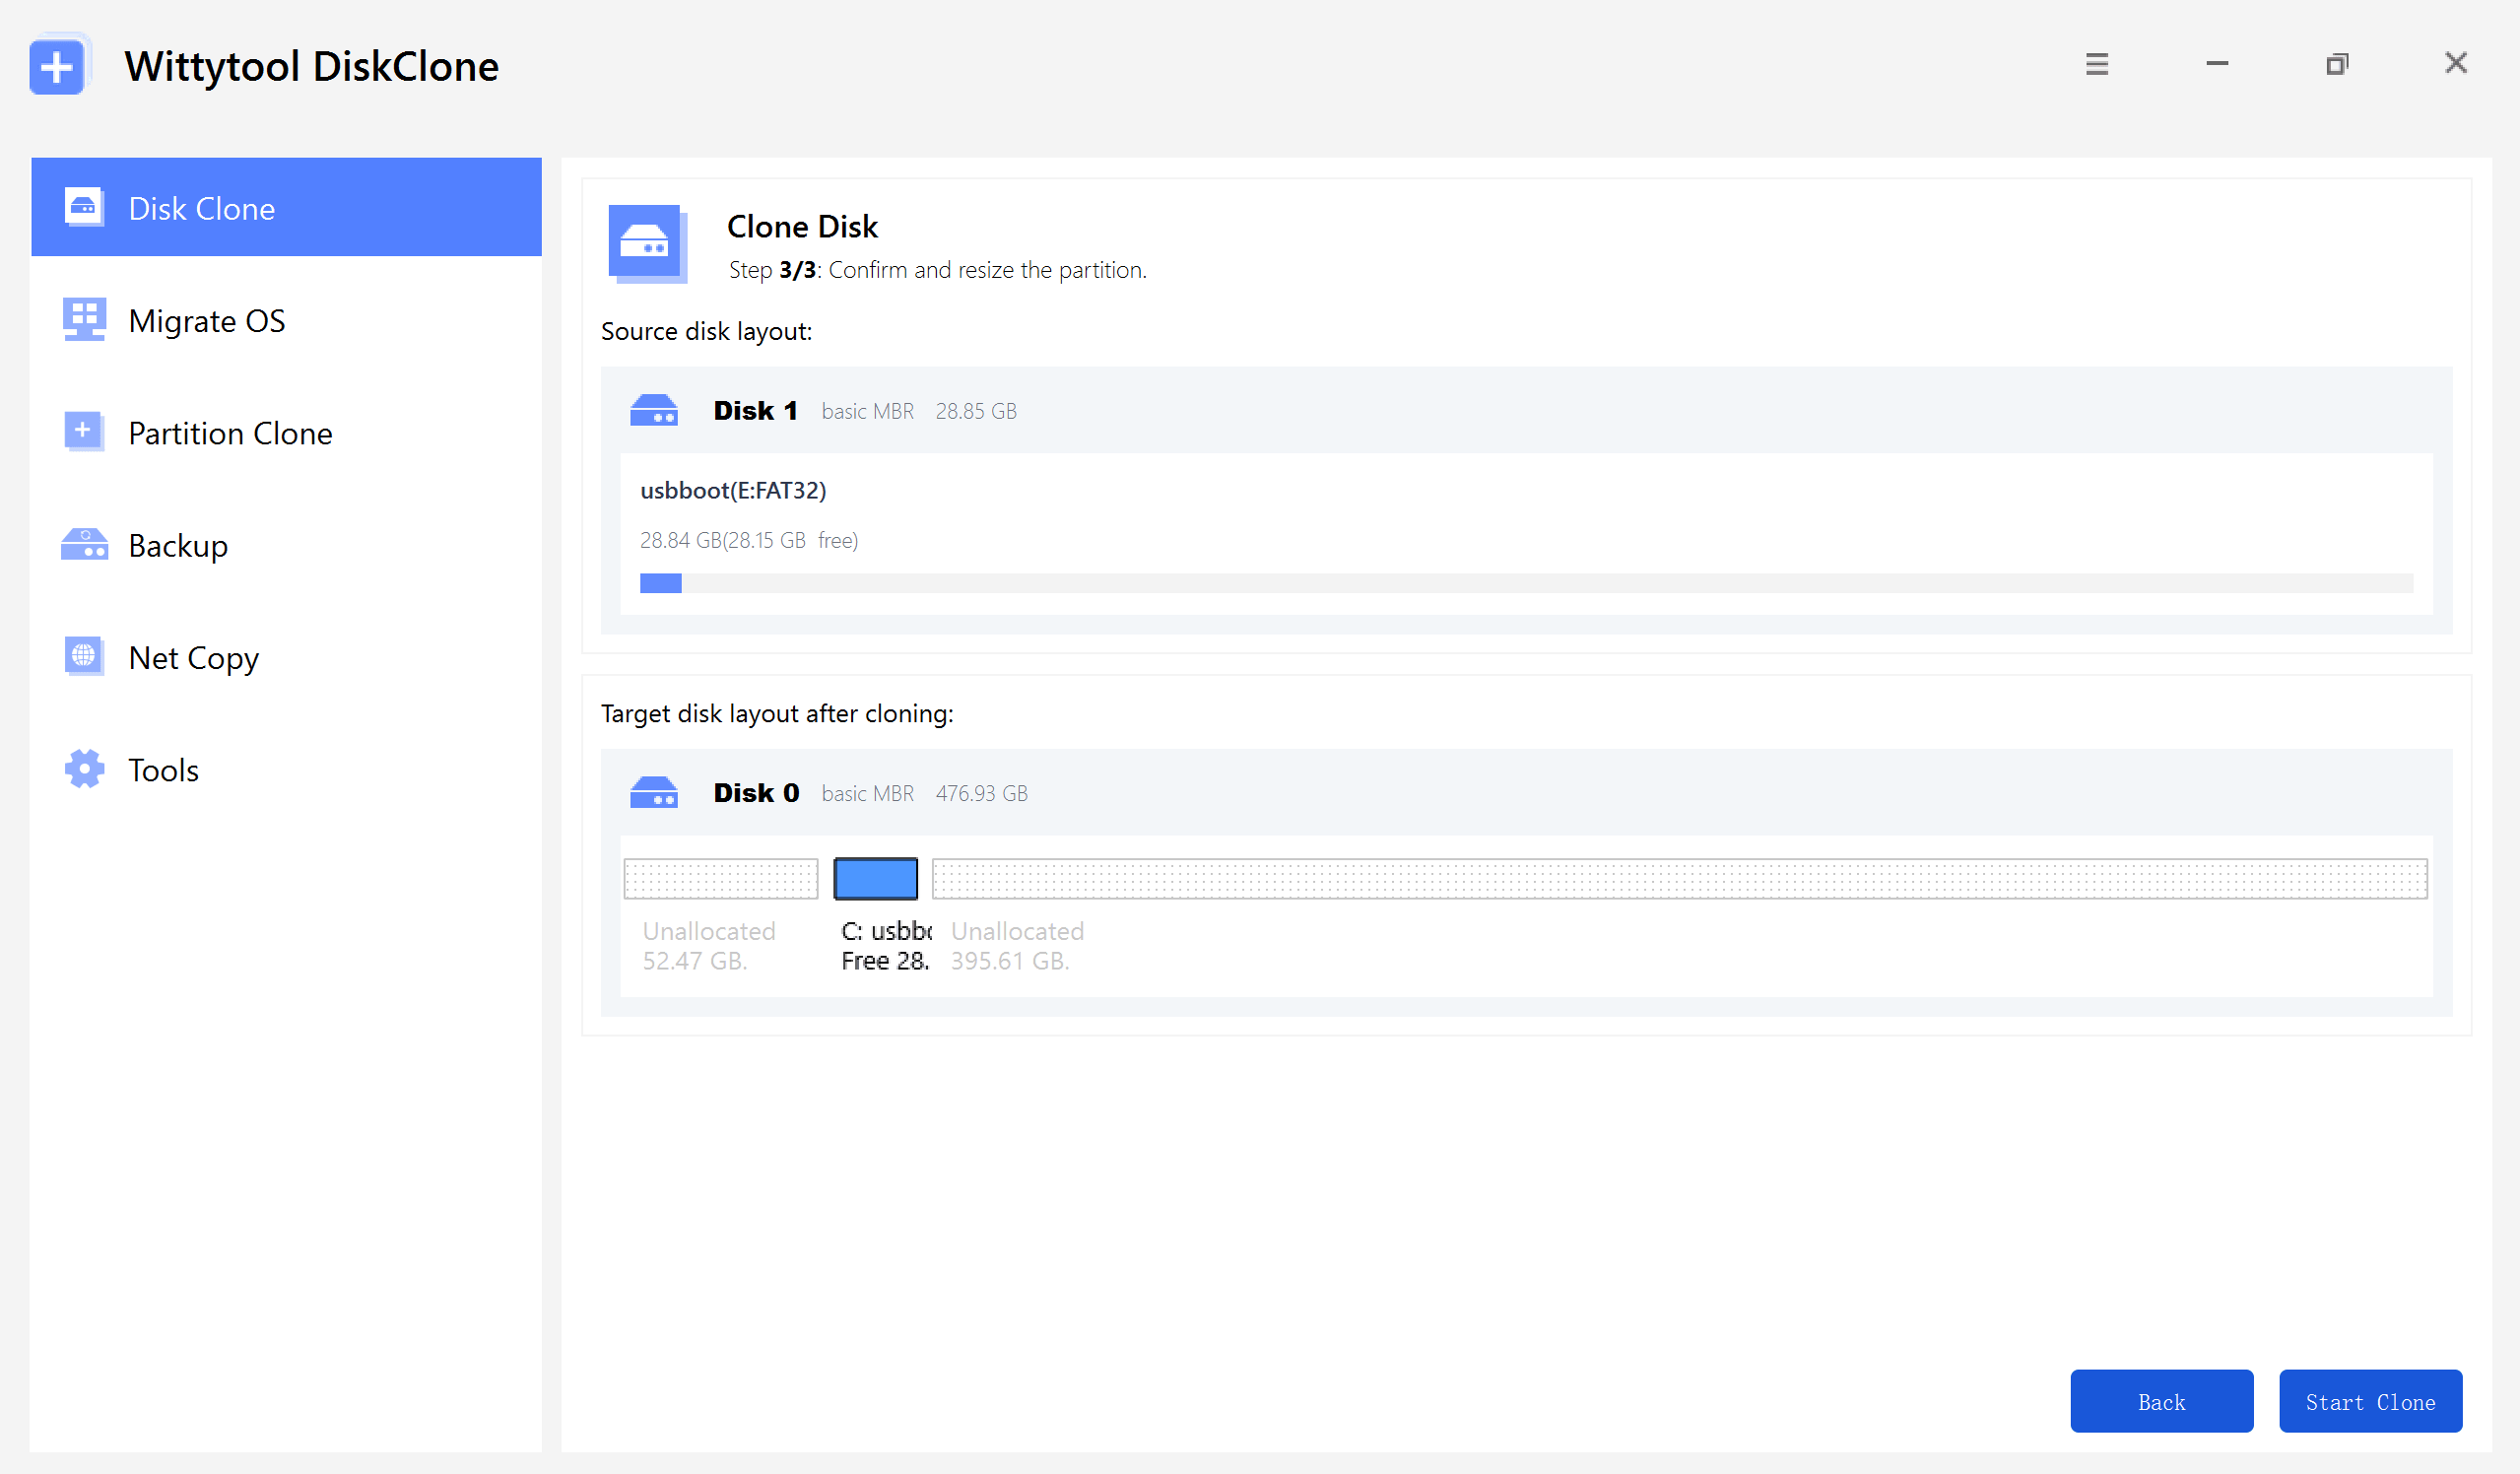
Step 1: Select Disk Clone (or Partition Clone for a nearly identical workflow), then choose your source disk and click Next.
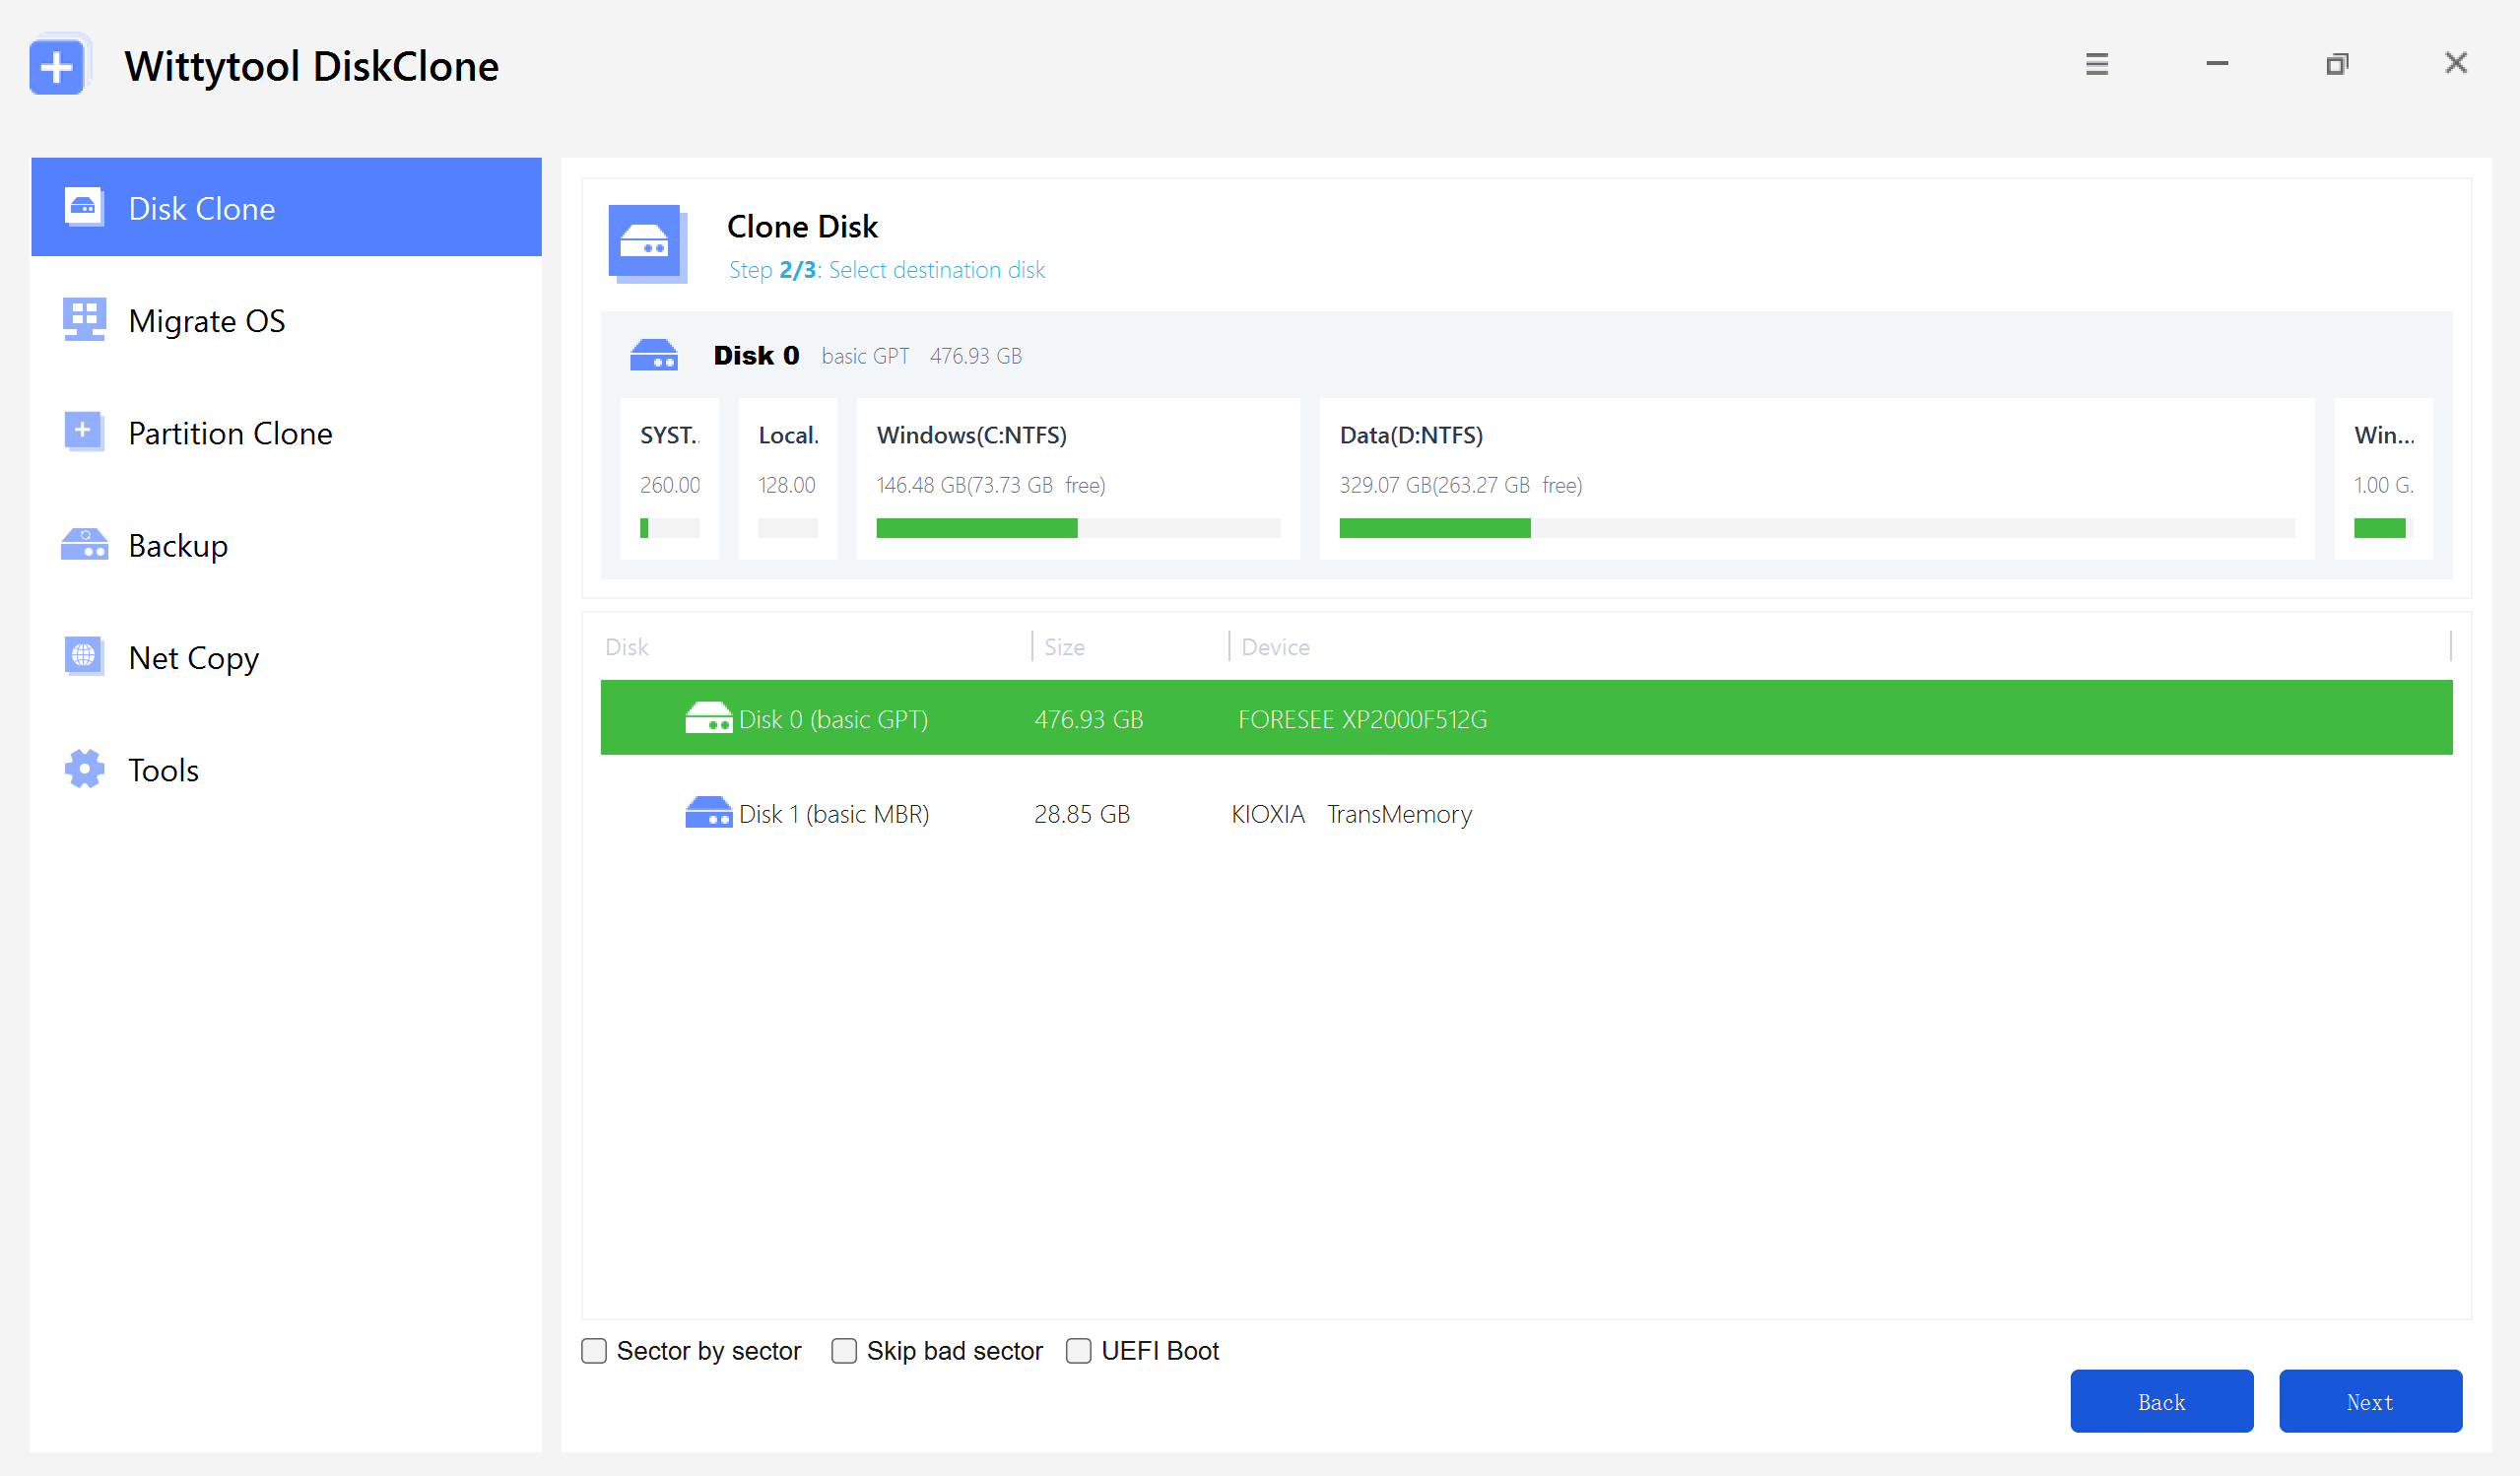
Step 2: Choose your destination disk and click Next to access the configuration settings.
Here, you can enable sector-level cloning, skip bad sectors, or check the UEFI BOOT option to convert the boot mode, ensuring the drive is fully compatible with the UEFI firmware of modern motherboards.
Step 3: Resize the partitions on the target disk layout as needed to fit your requirements, then click the “Start Clone” button to begin the cloning process.
Watch the Disk Cloning Video Guide with Wittytool Disk Clone:
After re-cloning this way, my system booted on the first try. With the boot issue out of the way, the next thing on my mind was making sure I never had to do this again.
How to Avoid Cloned SSD Boot Issues in the Future
After going through all of this, I built a small pre-clone routine that has saved me from repeat headaches. Here’s what’s on my checklist now:
- Match partition styles before cloning (both MBR or both GPT).
- Verify firmware mode (UEFI vs Legacy) matches your source disk.
- Run CHKDSK on the source drive to repair file system errors before cloning.
- Close all applications during cloning to prevent locked files.
- Use a UPS or a charged laptop to avoid power interruptions—a half-finished clone is worse than no clone.
- Enable 4K alignment for SSD performance and stability.
- Test the clone with the original drive disconnected before wiping the old disk.
- Keep a system image backup as a fallback.
If you want to go deeper on the cloning side, I’ve found the disk clone tips handy for one-off scenarios like cloning Samsung drives, troubleshooting slow clones, or moving Windows 11 to a new disk.
FAQs
Q: Why does my cloned SSD show up in BIOS but won’t boot?
A: BIOS detects the hardware, but the bootloader is missing or misconfigured. Start with Fix 5 and Fix 6 (rebuild BCD and Startup Repair).
Q: Can I clone Windows 11 to a new SSD without reinstalling?
A: Yes. As long as you clone all partitions (including EFI and Recovery) and match the partition style with your BIOS mode.
Q: Should I initialize the new SSD as MBR or GPT before cloning?
A: Match the source disk. If your motherboard supports UEFI and your source is MBR, consider converting to GPT after cloning for Windows 11 compatibility.
Q: Will cloning damage the original drive?
A: No. Cloning only reads from the source. The original disk stays untouched.
Q: How long does cloning a 500 GB drive take?
A: In my experience, anywhere from 30 minutes to 2 hours, depending on the source drive’s speed and how full it is. If yours is taking unreasonably long, why cloning a hard drive takes forever covers the most common slowdowns.
Final Thoughts
A cloned SSD that won’t boot feels like a disaster, but in almost every case I’ve encountered, it’s fixable without reinstalling Windows. Start with the simplest fix – boot order – then work your way through BIOS mode, partition style, and BCD repair. Six times out of ten, one of the first six fixes solves it.
If those don’t work, re-cloning with software that handles all hidden partitions correctly Wittytool Disk Clone worked for me, but there are other solid options too) is usually the path of least resistance. Your data isn’t lost – you’re just one bootloader away from a successful upgrade.
🚀 One last tip from me: Once your SSD boots, check that TRIM is enabled by running fsutil behavior query DisableDeleteNotify. A result of 0 means TRIM is active, which keeps your new drive fast for the long haul.