


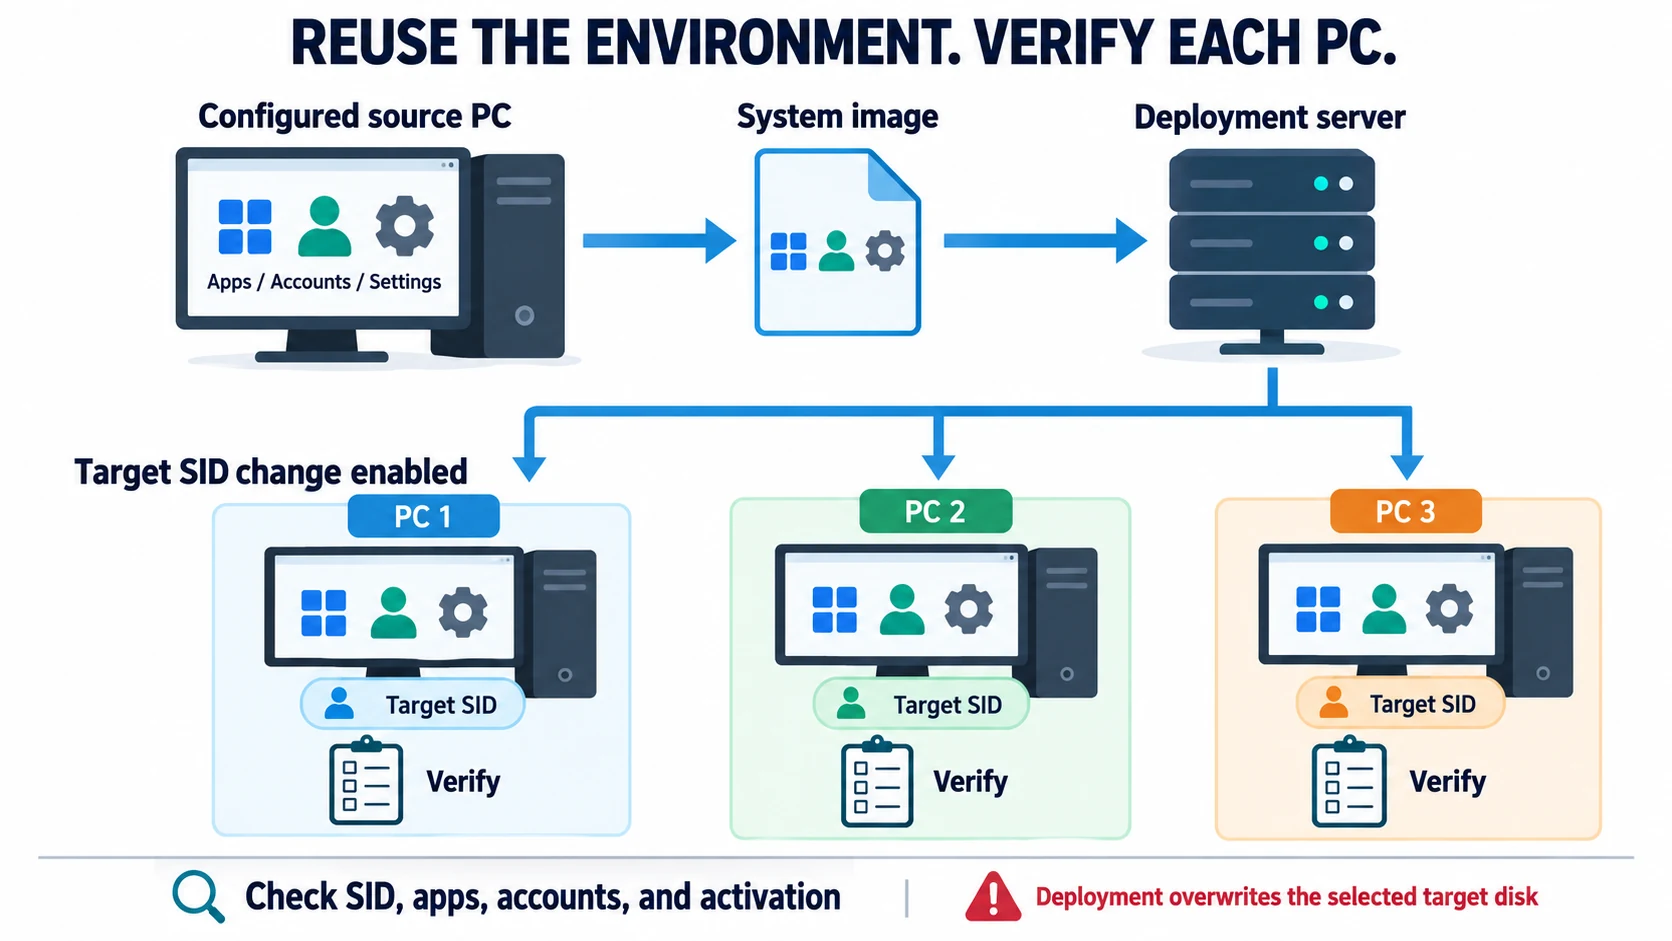
With Wittytool Disk Clone’s Windows image deployment feature, you can back up a configured Windows installation and deploy that image to multiple PCs without running Sysprep on the source first. The workflow preserves the applications and accounts included in the image and lets you change target Windows SIDs during deployment.
Before you connect any target clients, back up their data and confirm the destination disk. This deployment deletes partitions on the selected target disk and writes the image to it. Automatic deployment can begin when a client connects.
Can You Deploy Windows Images Without Sysprep?
Yes, Wittytool Disk Clone provides a product workflow that starts with a backup of your current system. You do not need to run Sysprep or separately change the source computer’s SID before creating that backup.
This is useful when you have already configured the Windows environment you want to distribute, such as a classroom PC with teaching applications or an office workstation with a standard set of programs and local accounts.
You skip the preparatory Sysprep operation on the source installation. You still need to review that installation, create a compatible image, configure the deployment server, prepare the target clients, and choose the destination disks.
For the broader setup process, see the guide to deploying a Windows image to multiple computers.
What the Image Preserves and What Each Target Still Needs
The environment you preserve comes from the source computer. It is the environment written onto each selected target disk.
| Content or setting | What this workflow means | What to check on each target |
|---|---|---|
| Installed applications | Applications included in the source image are carried into the deployed environment. | Launch required programs, test a representative task, and check activation where applicable. |
| Local user accounts | Configured accounts and their environment are retained from the source image. | Test the intended local accounts and permissions. |
| Microsoft Store apps | Store app content included in the image can be preserved. | Check that the required apps launch and work for the intended user. |
| Windows and application settings | The image carries the configuration you captured. | Review settings that need to differ by device, including names and network configuration. |
| Existing target files | The selected target disk is overwritten during deployment. | Restore any separately backed-up files you need after the new system is validated. |
Preserving an application’s files and configuration does not guarantee that its license, cloud sign-in, or device registration will work unchanged on another PC. Check those items separately.
Plan identity checks before deployment. The guide to checking duplicate machine SIDs explains machine SID comparisons and the distinction between machine, local user, and domain account SIDs. Changing a local machine SID does not change a domain user’s SID or establish a new domain relationship. For a domain-joined source or target, use the domain-joined Windows PC cloning guide to plan that relationship separately.
Prepare for Batch Windows Image Deployment
Before creating the image, confirm that the source PC contains the environment every target should receive. Test its required applications and local accounts. Remove personal documents, saved credentials, and other content that should not be copied to the whole batch. Record the Windows build, application versions, and image date so you can identify what you deployed.
Prepare these items before connecting clients:
- A compatible source image: Use a system or disk image created by Wittytool Disk Clone. This deployment workflow does not accept WIM files or backups from other imaging tools.
- A deployment server: A compatible PC with Wittytool Disk Clone installed can serve the image. “Server” describes the software role; it does not require the Windows Server operating system.
- A working client environment: Prepare WinPE so that each target can run the client, detect its storage, and reach the server. PXE is a supported boot option, alongside bootable media.
- Protected destination disks: Back up the target data you need, check that you can access the backup, and record the intended disk for each device. Disk numbering can differ between PCs, particularly when they have multiple drives or attached USB storage.
If a client cannot reach the server in WinPE, check its network driver and network initialization before starting deployment. Microsoft’s WinPE networking guidance explains those checks.
If your targets use different hardware, Wittytool Disk Clone’s Universal Restore supports dissimilar hardware deployment. Validate a representative PC from each hardware group before expanding the batch. A successful restore on one model does not establish startup or driver compatibility for every other model.
How to Deploy Windows Images Without Sysprep with Wittytool Disk Clone
Wittytool Disk Clone combines source-image backup with a graphical server/client workflow. You can deploy manually or automatically, configure target SID changes, and monitor client progress from the server.
Download Wittytool Disk Clone to create your source image and prepare the deployment server, then validate the workflow on one target PC.
Step 1: Create a Windows Image for Deployment
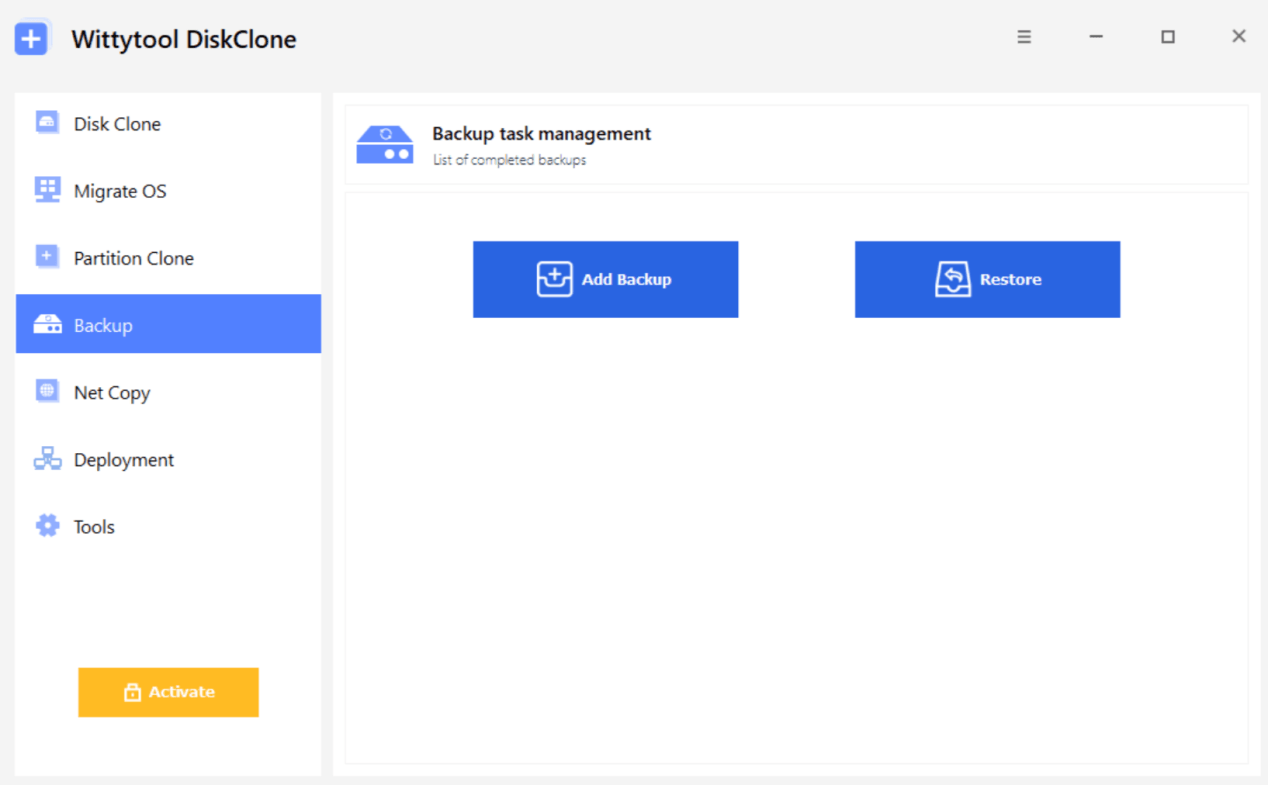
On the configured source PC, open Wittytool Disk Clone, select Backup, and click Add Backup to create an image of the Windows environment you want to deploy.
Select Backup System and check the system-related partitions. Enter a backup name and an image storage path that the deployment server can access, then click Start Backup. Wait for image creation to finish before continuing.
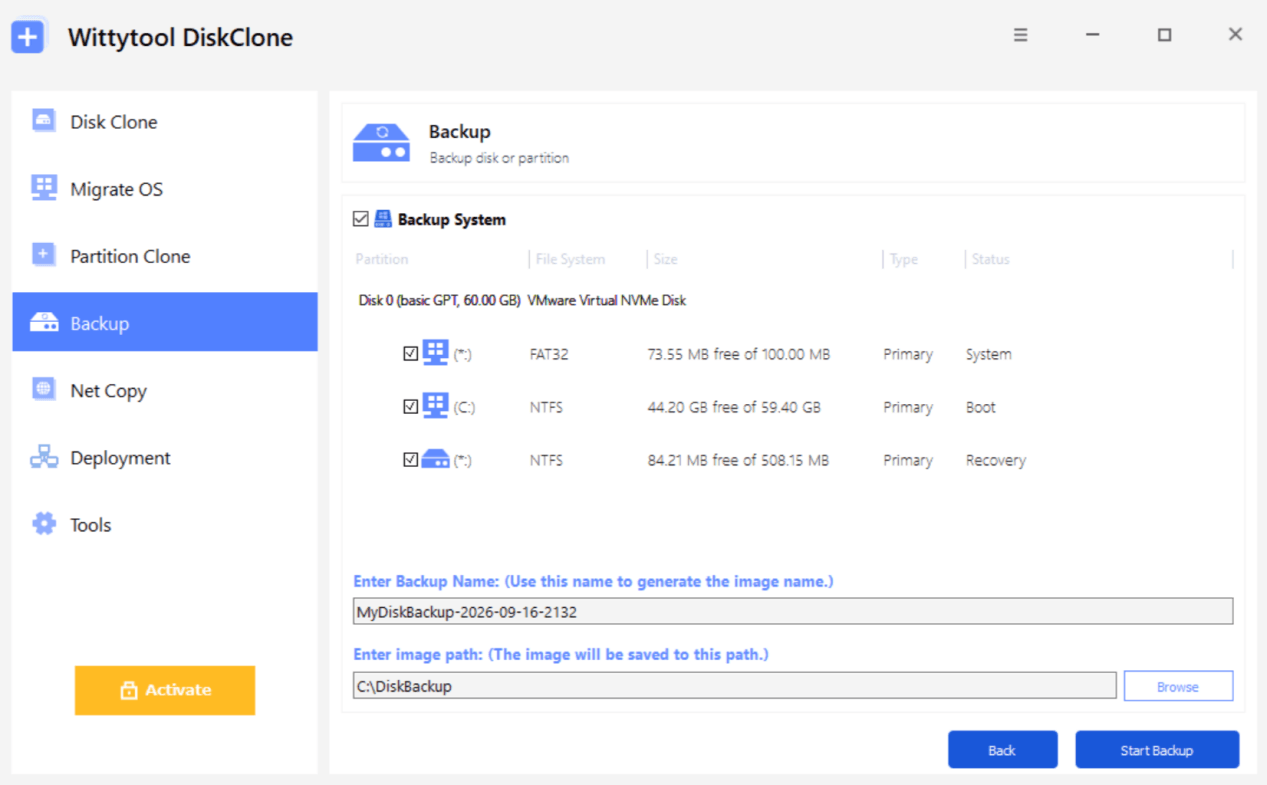
Wait for image creation to finish. You will select this image on the deployment server in Step 2.
Step 2: Start the Deployment Server
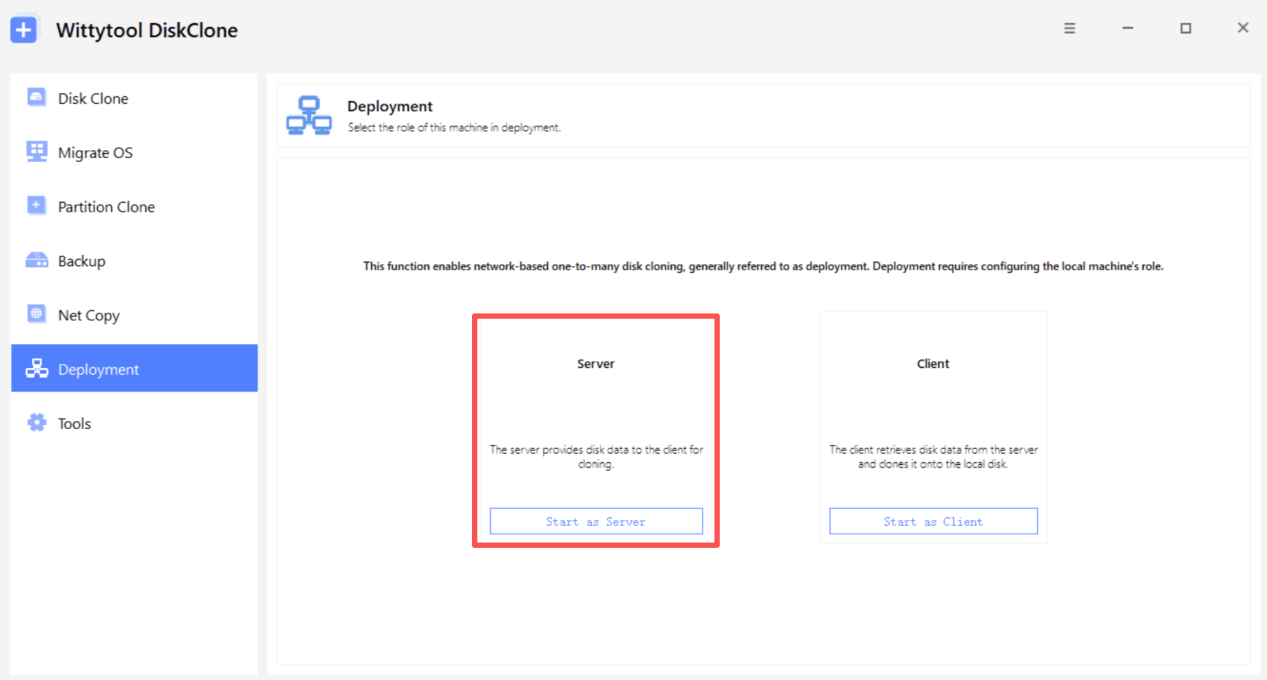
On the PC that will provide the image, open Deployment and click Start as Server. This sets the PC’s deployment role so it can serve the image to the target clients.
Step 3: Select the Image and System Partitions
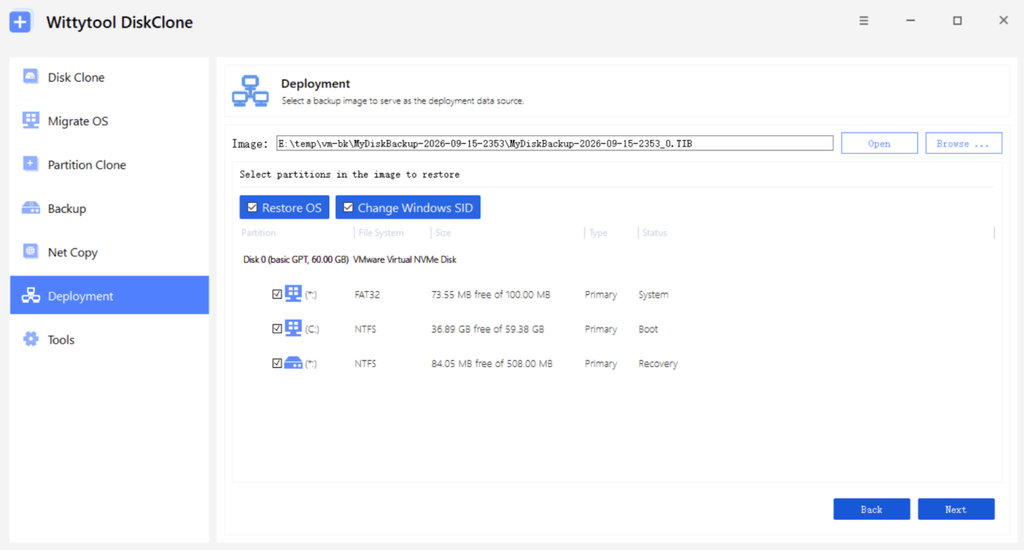
Click Browse … and select the image created in Step 1. For a system image, select Restore OS to automatically select the operating-system-related partitions. Review the selection, then click Next.
The Change Windows SID option on this page refers to the current image’s SID. You will configure target-side SID changes under Target PC settings in the next step.
Step 4: Configure Target PC Settings and Enable Target SID Changes
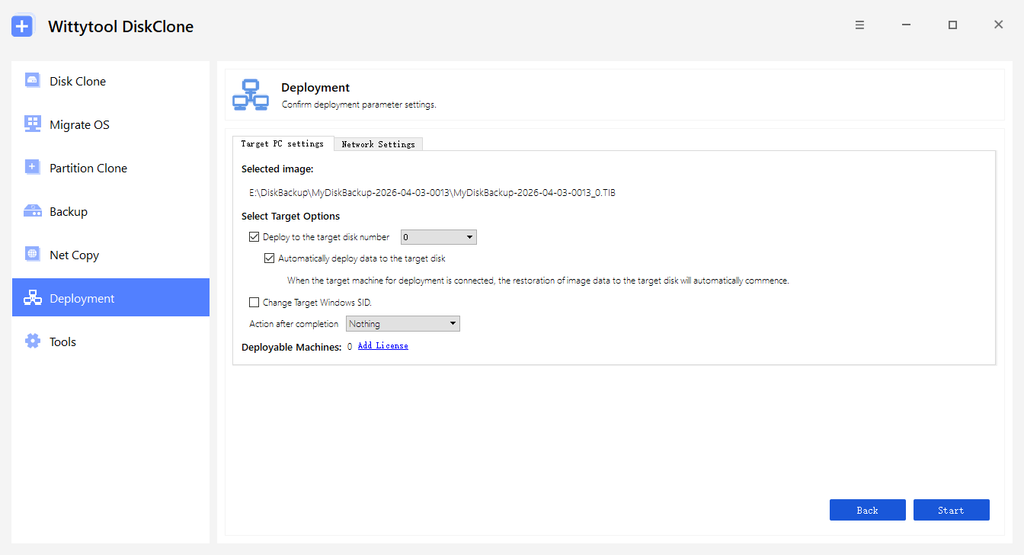
Under Target PC settings, select Change Target Windows SID. to enable SID changes on the deployed PCs. The checkbox is unchecked in the example screenshot below; select it for this workflow.
Choose how the clients will start deployment:
- Manual deployment: Leave Deploy to the target disk number and Automatically deploy data to the target disk disabled. You will select each destination disk on the client. Use this mode for your first pilot PC.
- Automatic deployment: Enable Deploy to the target disk number, choose the intended disk number, and select Automatically deploy data to the target disk. Use this mode after the pilot passes its verification checks.
Before connecting an automatic client, back up its required data and verify that the configured disk number identifies the correct disk on that PC. Connection can trigger deployment immediately.
Review the settings, then click Start to start the server’s deployment service.
Step 5: Connect the Target PCs and Deploy the Image
———Manual deployment for the pilot PC————–
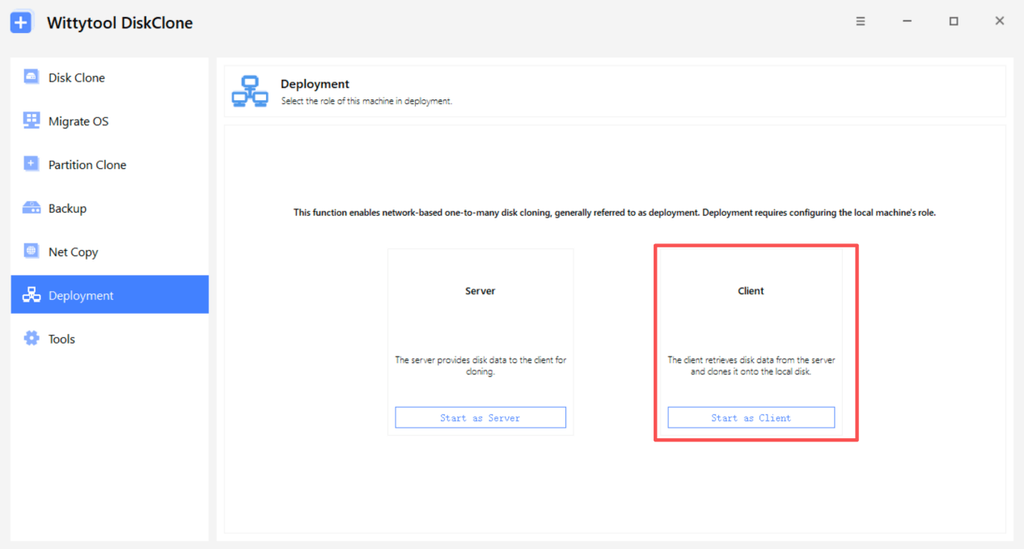
Start the prepared WinPE client environment on the target PC. Open Wittytool Disk Clone, select Deployment, and click Start as Client.
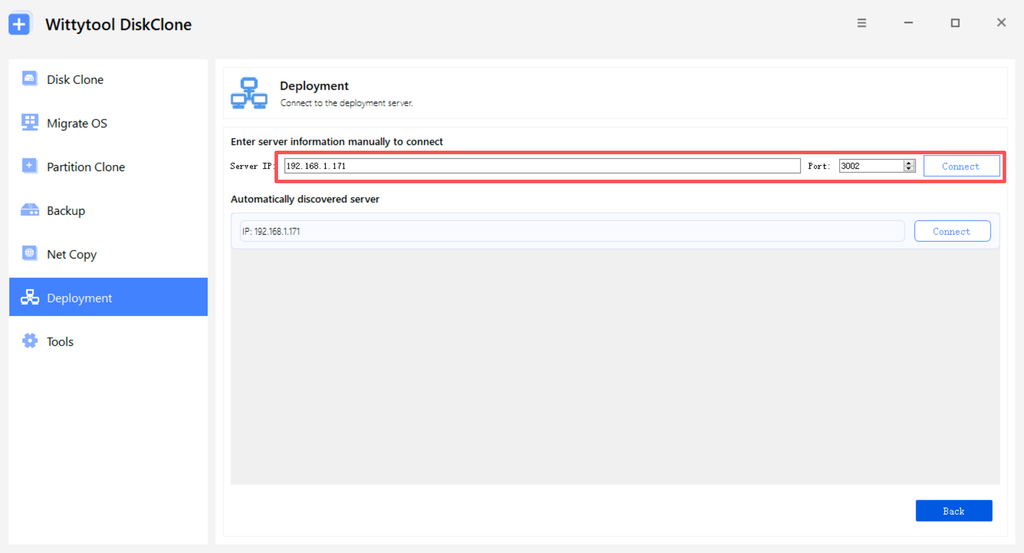
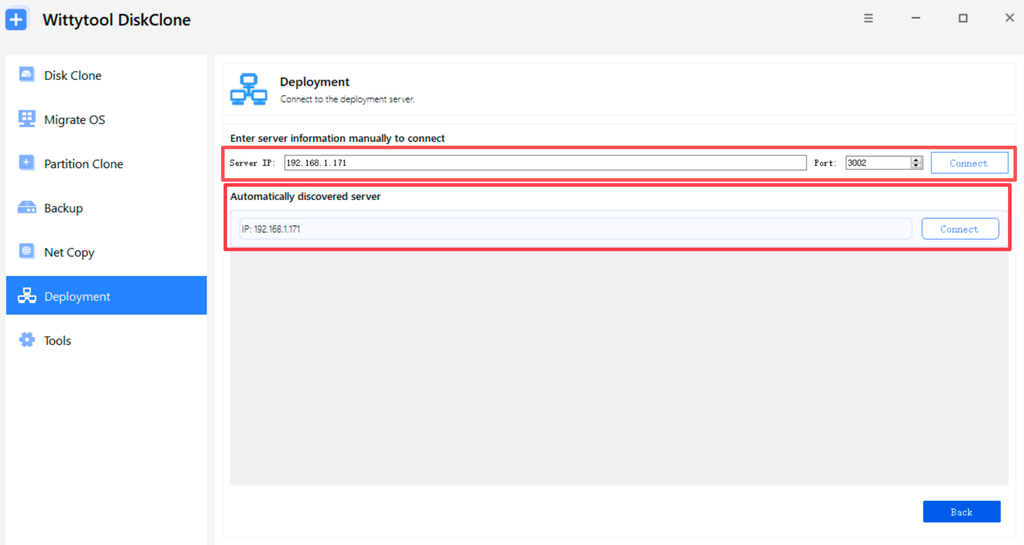
Enter the deployment server’s Server IP and configured Port, then click Connect. Use your environment’s values; the address and port shown in the screenshot are examples.
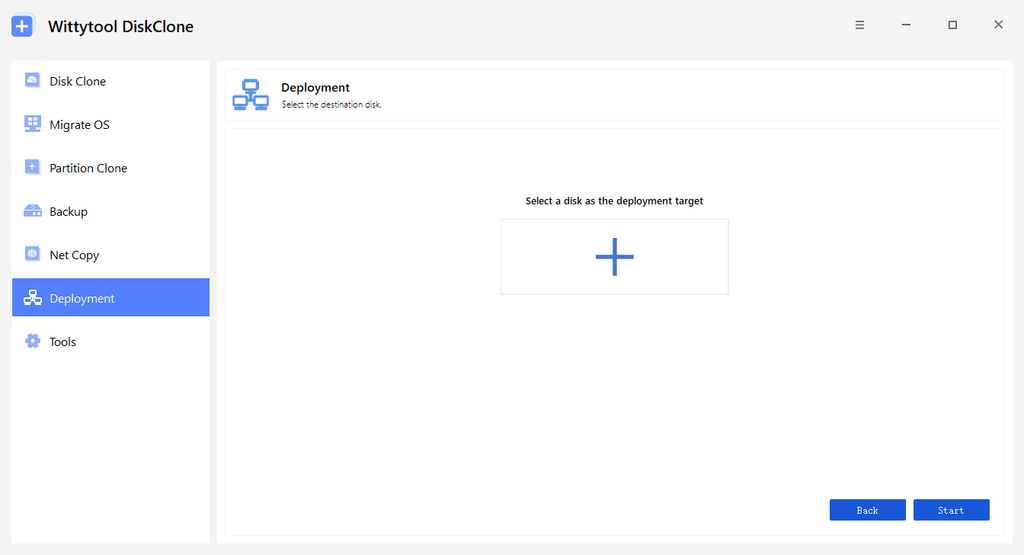
Use the + control to choose the destination disk on the target PC.
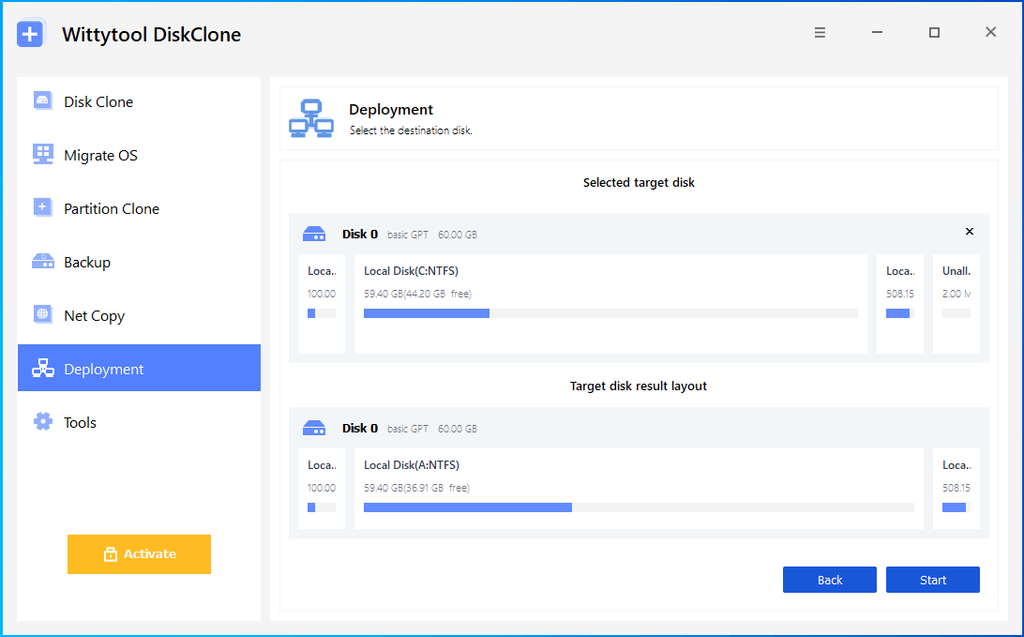
Review Selected target disk and Target disk result layout, and confirm the disk matches your deployment record.
Deployment deletes partitions on the selected target disk and writes the image to it. Confirm the destination and its data backup before clicking Start.
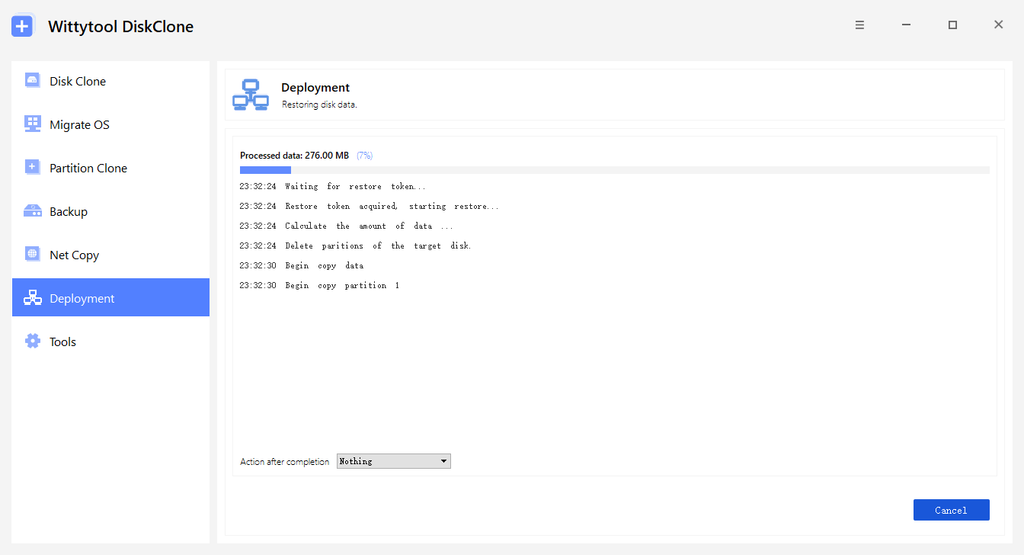
Click Start to begin deployment. The client displays processed data, progress, and a restore log while it writes the image.
———–Automatic deployment for the remaining PCs—————-
After the pilot passes the verification checks below, configure automatic deployment using the options in Step 4. Keep Change Target Windows SID. enabled and verify every target’s backup and disk mapping before connecting it.
Start Wittytool Disk Clone in WinPE on each prepared target. With automatic deployment configured on the server, the client can discover and connect to the server, then execute its deployment settings. You can also open Deployment and click Connect beside the discovered server, or enter its IP address and port manually.
Step 6: Monitor Deployment Progress on the Server
On the server, use the client list to match each PC by its MAC and IP address. Review Status and Progress, and use the Waiting, Restoring, Finish, or Failure filters to find clients that need attention.
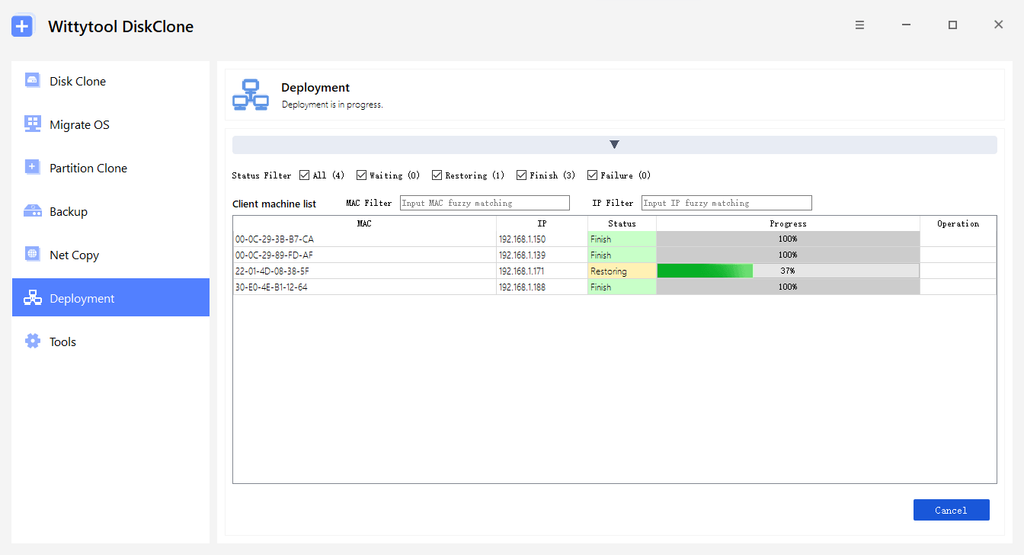
Record each client’s result when it reaches Finish. If a client shows Failure, investigate it before retrying.
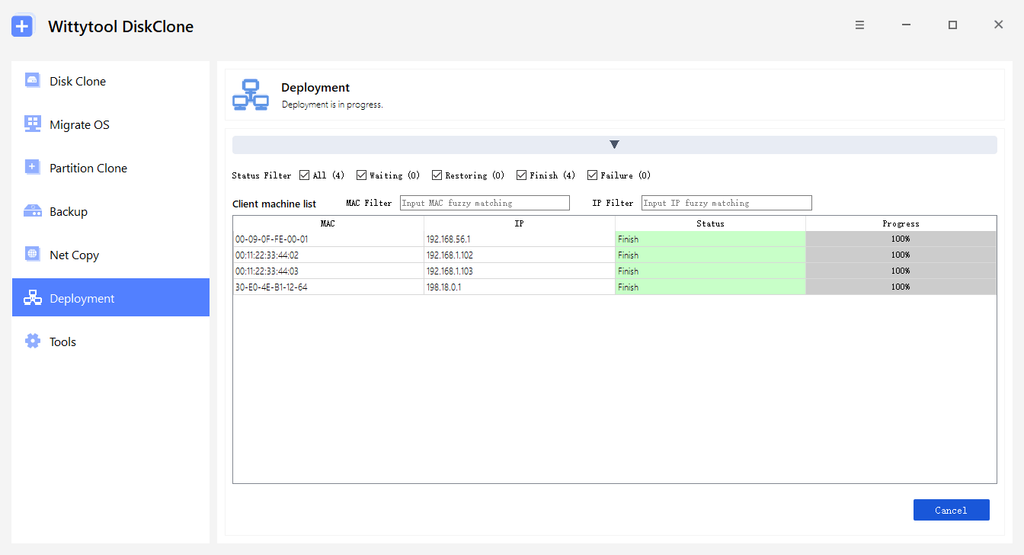
After restoring the image, check startup, machine SIDs, applications, accounts, and any required managed access on each target using the next section.
Video Walkthrough: Deploy Windows Images Without Sysprep
Watch the video below for a complete walkthrough of Windows image deployment with Wittytool Disk Clone. Follow along with the illustrated steps above and pause as needed to check the settings in your own deployment environment.
Verify Each PC After Windows Image Deployment
Validate the pilot first, then perform the same checks on every target. Keep the restore result and the readiness result as separate entries in your deployment record.
Compare the Machine SID on Every Target
Download PsTools from Microsoft’s PsGetSid page and extract it. Open PowerShell in the extracted folder on the source PC and each target. Review any first-run license prompt, then run:
hostname
.\PsGetsid.exe
Without a computer or account argument, this queries the local machine SID. Record the complete value together with an asset identifier. The asset identifier matters when cloned PCs still share a computer name.
Compare each target with the source and with every other target in the batch. Matching complete machine SID values on two confirmed, distinct PCs indicate duplication. Do not remove the last number from PsGetSid’s machine output, and do not substitute whoami /user, which reports the current user’s SID.
Test Startup, Apps, Accounts, and Managed Access
Check the parts of the installation that matter to its intended user:
| Check | What to verify |
|---|---|
| Startup and hardware | Windows starts from the intended drive, and required storage, network, display, and peripheral drivers work. |
| Applications | Required desktop and Store apps launch, and a representative work task completes. |
| Local accounts | Intended accounts can sign in and have the expected permissions and settings. |
| Device identity | Machine SIDs differ as planned, computer names fit your naming scheme, and network settings are appropriate. |
| Activation | Windows and licensed applications have the activation status required for that device. |
| Managed access | Where applicable, domain access, management enrollment, and business resources work for the intended user. |
Do not treat the target SID checkbox as an automatic domain-join or naming procedure. Verify those settings separately.
Use a compact deployment record with these columns: Asset ID, Image version, Restore result, Machine SID, App and account check, Managed access, and Ready for handover. Mark a PC ready only after its required checks pass. Different SIDs alone do not establish that every application or authentication problem has been resolved.
FAQs
Do I Need to Change the Source PC’s SID Before Creating the Image?
No. Wittytool Disk Clone supports backing up the current Windows system without first running Sysprep or separately changing the source SID. For the workflow in this guide, enable Change Target Windows SID during deployment and verify the machine SID on every target. Changing a source SID once does not establish that every deployed copy has a different SID.
Can I Preserve Microsoft Store Apps and Local User Accounts?
Yes. The deployment workflow preserves the applications, including Microsoft Store app content, and local user accounts included in the source image. Test the required apps and accounts after deployment. Preserving their content does not guarantee that every application license, cloud sign-in, or device registration will work unchanged on a different PC.
Can I Use an Image Created by Another Backup Tool?
No. This deployment workflow accepts system and disk image files generated by Wittytool Disk Clone. It does not accept WIM files or backups from other imaging products. Create a compatible image with Wittytool Disk Clone or use a deployment tool that supports your existing image format.
Does Changing the Target SID Also Rename the PC or Join It to a Domain?
Treat target SID changes, computer naming, and domain membership as separate tasks. Change Target Windows SID is the documented target SID setting; it should not be treated as an automatic naming or domain-join procedure. Plan and verify the computer name and managed access on each PC separately.