Last updated on June 25, 2026
Upgrading to an NVMe M.2 Solid State Drive (SSD) is one of the most impactful speed boosts you can give your computer. It’s like moving from a country road to a six-lane superhighway for your data. But to unlock this incredible speed, you need to have your operating system installed on it. You can either perform a fresh installation or system migration to the new drive. This guide will walk you through, step-by-step, exactly how to install Windows 11 on an NVMe M.2 SSD or how to install Windows 10 on an NVMe M.2 SSD. For users of older systems, we also have a dedicated guide on how to install Windows 7 on an NVMe M.2 SSD. We’ve designed this guide for absolute beginners, so don’t worry if you’re new to this – we’ve got you covered.
Why You Should Run Windows from an NVMe M.2 Drive
Before we dive into the “how,” let’s quickly cover the “why.” Understanding the benefits makes the process worthwhile!
An NVMe (Non-Volatile Memory Express) M.2 SSD is a huge leap over older SATA SSDs and hard drives (HDDs). It plugs directly into your motherboard, eliminating cables and using a super-fast PCIe connection.
- Lightning-Fast Boot and Load Times: This is the most noticeable difference. Windows can start up in under 10 seconds, and applications like your browser or games will load almost instantly. A study by Puget Systems showed that system configuration tasks could see performance improvements of over 200% when moving from a SATA SSD to a high-end NVMe drive.
- Superior Responsiveness: Everything feels snappier. File transfers, especially for large videos or game files, are exponentially faster.
- Future-Proofing: NVMe is the modern standard for storage. Installing Windows 11 or 10 on it ensures your system is optimized for years to come.
- Efficiency and Form Factor: The M.2 form factor is small and requires no power or data cables, resulting in a cleaner, better-ventilated PC case.
Simply put, if you have an NVMe SSD, your Windows installation needs to be on it to get the full performance you paid for.
Getting Ready: Your Pre-Installation Checklist
❗ Preparation is key! Following these steps will ensure a smooth and hassle-free installation process. Please don’t skip this section.
- Back Up Your Data! ⚠ This is the most critical step. Whether you’re migrating or doing a clean install, there’s a small risk of data loss. Back up your important files – documents, photos, music – to an external hard drive or a cloud service. Here you can use a free backup software – Wittytool Disk Clone.
- Gather Your Tools:
- A USB Drive: You’ll need a blank USB drive with at least 8GB of space for creating installation media.
- Your NVMe M.2 SSD: Ensure it is physically installed in your motherboard’s M.2 slot (we’ll cover this next).
- A Working Internet Connection: For downloading necessary software and drivers.
- Download Windows Creation Tool: Visit the official Microsoft website to download the “Media Creation Tool” for either Windows 10or Windows 11. This tool will help you create the installation USB drive.
- Have Your License Key Ready: Find your 25-digit Windows product key. If you have a digital license linked to your Microsoft account, you may not need it, but it’s good to have handy.
How to Physically Install Your NVMe SSD
💡 Most modern desktop PCs and many laptops have an M.2 slot. Please consult your motherboard or laptop manual to find its location.
For a Desktop PC:
- Shut down your computer and unplug the power cable.
- Open the case side panel.
- Locate the M.2 slot on your motherboard. It’s a horizontal slot, often labeled “M.2” or “PCIe.”
- Remove the tiny screw opposite the slot’s opening.
- Gently insert your NVMe SSD at a ~30-degree angle into the slot.
- Press it down gently and secure it with the screw you removed.
For a Laptop:
⚠ Laptop disassembly varies greatly. Please search for a teardown guide for your specific model.
- Shut down the laptop and disconnect the battery.
- Remove the bottom panel.
- Locate the M.2 slot (it may be empty or have a drive already).
- Insert the drive at an angle and secure it with the screw.
Once physically installed, you can proceed with the software part of the installation.
Two Reliable Methods for Installing Windows on Your New NVME M.2 SSD
There are two primary ways to get Windows onto your new drive. The best choice depends on your goal.
Option 1: Cloning Your Old Drive (The Easy Upgrade)
This method is perfect if you want to migrate your existing Windows installation – with all your apps, files, and settings – directly to the new NVMe SSD. It’s the fastest way to upgrade without reinstalling everything. For this, we use a reliable free disk cloning software like Wittytool Disk Clone.
Why use cloning software? It creates a perfect 1:1 copy of your old drive, making the switch seamless. Additionally, also a usb clone tool can help you repair bad sectors during the process, ensuring data integrity and drive health.
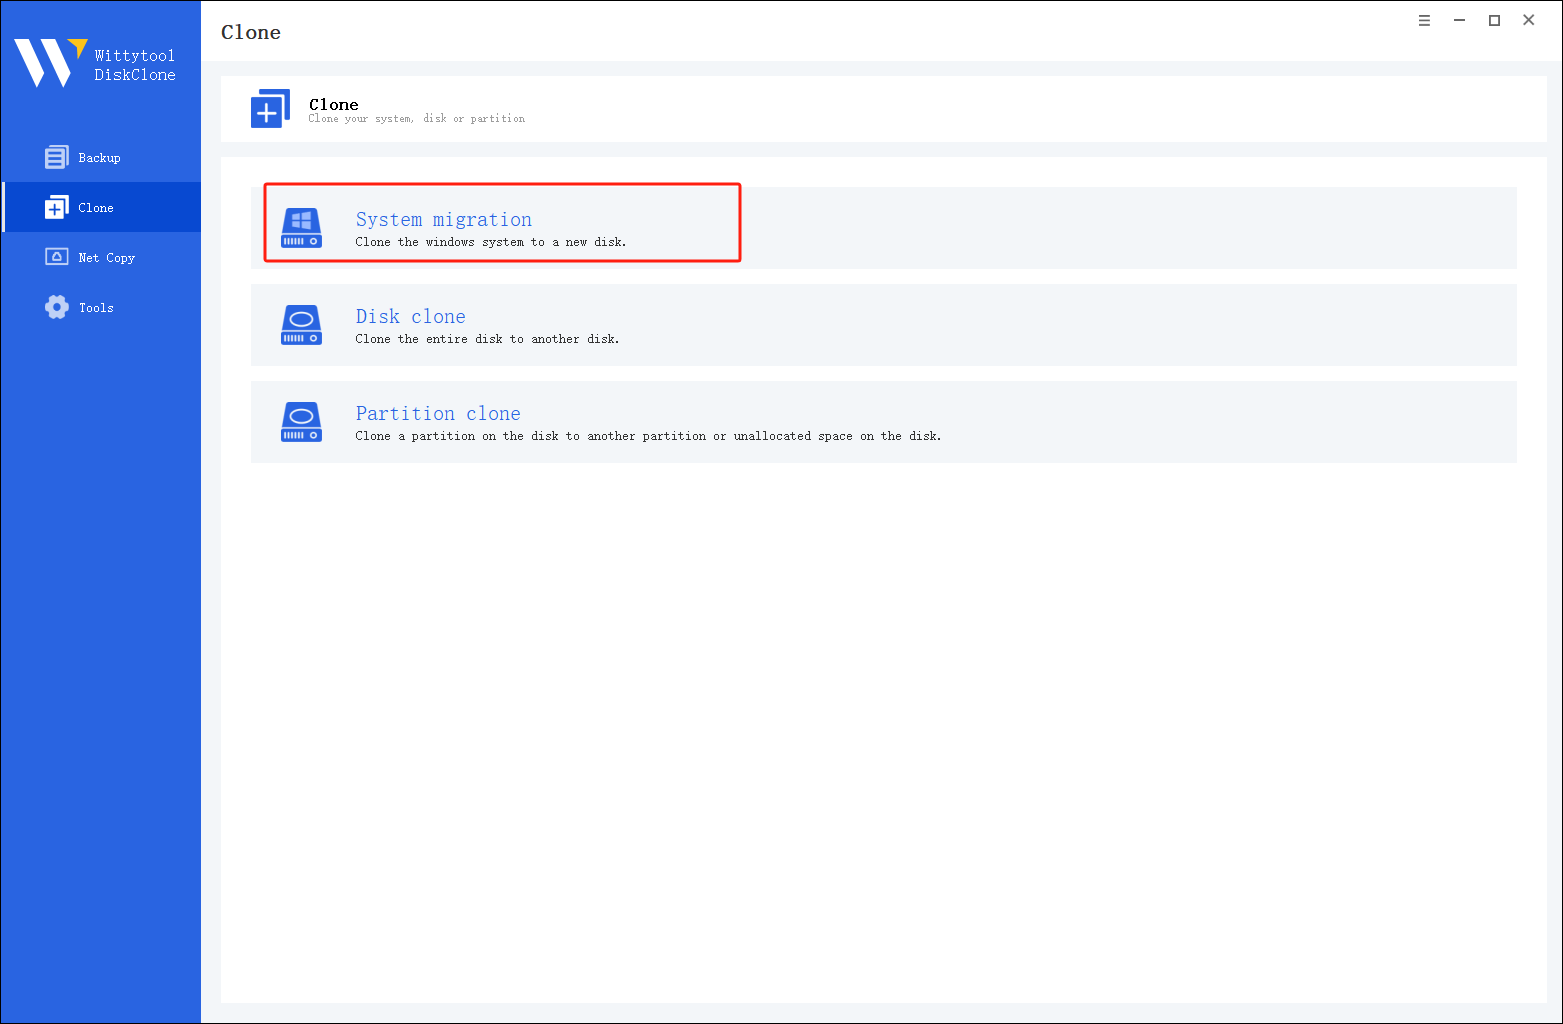
Steps to clone your OS to the NVMe M.2 SSD via Wittytool SSD cloning software:
Step 1: Select Migrate OS in left pannel, then choose the destination disk from the list.
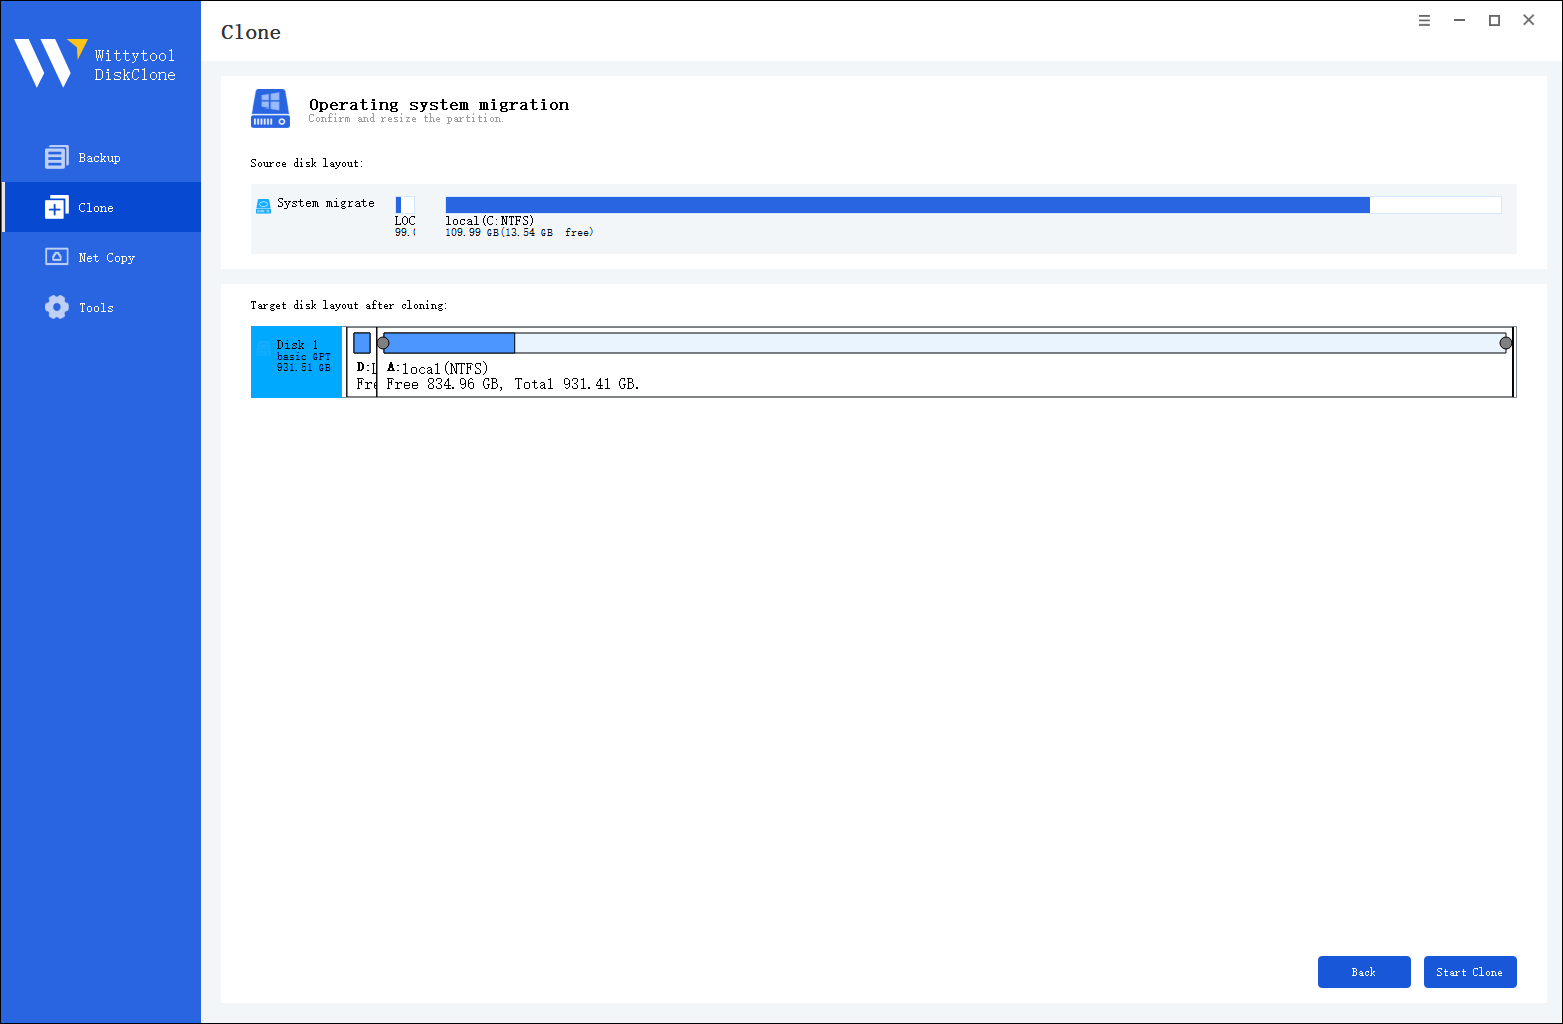
*Change Windows SID: When cloning multiple machines on the same network, select “Change Windows SID” to prevent SID duplicated issues related to network access. This direct approach allows you to change windows sid without sysprep, making large-scale cloning operations much quicker and more efficient.
Step 2: Confirm Partition Size. Review and resize the partitions on the target disk as needed. Once ready, click the “Start Clone” button to begin the cloning process.
Once the cloning process is complete, you must tell your computer to load Windows from the new drive:
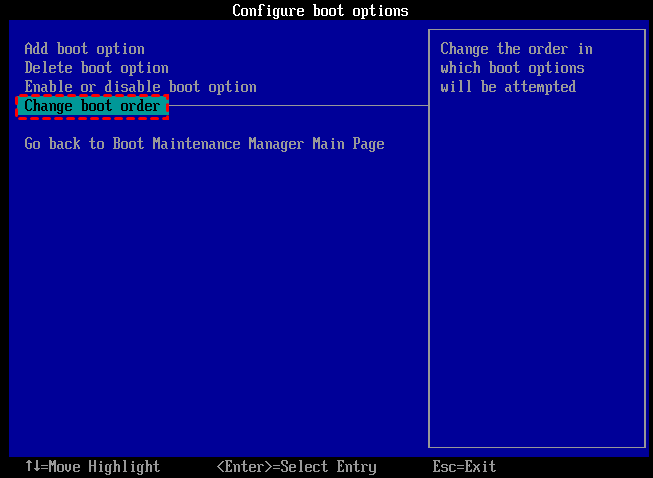
Step 3. Restart your PC and immediately press the BIOS key (usually F2, F12, or Del) repeatedly as the computer starts up.
Step 4. Navigate to the Boot menu or Boot Priority settings. Move your new disk to the top of the list to make it the primary boot device.
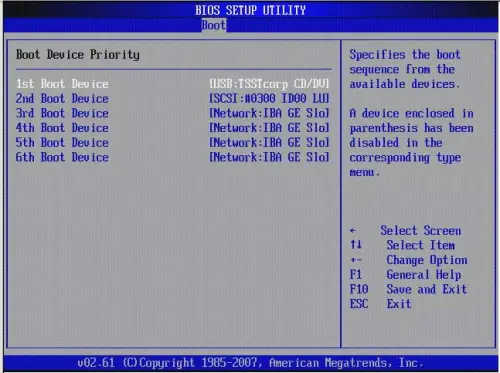
Step 5. Save your changes (often by pressing F10), exit the BIOS, and allow the PC to restart.
Watch this video guide to learn how to clone your system with Wittytool Disk Clone:
Option 2: Performing a Clean Windows Installation (The Fresh Start)
This method involves installing a brand-new copy of Windows onto the NVMe SSD from a USB drive. This is the recommended method if you want a completely clean system without any old files or software clutter. It’s the best way to ensure maximum performance and stability.
Steps for a clean install of Windows 11/10:
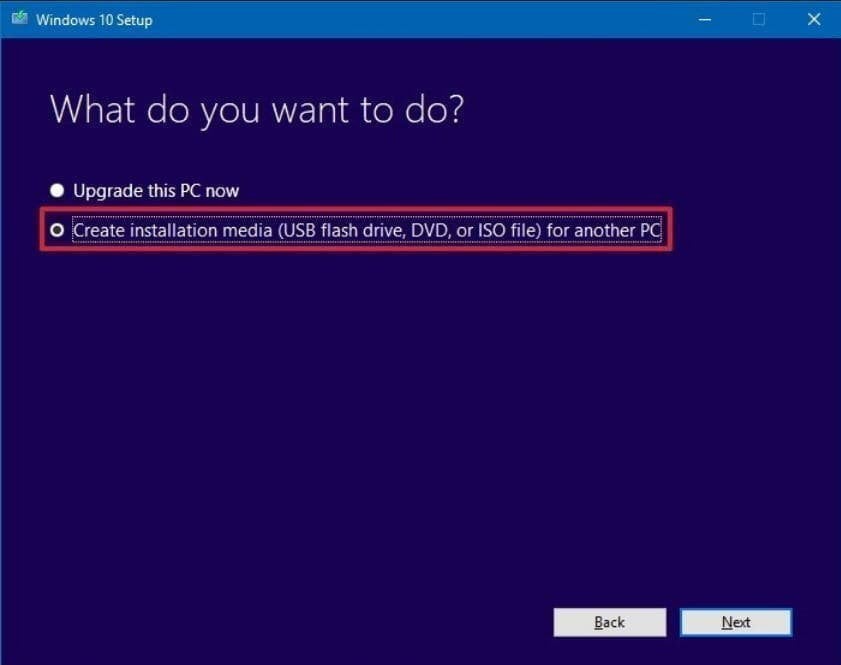
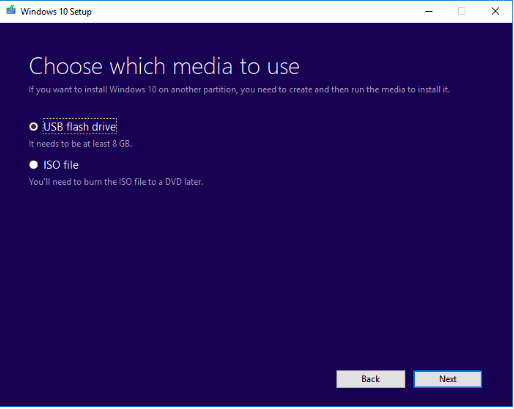
1. Create Installation Media: Run the Microsoft Media Creation Tool you downloaded earlier. Select “Create installation media for another PC” and follow the prompts to make a bootable USB drive.
2. Boot from the USB Drive: Insert the USB drive into your PC. Restart your computer and immediately press the key to enter the boot menu (common keys: F12, F10, Esc – check your motherboard manual). Select the USB drive to boot from.
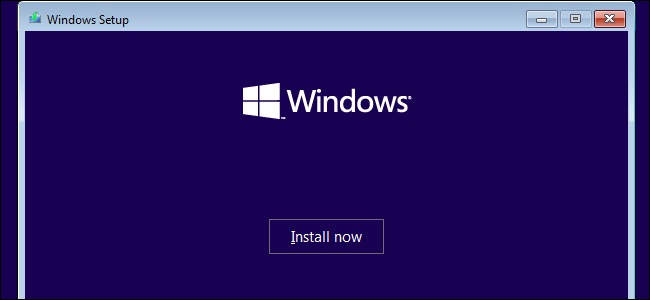
3. Install Windows: The Windows setup screen will appear. Choose your language and click “Install now.”
4. Enter your product key when prompted.
5. Choose your edition (e.g., Windows 11 Home or Pro).
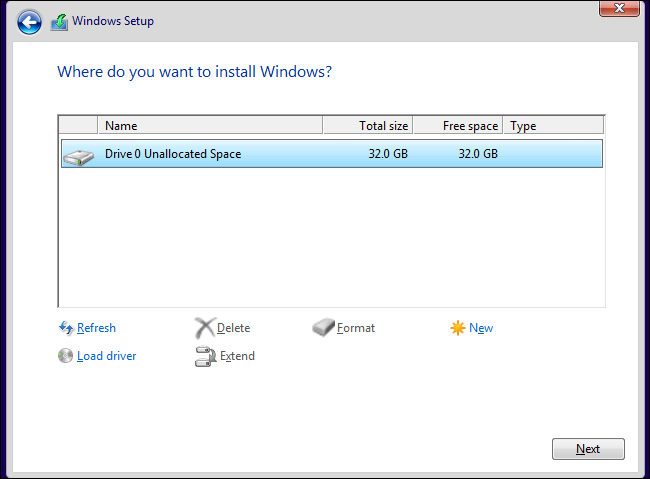
6. Critical: Where to install Windows? You will see a list of drives. Select your NVMe M.2 SSD to install Windows on it. You may see unallocated space. Just select it and click “Next.” Windows will automatically create the necessary partitions.
7. Follow the on-screen prompts to complete the setup, like creating a user account and configuring settings.
Which Method Is Right For You: Migration or Clean Install?
This is a common question, and the answer depends on your situation.
- Choose OS Migration if: You want to move your entire system exactly as it is, with all your programs and files, and get up and running on the new drive as quickly as possible. It’s great for a straightforward hardware upgrade.
- Choose a CLEAN INSTALL if: You want to start fresh, your current Windows installation is slow or plagued with errors, or you are building a completely new PC. A clean install is often more stable and performant as it avoids carrying over any old software conflicts or junk files.
For most users seeking the easist way and purest performance benefit from their new NVMe SSD, a system migration is highly recommended.
Frequently Asked Questions (FAQ)
1. Why can’t I install Windows 11/10 on my NVMe SSD?
The most common reasons are:
- BIOS/UEFI Settings: Your motherboard’s BIOS might not be set to the correct mode. Ensure the SATA mode is set to AHCI (not RAID or IDE) and that NVMe support is enabled. You may also need to enable “Fast Boot” or disable “Secure Boot” temporarily.
- Missing Driver: Very old motherboards might need a specific NVMe driver loaded during Windows setup. You can download this from your motherboard manufacturer’s website.
- Disk Not Initialized: The SSD might not be formatted. In the Windows installation screen, you can select each partition on the drive and click “Delete” until you have a single “Unallocated Space” entry, then proceed.
2. Can I install Windows on an NVMe SSD?
Absolutely yes. Windows 10 and 11 have native support for NVMe SSDs. It is the ideal type of drive to install a modern operating system on for the best possible experience.
3. My M.2 SSD is not detected during Windows 11/10 install. What do I do?
⚠ This is a common hiccup. Try these fixes:
- Check the BIOS/UEFI: First, restart and enter your BIOS/UEFI. Navigate to the storage or boot section. See if the NVMe drive is listed there. If it isn’t, the issue is physical (not seated correctly) or hardware-related.
- Try a Different M.2 Slot: Many motherboards have multiple slots. Some might share bandwidth with SATA ports. Consult your manual and try a different slot.
- Update Your Motherboard BIOS: An outdated BIOS can often cause detection issues. Visit your motherboard manufacturer’s website, download the latest BIOS version onto a USB drive, and use their update tool (often found in the BIOS) to flash it.
- Load Drivers in Setup: During the Windows installation screen where you select a drive, click “Load driver” and browse to a downloaded storage driver from your motherboard’s support page.