Last updated on May 8, 2026
Finding that your USB flash drive, SD card, or pen drive suddenly shows only shortcuts instead of your important files can be alarming and frustrating. This is a classic sign of the ‘Shortcut Virus,’ a common and pesky type of malware targeting removable drives. If you’re seeing mysterious .lnk files and your actual data seems gone — or even encountering unrelated system issues like a laptop screen black but still running — don’t panic! This guide will walk you through exactly what this virus is, how it spreads, and most importantly, several effective methods to remove shortcut virus from USB flash drive, SD card using cmd, or any other removable storage. We’ll also cover how to prevent my USB from making shortcuts Windows 11 and beyond (including checking your Windows 10 startup folder for suspicious entries), and crucially, how to recover your precious files afterwards.
What Is Shortcut Virus?
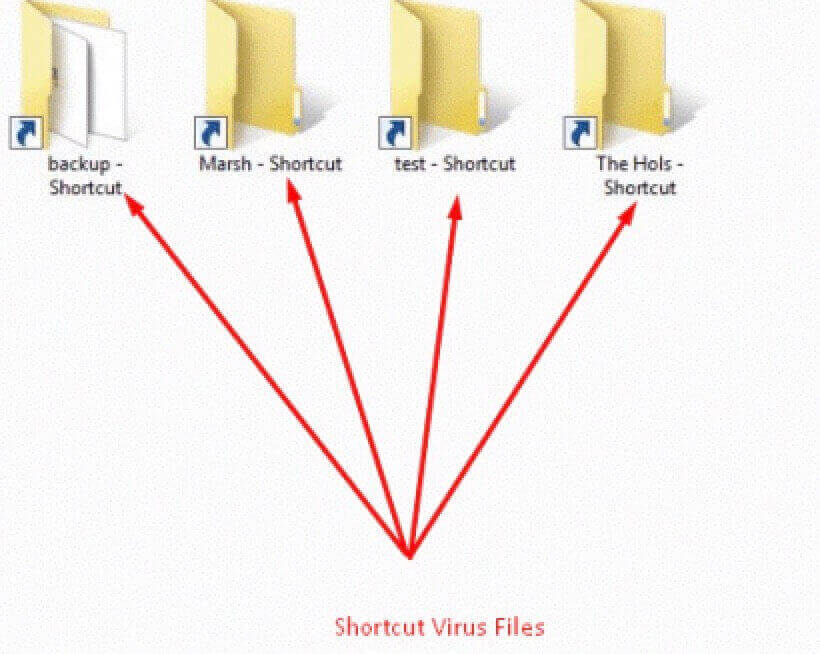
The Shortcut Virus isn’t a single virus but a category of malware with a specific trick. Instead of deleting your files, it cleverly hides them and replaces them with shortcut files (.lnk files). These shortcuts often look identical to your original folders or files but have the tell-tale shortcut arrow icon. When you double-click one of these shortcuts, it might do one of two things:
- Run the Malware: Often, clicking the shortcut actually runs the hidden virus file again, potentially spreading it further or causing other harm.
- Open the Folder (Sometimes): In some cases, it might open the hidden folder, giving a false sense that everything is okay, while the malware remains active in the background.
The core problem is that your real files are still on the drive, but they are marked as “hidden” and “system” files by the virus, making them invisible through normal File Explorer viewing. This causes significant confusion and concern for users who think their data is lost (similar to how one might feel trying to recover files deleted from recycle bin). Understanding this hiding mechanism is key to both removing the virus and recovering your files without data loss.
How Does Shortcut Virus Spread?
This virus primarily spreads through infected removable drives, like USB flash drives, external hard drives, SD cards, and pen drives. Here’s how it typically happens:
- Infected Source PC: A computer already infected with the shortcut virus malware.
- Plugging in a Clean Drive: When you plug a clean USB flash drive or SD card into this infected PC.
- Autorun Exploitation (Historically): While modern Windows versions (like Windows 10 and 11) have significantly restricted the Autorun feature that these viruses heavily relied on in the past (like Windows XP), the malware can still spread through other means.
- File System Infection: The virus copies itself onto the removable drive (often as a hidden file like
autorun.infor other disguised executables) and then executes its routine: hiding your real files and creating the deceptive shortcuts. - Spreading Further: When this infected drive is plugged into another clean computer, the virus might attempt to run (especially if Autorun was enabled or the user clicks the shortcuts), infecting that new PC. The cycle then repeats.
Reports from cybersecurity firms like Symantec and McAfee consistently highlight removable media as a significant vector for malware spread, especially in environments where drives are shared frequently between computers (like offices, schools, or photo labs). While sophisticated attacks grab headlines, these simpler, widespread nuisances like the shortcut virus remain incredibly common due to their ease of propagation. Panic reactions to data disappearance can sometimes lead users to accidentally formatting drives, making understanding techniques like how to recover formatted hard drive crucial.
Solution 1. Using Command Prompt to Remove Shortcut Virus
One of the most direct and effective ways to tackle the lnk file virus is by using the Windows Command Prompt (CMD). This method targets the core action of the virus: hiding your files. It doesn’t remove the virus files themselves but makes your data visible again. Crucially, this method typically does not delete your hidden files.
❗ Important: Before starting, ensure your antivirus is temporarily disabled if it might interfere with running commands. Plug in the infected USB drive.
- Open Command Prompt as Administrator:
- Type
cmdinto the Windows search bar. - Right-click on “Command Prompt” and select “Run as administrator”. Click “Yes” if prompted by User Account Control (UAC).
- Type
- Navigate to Your Infected Drive:
- In the Command Prompt window, type the letter assigned to your infected USB drive followed by a colon, then press Enter. For example, if your drive is
E:, type:E:,then Press Enter.
- In the Command Prompt window, type the letter assigned to your infected USB drive followed by a colon, then press Enter. For example, if your drive is
- Unhide Your Files and Remove Attributes:
- Type the following command and press Enter:
attrib -h -r -s /s /d *.* - Let’s break down what this command prompt lnk solution does:
attrib: The command to change file attributes.-h: Removes the Hidden attribute.-r: Removes the Read-only attribute.-s: Removes the System attribute./s: Applies the command to all files in the current directory and all subdirectories./d: Applies the command to directories as well.*.*: Applies to all files.
- Type the following command and press Enter:
⚠ Be Patient: This command can take a few minutes to run, especially on drives with many files. Wait until the command prompt returns, showing the drive letter again (e.g., E:\>).
- Check Your Drive: Open File Explorer and navigate to your USB drive. Your previously hidden files and folders should now be visible! The shortcut files (.lnk) might still be present.
- Delete the Shortcuts and Virus Files: Now that your files are visible, you can manually delete:
- All the shortcut files (.lnk) that were created by the virus.
- Any suspicious files you don’t recognize, especially hidden files like
autorun.infor executable files (.exe,.vbs,.bat) that appeared around the time the problem started. Look for files with random names or names mimicking system files.
💡 Tip: To see hidden files in File Explorer, go to the “View” tab and check “Hidden items”. To see protected operating system files, you might need to go to “View” > “Options” > “Change folder and search options” > “View” tab, then uncheck “Hide protected operating system files (Recommended)” – be very careful deleting files if you do this, and re-enable it afterwards.
This CMD method is powerful for revealing your data but doesn’t guarantee the virus is completely gone from the drive or your PC. Follow up with an antivirus scan (Method 3) and consider cleaning the source PC (Method 4).
Solution 2. Creating a BAT File for Automated Removal
If you find yourself dealing with this issue frequently or want a reusable tool, creating a simple Batch (.bat) file can automate the Command Prompt steps above.
- Open Notepad: Type
Notepadinto the Windows search bar and open it. - Enter the Commands: Type the following lines into Notepad:
@echo off
attrib -h -r -s /s /d3.Save as a BAT File:
- Go to
File>Save As. - Navigate to the location where you want to save the file (e.g., your Desktop).
- In the “File name” field, type a name like
UnhideFiles.bat. - Crucially, in the “Save as type” dropdown, select “All Files (.)”.
- Click “Save”.
4.Using the BAT File:
- Plug in your infected USB drive and note its drive letter (e.g.,
E:). - Copy the
UnhideFiles.batfile you created onto the root of the infected drive (so it’s directly insideE:\, not in any folder). - Double-click the
UnhideFiles.batfile while it’s on the infected drive. This will run theattribcommand directly on that drive. - A Command Prompt window will open, run the command, and then close. Your files should now be visible. Proceed to manually delete the shortcuts and any suspicious files as described in Method 1.
💡 Advantage: This method is quick to execute once the BAT file is created. It performs the same core function as the manual CMD method.
Solution 3. Using Antivirus Software as a USB Shortcut Virus Remover
A dedicated antivirus or anti-malware scan is essential for thoroughly removing the shortcut virus remover threat. While the CMD/BAT methods reveal your files, antivirus software aims to detect and eliminate the malicious files responsible for the infection.
- Ensure Your Antivirus is Updated: Before scanning, make sure your antivirus software has the latest virus definitions. This is crucial for detecting new variants.
- Perform a Full Scan:
- Plug in the infected USB drive.
- Open your antivirus software (Windows Security / Defender is built-in for Windows 10/11).
- Initiate a full scan of the infected USB drive. Do not just do a quick scan.
- Most antivirus programs will have an option to specifically scan removable drives.
- Review and Quarantine/Delete: After the scan completes, the software will list detected threats. Look for entries related to shortcut viruses, autorun malware, or suspicious files identified on the USB drive. Follow the software’s prompts to quarantine or delete the infected files. Quarantine is safer initially, allowing you to restore if something critical is mistakenly flagged (though rare with this type of malware).
- Consider a Second Opinion Scanner: If your primary antivirus doesn’t find anything, but you are sure the drive was infected (files were hidden), run a scan with a reputable second-opinion virus on USB stick scanner like Malwarebytes Anti-Malware (free version available). It often detects threats that others miss.
⚠ Important: Running an antivirus scan after using the CMD/BAT method to unhide files is highly recommended. This helps ensure the underlying malware executable is cleaned up, preventing re-infection.
Solution 4. Removing Shortcut Virus from the Source PC
Simply cleaning the USB drive isn’t always enough. If the computer you plugged the infected drive into was the source of the infection, or if it became infected by the drive, you need to clean that PC too. Otherwise, plugging in any clean USB drive into that PC will likely get infected again. Remember, if files were accidentally deleted during the cleaning process or by the virus, tools exist to help recover deleted files.
- Update and Run Full Antivirus Scan: Ensure your PC’s antivirus is up-to-date and perform a full system scan. Pay close attention to the scan results.
- Use Anti-Malware Tools: Run scans with dedicated anti-malware tools like Malwarebytes or HitmanPro. These can often catch residual infections.
- Check for Persistence: Some shortcut viruses try to create entries to run automatically when Windows starts. Check:
- Task Manager > Startup Tab: Look for suspicious entries, right-click and disable them.
- System Configuration (msconfig): Type
msconfigin the Windows search bar, go to the “Services” tab, check “Hide all Microsoft services”, and look for suspicious entries. Also, check the “Startup” tab (linked to Task Manager now).
- Monitor Behavior: After cleaning, monitor your PC for unusual behavior like slow performance, unexpected pop-ups, or the shortcut issue reappearing on newly plugged USB drives.
Cleaning the source PC is vital to breaking the infection cycle and preventing my USB from making shortcuts Windows 11 (or any other OS version) in the future.
Solution 5. Deleting Suspicious Registry Keys (Advanced)
The shortcut virus might create entries in the Windows Registry to ensure it runs automatically. This step is more advanced and should be done with extreme caution, as incorrect changes to the registry can seriously damage your Windows installation. Always back up the registry before making changes (File > Export in Regedit).
- Open Registry Editor: Type
regeditinto the Windows search bar and run it as administrator (right-click > Run as administrator). - Navigate to Common Run Keys: Malware often adds itself here:
HKEY_CURRENT_USER\Software\Microsoft\Windows\CurrentVersion\RunHKEY_CURRENT_USER\Software\Microsoft\Windows\CurrentVersion\RunOnceHKEY_LOCAL_MACHINE\SOFTWARE\Microsoft\Windows\CurrentVersion\RunHKEY_LOCAL_MACHINE\SOFTWARE\Microsoft\Windows\CurrentVersion\RunOnce
- Look for Suspicious Entries: Carefully examine the entries in the right-hand pane of these locations. Look for entries that:
- Have random or nonsensical names.
- Point to executable files (.exe, .vbs, .bat) located in unusual folders (like the root of a drive, Temp folders, or within your user AppData folders).
- Reference filenames that were present on your infected USB drive.
- Delete Suspicious Keys: If you identify an entry that looks highly suspicious and matches known shortcut virus behavior, right-click on it and select “Delete”. Only delete entries you are absolutely certain are malicious. If unsure, research the specific entry name online before deleting.
- Reboot: After making any changes, reboot your computer.
💡 Recommendation: For most users, a thorough antivirus/anti-malware scan (Method 3) combined with cleaning the source PC (Method 4) is sufficient. Only attempt this registry method if you are comfortable with the registry and have strong reason to believe remnants persist after standard scans. Consider seeking expert help if unsure.
Bonus Tip: Recover Data After Removing Shortcut Virus [IMPORTANT]
While the methods above focus on removing the virus and revealing hidden files, sometimes the situation is more complex. This is where data recovery software becomes essential. Do not save new files to the USB drive if you suspect data is still missing or corrupted! Writing new data can overwrite the space where your lost files reside, making recovery impossible.
We recommend using WittyTool Data Recovery Free. This powerful free data recovery software is designed to be user-friendly, even for beginners, while offering deep scanning capabilities perfect for situations like recovering files after a shortcut virus attack, retrieving files lost due to deletion, or even performing partition recovery if the drive’s structure was damaged.
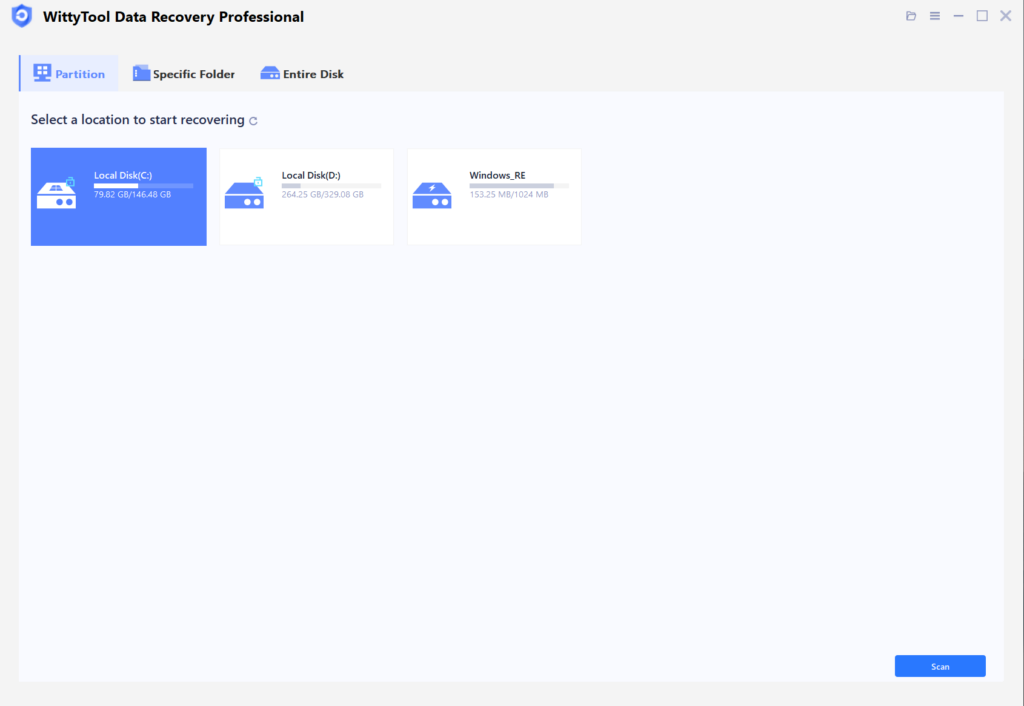
Step 1: Select Location and Initiate Scan
Launch Wittytool Data Recovery. Select the partition or drive where your deleted files were originally stored. Click “Scan” to begin searching for lost files.
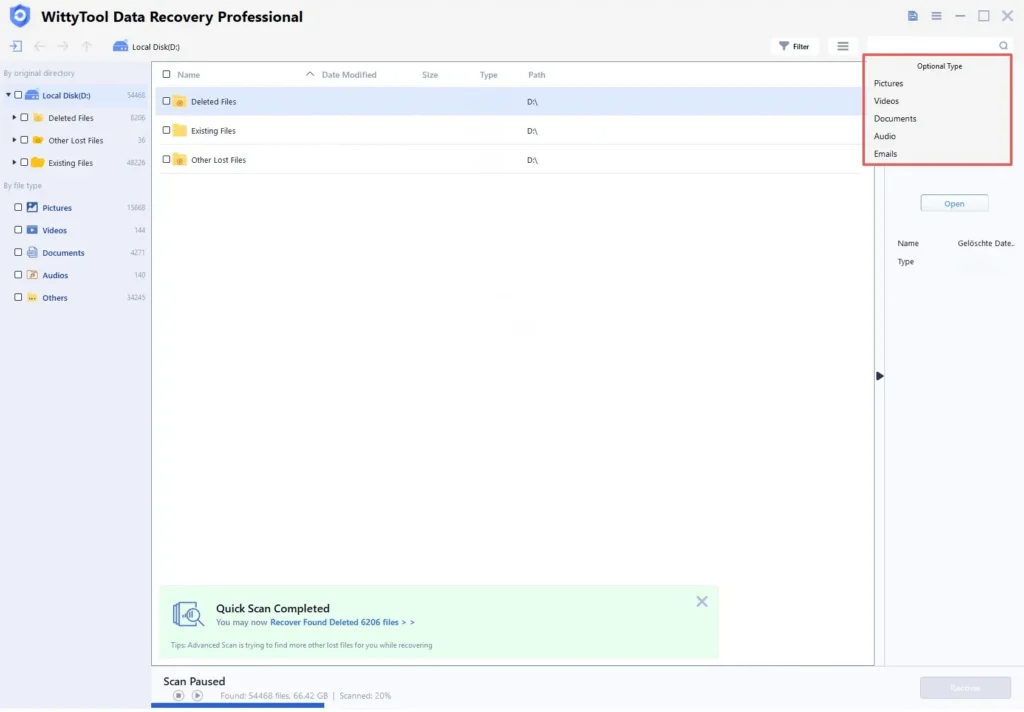
Step 2: Identify Files for Recovery
Once the scan completes, browse the results and select files you wish to recover. Utilize these options to locate files efficiently:
- Search by filename using the search box for fastest results
- Click the filter icon to display specific file types
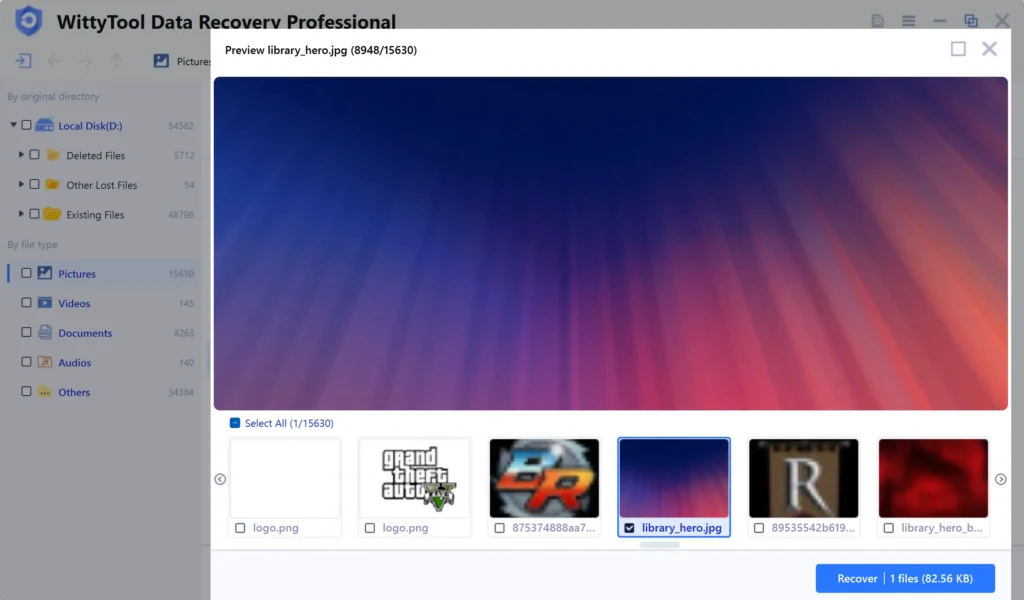
Step 3: Preview and recover your files
After previewing your recoverable files to verify content, select the target files and click “Recover”. Immediately choose a new storage location for saving recovered files.
CRITICAL: DO NOT select the original drive where data loss occurred to prevent overwriting – then click “Save” to complete the restoration.
How to Prevent USB, Pen Drive, or PC from Getting Infected with Shortcut Virus
Prevention is always better than cure. Here are key strategies to protect your devices and avoid the headache of removing shortcut virus from USB flash drive repeatedly:
- Keep Your Antivirus Updated and Active: This is your first line of defense. Ensure real-time protection is enabled.
- Disable Autorun/Autoplay (Especially for Removable Drives): This significantly reduces the risk of the virus auto-executing when you plug in a drive.
- Windows 10/11: Go to
Settings>Devices>AutoPlay. Turn off “Use AutoPlay for all media and devices” or carefully configure the options for removable drives to “Take no action” or “Open folder to view files”.
- Windows 10/11: Go to
- Scan Removable Drives Before Opening Files: Get into the habit of right-clicking the USB drive in File Explorer and selecting “Scan with [Your Antivirus]” before opening any files or folders. Most antivirus programs add this option to the context menu.
- View Files Safely: Instead of double-clicking the drive icon, open it via File Explorer. Immediately check if you see only shortcuts or your actual files. If you see shortcuts, do not click them.
- Show Hidden Items Temporarily: Before interacting with files on a new or unfamiliar USB drive, go to File Explorer’s “View” tab and check “Hidden items”. This can sometimes reveal hidden virus files (like
autorun.inf) alongside your data, alerting you to a potential infection before you accidentally run it. - Be Wary of Unknown Drives: Avoid plugging in USB drives from unknown or untrusted sources. If you must, scan them thoroughly before opening any files.
- Keep Windows Updated: Install the latest Windows updates and security patches promptly. These often include fixes for vulnerabilities malware exploits.
- Educate Others: If you share computers or drives in a home or office environment, educate others about the risks and safe practices outlined above.
Following these steps, especially disabling Autorun/Autoplay and scanning drives before use, will dramatically reduce your chances of encountering the virus on USB stick or lnk file virus again.
In Conclusion
Dealing with a shortcut virus on your USB flash drive, SD card, or pen drive can be unsettling, but it’s a manageable problem. The key steps involve:
- Revealing Hidden Files: Use Command Prompt (
attrib -h -r -s /s /d *.*) or a BAT file to make your actual files visible again. - Removing the Malware: Delete the shortcut files (.lnk) and any suspicious executables manually. Follow up with a thorough antivirus scan of the USB drive.
- Cleaning the Source PC: Ensure the computer you use the drive with isn’t infected, running full antivirus and anti-malware scans.
- Recovering Missing Data: If files are still missing or accidentally deleted, use reliable free file recovery software like WittyTool Data Recovery Free before writing new data to the drive.
- Implementing Prevention: Disable Autorun, scan drives before opening, keep software updated, and practice safe computing habits to avoid future infections.
Shortcut Virus Remover CMD FAQs
How to remove shortcut virus from pendrive?
The process is identical to removing it from a USB flash drive. Follow Method 1 (Using Command Prompt) or Method 2 (BAT File) outlined above to unhide your files. Then, manually delete the shortcut files and any suspicious executables. Finally, scan the pendrive with antivirus software (Method 3).
How to remove shortcut virus from USB without data loss?
The Command Prompt method (attrib -h -r -s /s /d *.*) is specifically designed to reveal hidden files without deleting them, making it the primary method for removal without data loss. The key is not to format the drive immediately. If files remain missing after using attrib, use data recovery software like WittyTool Data Recovery Free before attempting any other drastic measures.
How to remove shortcut virus from external hard drive?
External hard drives can be infected just like USB flash drives. Use the exact same methods: Command Prompt (Method 1), BAT file (Method 2), and antivirus scan (Method 3). The attrib command works on any drive letter. Ensure you scan the external drive thoroughly with antivirus software after revealing the files.
How can I delete virus using CMD?
While the attrib command reveals files hidden by the shortcut virus, it doesn’t directly delete the virus executable. To delete the virus files using CMD:
- Use
attribto unhide files (as in Method 1). - Identify suspicious files (often executables like
.exe,.vbs,.batorautorun.inf). - Navigate to the drive in CMD (
X:where X is your drive letter). - Use the
delcommand to delete specific suspicious files (e.g.,del suspiciousfile.exe). Use extreme caution withdeland wildcards (*.*) as you could delete your own data. It’s generally safer to delete suspicious files manually via File Explorer after they are visible or rely on antivirus software (Method 3) to remove them.